
The Spookiest Vampire Fudge Recipe for Sweet Halloween Thrills
Dark chocolate meets a sinister twist in this vampire fudge recipe that promises to bewitch your taste buds.
Rich, decadent, and hauntingly delicious, this treat whispers of midnight indulgence.
Deep cocoa flavors meld with unexpected ingredients to create a dessert that’s both elegant and wickedly fun.
The smooth, velvety texture melts like a vampire charm across your palate.
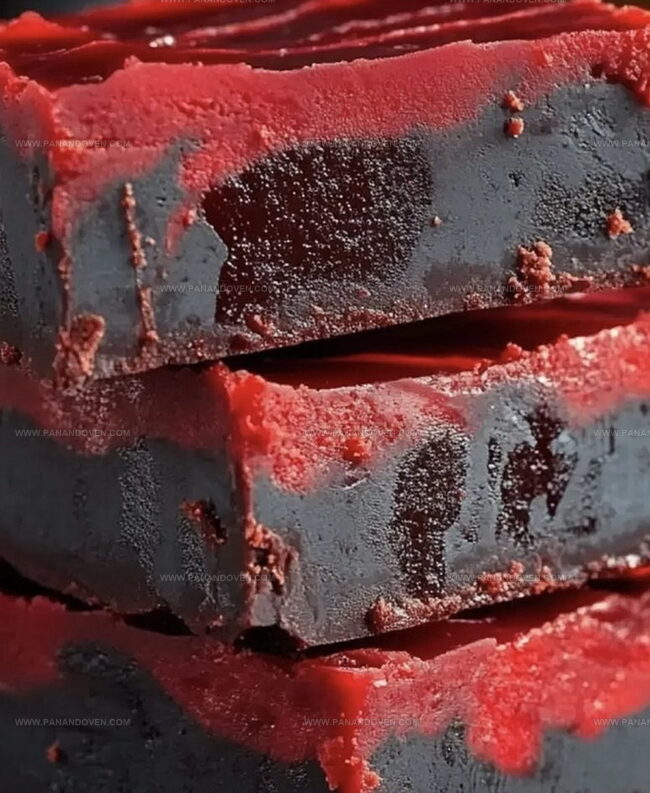
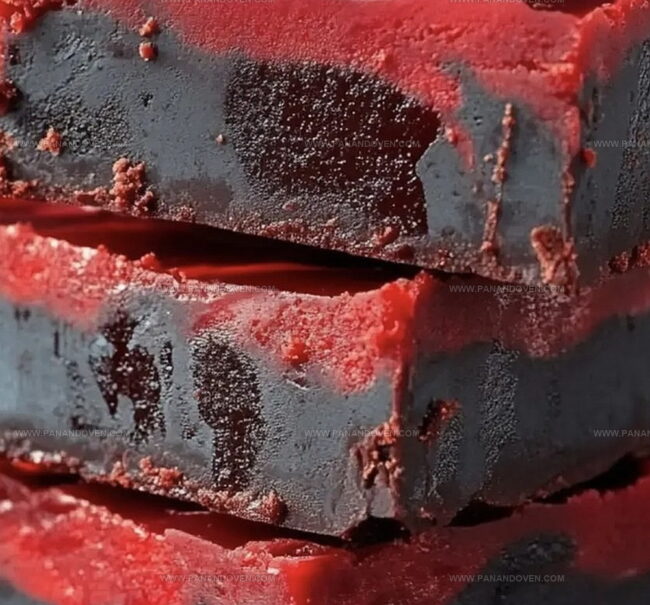
Blood-red accents add a dramatic flair to this wickedly delightful confection.
Each bite tells a story of sweet seduction and culinary magic.
Prepare to sink your teeth into a dessert that’s guaranteed to cast a delicious spell.
Vampire Fudge Halloween Treat That Stands Out
All You Need for Bloody Good Vampire Fudge
Candy Base:Binding Ingredient:Preparation Ingredients:Kitchen Tools for Spooky Fudge Prep
Making Vampire Fudge Step by Step
Step 1: Prepare Spooky Pan
Grab an 8 x 8 inch cake pan and give it a light coating of grease.
Create a parchment paper cross (+) inside the pan to make lifting easier later.
This will be your haunting fudge canvas.
Step 2: Melt Midnight Black Candy
Take your black candy melts and place them in a microwave-safe bowl.
These dark treats will create the dramatic base of your vampire-inspired dessert.
Step 3: Melt Blood-Red Candy
In a separate bowl, position your red candy melts.
These will add a spine-chilling pop of color to your fudge creation.
Step 4: Zap Candy Melts
Microwave each bowl of candy melts separately for 2 minutes on high power.
Remember to stir every 30 seconds to prevent burning and ensure a smooth, glossy texture.
Step 5: Warm Creamy Frosting
Grab your cream cheese frosting and give it a quick 45-second zap in the microwave.
This will help it blend seamlessly with the melted candy.
Step 6: Blend Spooky Colors
Divide the warmed frosting between the black and red candy melt bowls.
Stir each mixture vigorously until the colors are completely combined and look wickedly smooth.
Step 7: Layer Haunting Colors
Pour the black and red mixtures alternately into your prepared pan.
Create a mesmerizing layered effect that looks like a vampire’s dramatic color palette.
Step 8: Chill Supernatural Treat
Tap the pan gently to even out the surface.
Slide the pan into the refrigerator and let it set for 4 hours.
The fudge will transform into a solid, spine-tingling treat.
Step 9: Slice Ghoulish Squares
Once set, lift the fudge out using the parchment paper.
Place on a cutting board and slice into 25 or 36 delightfully wicked squares.
Step 10: Serve and Preserve
Serve immediately to eager Halloween guests.
Store any leftover pieces in an airtight container in the refrigerator to maintain their frightfully delicious texture.
Tips for Layering Spooky Halloween Fudge
Fudge Flavor Ideas for a Frightful Bite
Serving Vampire Fudge at Halloween Parties
Storage Suggestions for Vampire Fudge
FAQs
Pour the black and red candy melts alternately into the pan, using a toothpick or knife to gently swirl the colors together without fully mixing them, creating a marbled effect that looks like a spooky vampire-inspired design.
Yes, you can experiment with different colors like purple and black or orange and black to create your own Halloween-themed fudge. Just ensure the candy melts are high-quality and melt smoothly.
Warming the frosting helps it blend more easily with the melted candy, creating a smoother and more consistent texture for the fudge. It also prevents the mixture from seizing or becoming grainy.
Absolutely!
Print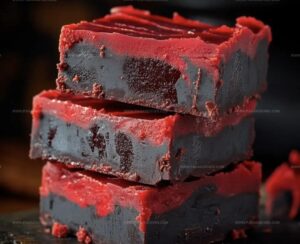
Vampire Fudge Recipe
- Total Time: 4 hours 15 minutes
- Yield: 12 1x
Description
Spooky Vampire Fudge blends dark chocolate’s sinister charm with crimson raspberry swirls. Blood-red raspberry sauce creates haunting patterns across rich chocolate layers, offering ghoulish delight for Halloween dessert enthusiasts.
Ingredients
Main Ingredients:
- 1 cup black candy melts
- 1 cup red candy melts
Binding/Creamy Base:
- 16 ounces (454 grams) cream cheese frosting
Instructions
- Prepare a square 8×8 inch baking pan by lightly coating with grease and creating a parchment paper cross liner for easy removal.
- Separate two microwave-safe bowls for black and red candy melts, ensuring each bowl contains only one color.
- Microwave black candy melts at high power for 2 minutes, pausing every 30 seconds to stir and prevent scorching, until completely smooth and liquid.
- Repeat identical melting process with red candy melts in the second bowl, stirring consistently to maintain even heat distribution.
- Heat cream cheese frosting in microwave for 45 seconds until slightly warm and pliable.
- Divide warmed frosting equally between black and red melted candy, mixing thoroughly until colors are uniform and glossy.
- Pour alternating colors into prepared pan, creating layered swirling patterns by gently tilting pan and allowing colors to intermingle.
- Eliminate air bubbles by tapping pan gently against countertop, ensuring smooth surface.
- Refrigerate fudge for 4 hours or until completely firm and set, allowing colors to solidify.
- Remove fudge from pan using parchment paper edges, transfer to cutting board and slice into precise squares.
- Serve chilled and store remaining pieces in sealed container within refrigerator for maximum freshness.
Notes
- Use high-quality candy melts for vibrant, smooth colors that create a dramatic vampire-inspired fudge appearance.
- Ensure strict temperature control during melting to prevent candy from burning or seizing, which can ruin texture and taste.
- Create clean, sharp layers by pouring candy colors slowly and gently, allowing each layer to settle before adding the next.
- Experiment with different frosting flavors like vanilla or chocolate to customize the fudge’s taste profile while maintaining the spooky aesthetic.
- Prep Time: 15 minutes
- Cook Time: 4 hours
- Category: Desserts, Snacks
- Method: Blending
- Cuisine: American
Nutrition
- Serving Size: 12
- Calories: 210
- Sugar: 25 g
- Sodium: 150 mg
- Fat: 9 g
- Saturated Fat: 5 g
- Unsaturated Fat: 3 g
- Trans Fat: 0 g
- Carbohydrates: 30 g
- Fiber: 0 g
- Protein: 1 g
- Cholesterol: 20 mg
Marcus Reed
Founder & Food Content Creator
Expertise
Single-recipe development, Seasonal and local ingredient utilization, Food photography and styling, Culinary writing and content creation
Education
Culinary Arts Certificate, Blue Ridge Community and Technical College, WV
Focus: Fundamentals of culinary techniques, emphasizing hands-on experience in small-scale kitchen settings.
Marcus’s story begins in Asheville, where good food and family kitchens shaped his earliest memories. After hands-on culinary training and a lot of trial (and a little error), he realized that real cooking isn’t about perfection, it’s about connection.
At Pan and Oven, Marcus crafts recipes that are easy to follow, packed with flavor, and built for real kitchens.