
Sweet & Sizzling Sheet Pan Caramel Apples Recipe
Sweet autumn evenings call for delightful sheet pan caramel apples that burst with warmth and nostalgia.
Crisp, seasonal apples transform into a decadent dessert when coated with rich, golden caramel.
Each bite promises a perfect balance of tart fruit and sugary glaze.
The simple sheet pan method ensures effortless preparation and minimal cleanup.
Drizzle extra caramel for added indulgence, creating a dessert that wows with minimal effort.
Serve these irresistible treats warm and watch smiles spread across eager faces.
Get ready to become the dessert hero at your next gathering.
Sheet Pan Caramel Apples: Fall in Every Bite
What You’ll Need for Sheet Pan Caramel Apples
Produce:Caramel Coating:Optional Toppings:Baking Essentials:Tools to Make Caramel Apples Easy
How to Assemble Sheet Pan Caramel Apples
Step 1: Warm Up the Baking Surface
Grab a large rimmed baking sheet and give it a light spray of nonstick cooking spray to prevent any sticking.
Step 2: Slice and Arrange Apples
Wash your apples and slice them into approximately 12 even pieces, keeping the skin on for extra flavor and nutrition.
Spread the apple slices in a single, neat layer across the prepared baking sheet.
Step 3: Create Dreamy Caramel Sauce
Grab a microwave-safe bowl and combine:Zap the mixture in the microwave on high, stirring every 30 seconds until the caramel transforms into a silky, smooth sauce that’ll make your mouth water.
Step 4: Shower Apples with Caramel
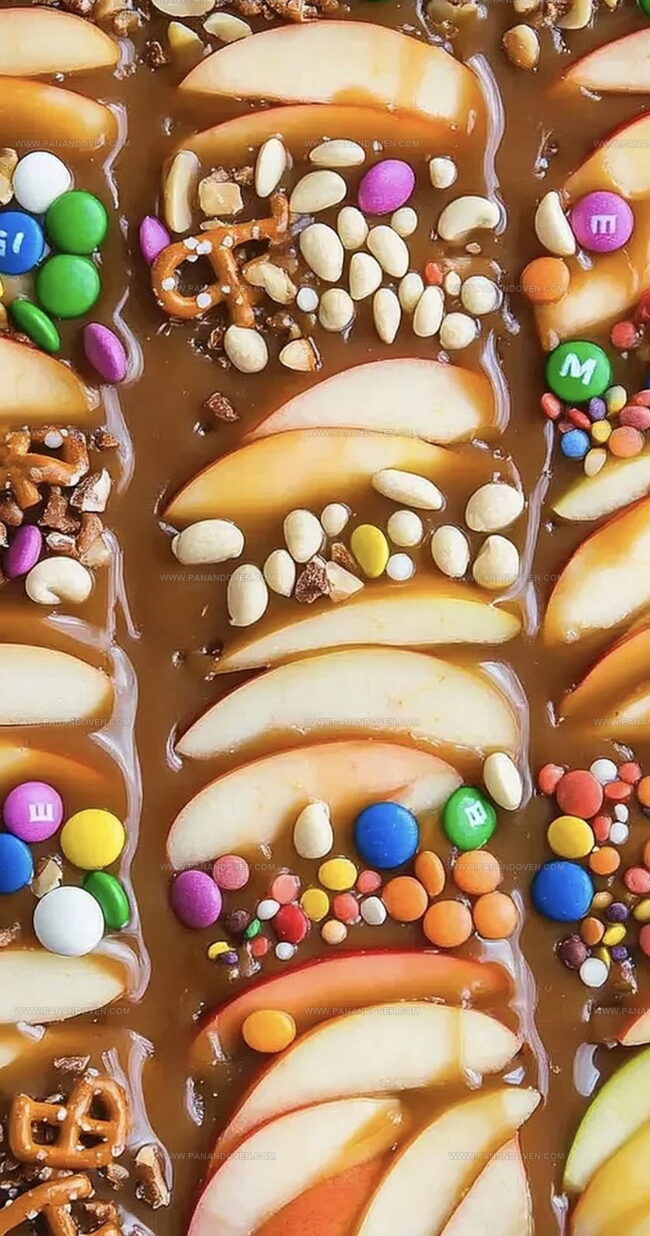
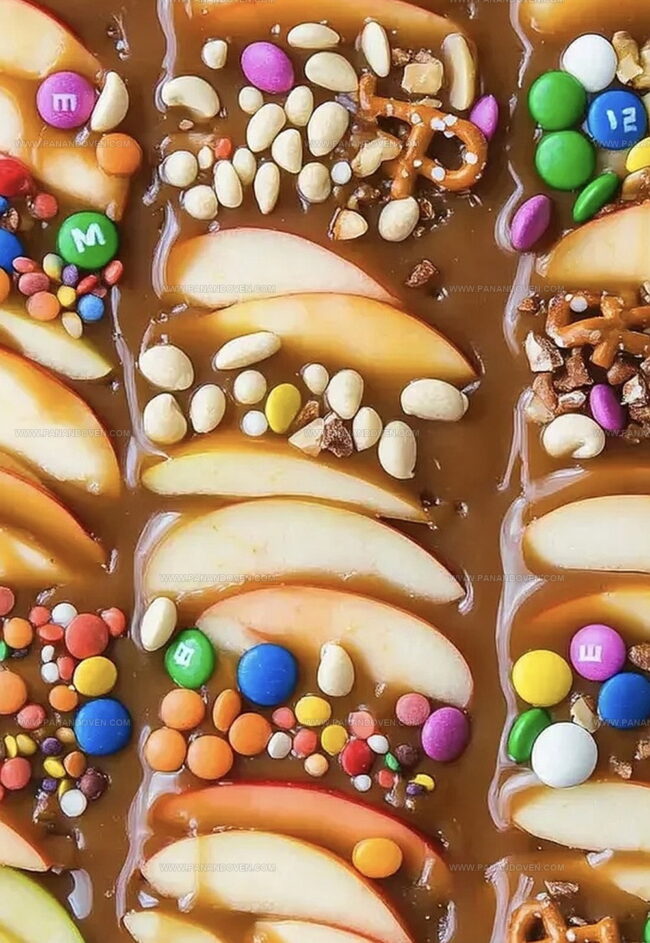
Drizzle the luscious, golden caramel sauce generously over the apple slices, ensuring each piece gets a delicious coating.
Step 5: Customize with Crunchy Toppings
Sprinkle on your favorite toppings – think chopped nuts, chocolate chips, or crushed cookies – to add extra texture and flavor.
Step 6: Let Cool and Serve
Allow the caramel apples to cool slightly so the sauce can set, then dive in and enjoy the sweet, gooey goodness.
Step 7: Preserve the Deliciousness
If you have any leftovers (unlikely!), cover and store in the refrigerator.
These are best enjoyed on the same day for maximum flavor and texture.
Tips for Smooth Caramel Coating
Sheet Pan Apple Flavor Options
Serving Caramel Apples at Events
Storing Sheet Pan Apples
FAQs
Yes, you can use varieties like Honeycrisp, Granny Smith, or Fuji. Choose firm apples that hold their shape well during baking.
No, simply slice the apples into about 12 even pieces. The peel helps hold the slices together during baking.
Chopped nuts, chocolate chips, crushed graham crackers, and shredded coconut are excellent options. Mix and match for different flavor combinations.
Absolutely! Kids will love helping drizzle caramel and adding their favorite toppings. It’s a fun, interactive dessert that the whole family can enjoy together.
Print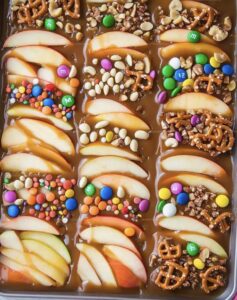
Sheet Pan Caramel Apples Recipe
- Total Time: 22 minutes
- Yield: 12 1x
Description
Sheet pan caramel apples deliver a nostalgic twist on classic fair treats. Crisp autumn apples get lavishly coated in smooth caramel, offering simple elegance you’ll savor with delight.
Ingredients
Main Ingredients:
- 4 medium Granny Smith apples, sliced (about 48 slices total)
- 1 11-ounce (311-gram) bag caramel bits
Dairy and Cream:
- 1/4 cup (60 milliliters) heavy cream
Cooking and Optional Toppings:
- Nonstick cooking spray
- Optional toppings: mini chocolate chips, white chocolate chips, toffee bits, crushed pretzels, M&M’s, chopped candy bars
Instructions
- Warm the sheet pan in the oven at 400°F and coat with nonstick spray to prevent sticking.
- Carefully cut apples into approximately 12 uniform wedges, maintaining the skin for added texture and nutrition.
- Spread apple slices evenly across the preheated baking sheet, ensuring no overlap for consistent caramelization.
- Combine caramel bits and cream in a microwave-safe container, heating in 30-second intervals and stirring until achieving a silky, glossy consistency.
- Generously cascade the molten caramel across apple slices, creating an even, glistening coating.
- Embellish with preferred garnishes like chopped nuts, chocolate chips, or toasted coconut for additional crunch and flavor complexity.
- Allow the caramel-coated apples to rest and slightly solidify for 5-7 minutes, maximizing flavor absorption.
- For optimal taste and texture, consume within several hours of preparation, storing any leftovers in a sealed container in the refrigerator.
Notes
- Choose firm, crisp apples like Honeycrisp or Granny Smith for the best texture and flavor balance.
- Line the baking sheet with parchment paper for easier cleanup and to prevent sticking.
- Experiment with different toppings like chopped nuts, chocolate chips, or shredded coconut for variety.
- Serve immediately for the most enjoyable caramel consistency and apple crispness.
- Prep Time: 15 minutes
- Cook Time: 7 minutes
- Category: Desserts, Snacks
- Method: Baking
- Cuisine: American
Nutrition
- Serving Size: 12
- Calories: 170
- Sugar: 20 g
- Sodium: 50 mg
- Fat: 6 g
- Saturated Fat: 3.5 g
- Unsaturated Fat: 2.5 g
- Trans Fat: 0 g
- Carbohydrates: 27 g
- Fiber: 1 g
- Protein: 1 g
- Cholesterol: 15 mg
Marcus Reed
Founder & Food Content Creator
Expertise
Single-recipe development, Seasonal and local ingredient utilization, Food photography and styling, Culinary writing and content creation
Education
Culinary Arts Certificate, Blue Ridge Community and Technical College, WV
Focus: Fundamentals of culinary techniques, emphasizing hands-on experience in small-scale kitchen settings.
Marcus’s story begins in Asheville, where good food and family kitchens shaped his earliest memories. After hands-on culinary training and a lot of trial (and a little error), he realized that real cooking isn’t about perfection, it’s about connection.
At Pan and Oven, Marcus crafts recipes that are easy to follow, packed with flavor, and built for real kitchens.