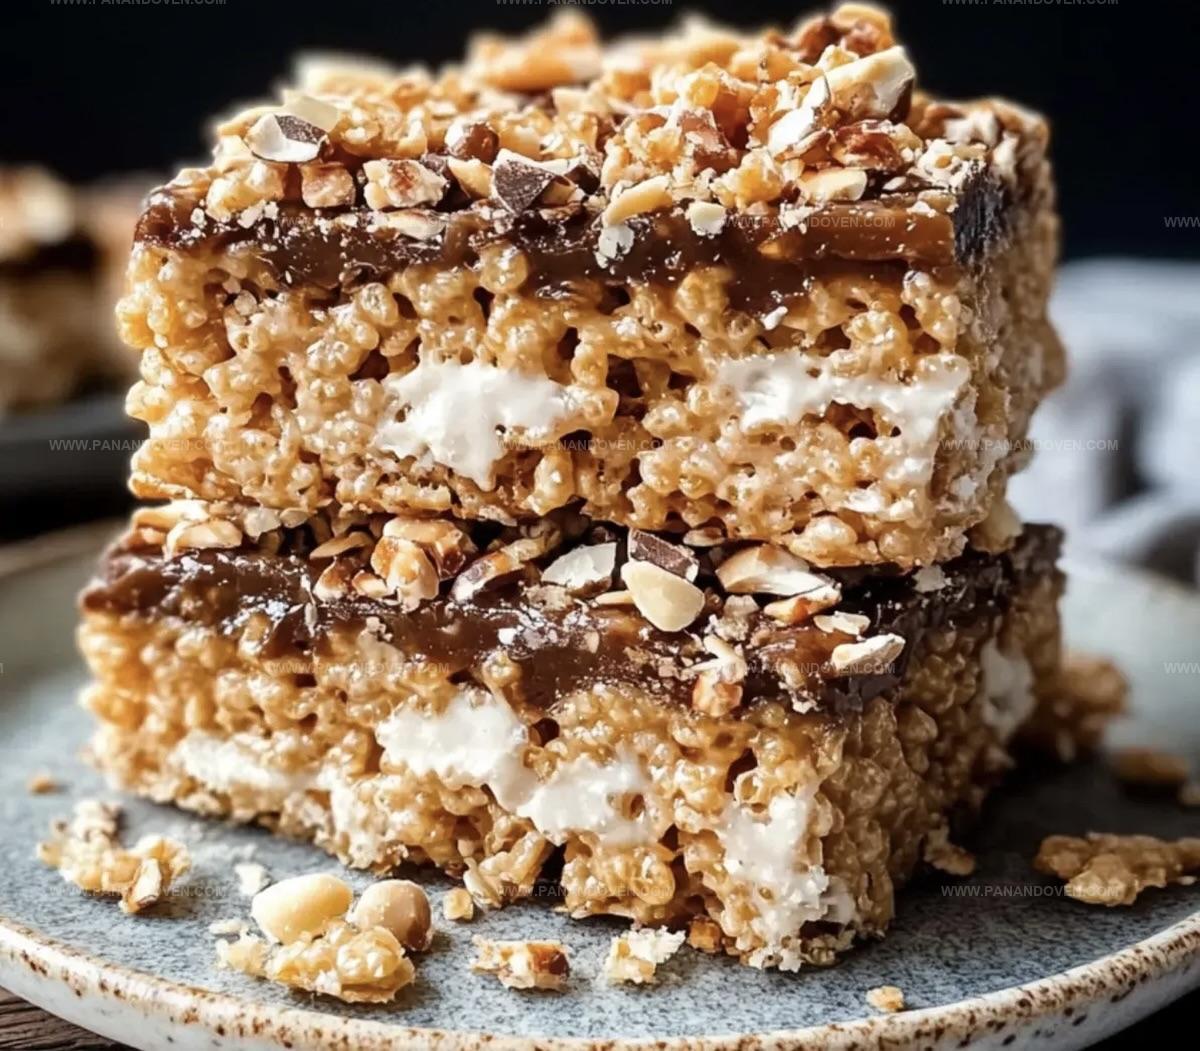
Crunchy, Sweet Samoa Krispies Recipe – A Tropical Twist
Sweet and gooey samoa krispies recipe brings the beloved Girl Scout cookie flavor into an irresistible treat that melts in your mouth.
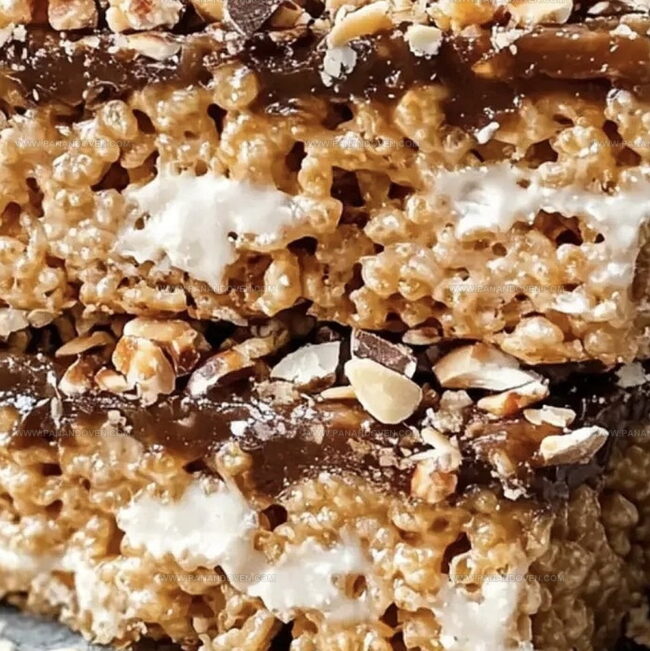
Caramel, toasted coconut, and chocolate create a symphony of decadent flavors.
Childhood memories dance with each sticky, crunchy bite.
These no-bake bars require minimal effort but deliver maximum deliciousness.
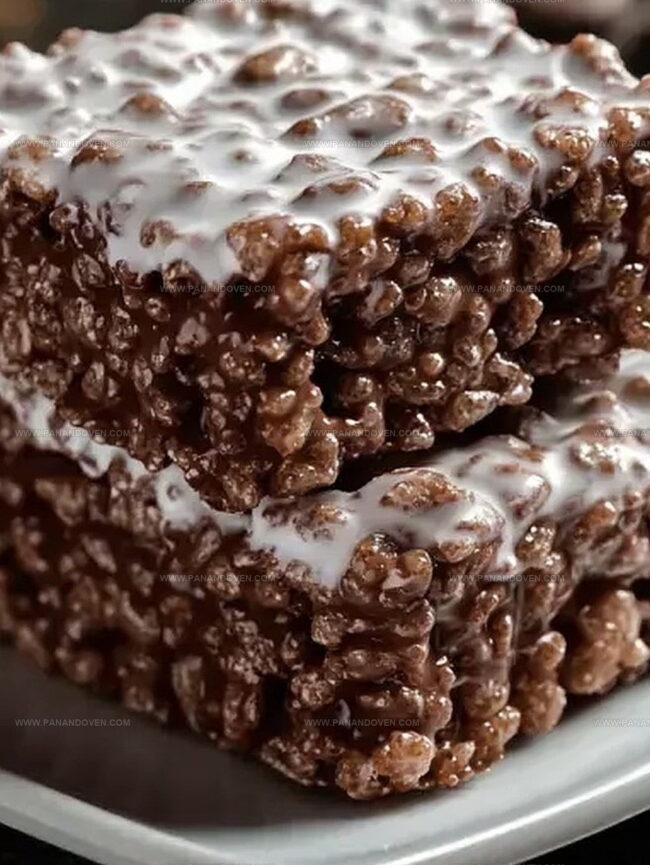
Chocolate drizzles add an elegant touch to the simple yet spectacular dessert.
The combination of crispy rice cereal and rich caramel ensures every square is a celebration of pure indulgence.
You won’t be able to resist these addictive samoa-inspired bars that come together in minutes.
Samoa Krispie Standouts

Samoa Krispie Shopping List
Base Ingredients:Flavor Enhancers:Topping Ingredients:Tools for Samoa Krispies
Samoa Krispie Baking Steps
Step 1: Caramelize Coconut
Toast shredded coconut in a large skillet over medium-high heat.
Stir continuously until the coconut turns a beautiful golden brown color.
Watch carefully to prevent burning.
Remove from heat, allowing residual warmth to complete the toasting process.
Step 2: Prepare Coconut Garnish
Set aside a portion of the toasted coconut for a final decorative touch on the finished bars.
Step 3: Create Caramel Coconut Mixture
Warm dulce de leche with a splash of milk in a microwave-safe bowl.
Stir until smooth and slightly runny.
Fold in the toasted coconut, creating a rich, fragrant mixture.
Step 4: Prepare Marshmallow Base
Combine marshmallows and butter in a large microwave-safe bowl.
Heat until completely melted and smooth, stirring occasionally to ensure even melting.
Step 5: Combine Cereal
Gently fold Rice Krispies into the marshmallow mixture, ensuring every piece is evenly coated.
Step 6: Layer the Bars
Grease a rectangular baking pan.
Spread half of the cereal mixture as the first layer, pressing down firmly and evenly.
Step 7: Add Caramel Coconut Layer
Spread the prepared caramel coconut mixture over the first cereal layer, creating a delicious middle section.
Step 8: Complete Final Cereal Layer
Top with the remaining cereal mixture, gently pressing to create a smooth surface.
Step 9: Chocolate Drizzle
Melt semisweet chocolate and drizzle generously over the top of the bars.
Step 10: Garnish and Chill
Sprinkle the reserved toasted coconut over the chocolate.
Allow the bars to set completely at room temperature or in the refrigerator until the chocolate hardens.
Step 11: Slice and Serve
Cut into squares and serve these tropical-inspired treats that combine the classic Rice Krispies bar with the beloved Samoa cookie flavors.
Tips for Samoa Krispie Success
Flavor Mix-Ins for Samoa Krispies
How to Serve Samoa Krispies
Samoa Krispie Storage Guide

FAQs

Dulce de leche adds a rich, caramel-like sweetness that enhances the flavor profile and creates a luxurious texture in the Samoa Rice Krispies.
While possible, dulce de leche provides a more complex and authentic flavor that’s closer to the traditional Samoa cookie taste.
Look for a golden brown color and a nutty aroma. Stir constantly to prevent burning, and remove from heat when most of the coconut is evenly toasted.
Absolutely! Most steps are simple and safe, making it a fun baking activity for children with adult supervision during melting and mixing stages.
Print
Samoa Krispies Recipe
- Total Time: 20 minutes
- Yield: 12 1x
Description
Samoa krispies blend Girl Scout cookie nostalgia with crispy rice magic. Caramel, coconut, and chocolate create an irresistible treat you won’t be able to resist.
Ingredients
Main Ingredients:
- 6 cups Rice Krispie cereal
- 14 ounces (396 grams) sweetened shredded coconut
- 1 (13.4 ounces/380 grams) can dulce de leche
- 6 ounces (170 grams) semisweet chocolate, melted
Binding Ingredients:
- 5 cups mini marshmallows
- 3 tablespoons butter
- 2 tablespoons milk
Instructions
- Toast coconut in a large sauté pan over medium-high heat, stirring constantly until golden brown. Remove from heat, allowing residual warmth to complete toasting process.
- Separate 1/2 cup of toasted coconut for later garnishing.
- Microwave dulce de leche with milk for approximately 1.5 minutes, creating a smoother consistency for mixing.
- Combine dulce de leche with remaining toasted coconut, creating a rich caramel-coconut blend.
- Melt marshmallows and butter in microwave for about 2 minutes, stirring until fully incorporated.
- Fold Rice Krispies into marshmallow mixture, ensuring complete and even coating.
- Grease 8×12-inch pan and layer half the cereal mixture, pressing firmly to create an even base.
- Spread caramel-coconut mixture over first layer, then top with remaining cereal mixture, gently pressing to seal.
- Melt semisweet chocolate and drizzle evenly across the top of the dessert.
- Sprinkle reserved toasted coconut over melted chocolate for decorative finish.
- Refrigerate for 15-20 minutes to allow chocolate and layers to set completely before cutting into squares.
Notes
- Toast coconut carefully to prevent burning, stirring constantly and watching for golden-brown color without scorching edges.
- Use low microwave heat when melting marshmallows and chocolate to maintain smooth texture and prevent burning.
- Consider using dairy-free alternatives like coconut condensed milk and vegan marshmallows for plant-based dietary needs.
- Refrigerate bars briefly to help chocolate set faster and create cleaner cutting lines when serving.
- Prep Time: 15 minutes
- Cook Time: 5 minutes
- Category: Desserts, Snacks
- Method: Sautéing
- Cuisine: American
Nutrition
- Serving Size: 12
- Calories: 200
- Sugar: 15 g
- Sodium: 80 mg
- Fat: 7 g
- Saturated Fat: 4 g
- Unsaturated Fat: 2 g
- Trans Fat: 0 g
- Carbohydrates: 32 g
- Fiber: 1 g
- Protein: 2 g
- Cholesterol: 10 mg
Marcus Reed
Founder & Food Content Creator
Expertise
Single-recipe development, Seasonal and local ingredient utilization, Food photography and styling, Culinary writing and content creation
Education
Culinary Arts Certificate, Blue Ridge Community and Technical College, WV
Focus: Fundamentals of culinary techniques, emphasizing hands-on experience in small-scale kitchen settings.
Marcus’s story begins in Asheville, where good food and family kitchens shaped his earliest memories. After hands-on culinary training and a lot of trial (and a little error), he realized that real cooking isn’t about perfection, it’s about connection.
At Pan and Oven, Marcus crafts recipes that are easy to follow, packed with flavor, and built for real kitchens.