
Dreamy Red Velvet Snowball Cookies Recipe for Sweet Holidays
These melt-in-your-mouth red velvet snowball cookies bring festive cheer to any holiday gathering.
Soft cocoa-infused dough swirled with red velvet magic creates an irresistible treat.
The classic cookie receives a delightful seasonal twist that sparkles with rich flavor.
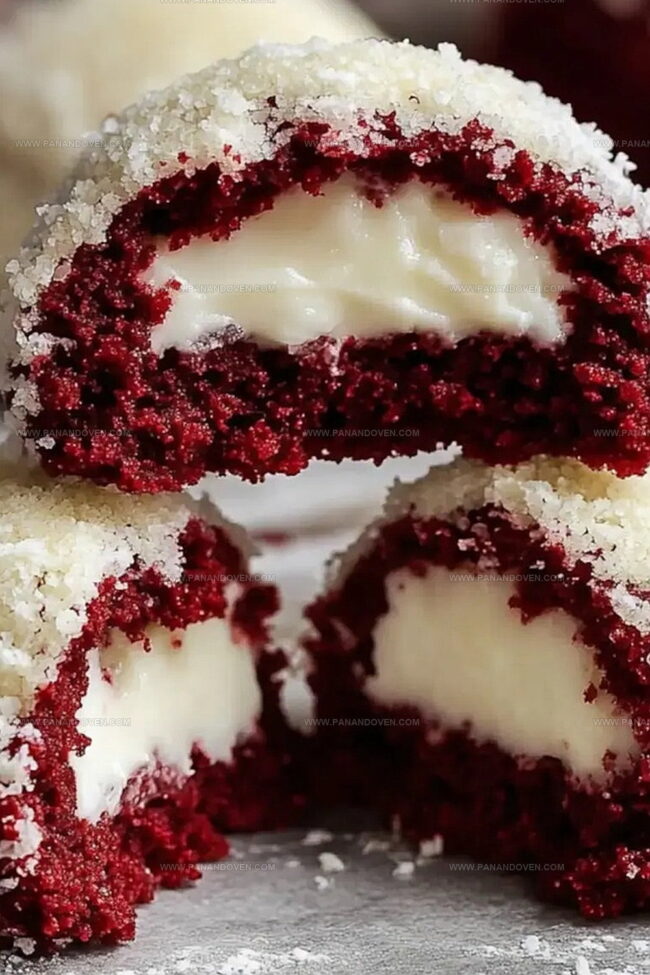
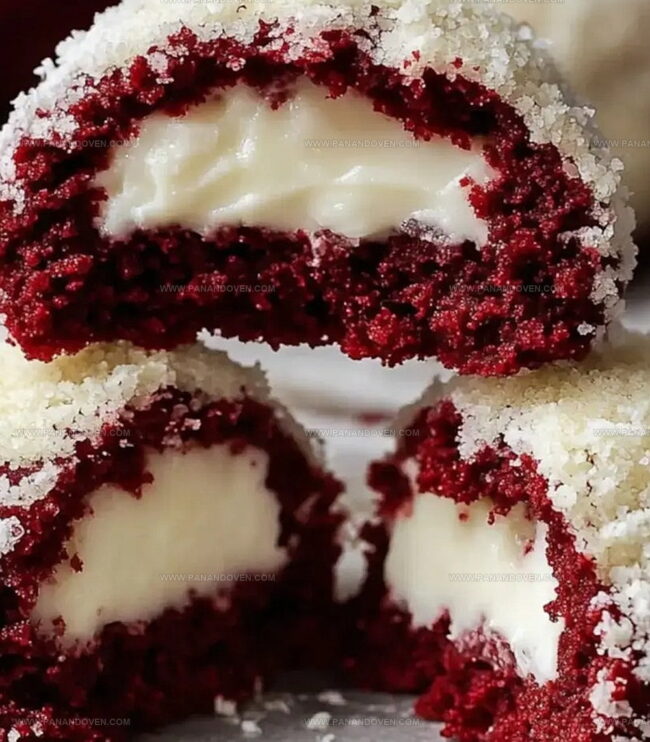
Powdered sugar coating gives each bite a delicate, snow-dusted appearance.
Crumbly and tender, these cookies offer a perfect balance of sweetness and texture.
Bakers of all skill levels can create these elegant desserts with simple ingredients.
Serve these stunning snowball cookies and watch smiles spread across every face.
Why Everyone’s Talking About Red Velvet Snowball Cookies
Gather the Goods for Red Velvet Snowball Cookies
Dry Ingredients:Wet Ingredients:Filling and Coating Ingredients:All the Tools for Red Velvet Snowball Cookie Success
Let’s Bake Red Velvet Snowball Cookies Step-by-Step
Step 1: Warm Up the Oven
Crank your oven to 350F and grab a baking sheet.
Line it with parchment paper for easy cleanup and perfect cookie release.
Step 2: Create Dry Magic
Grab a mixing bowl and whisk together these dry ingredients:Blend until they’re perfectly combined and free of lumps.
Step 3: Whip Up Creamy Goodness
Use an electric mixer to cream together:Beat until the mixture looks light, fluffy, and almost cloud-like, which takes about 2-3 minutes.
Step 4: Add Vibrant Color and Flavor
Mix in these wet ingredients:Stir until the batter transforms into a gorgeous deep red shade.
Step 5: Build the Perfect Dough
Slowly alternate adding:Mix gently until everything comes together smoothly without overmixing.
Step 6: Chill and Relax
Pop the dough into the refrigerator for 30 minutes.
This helps the flavors meld and makes the dough easier to handle.
Step 7: Shape Delightful Surprises
Create cookie balls with a secret chocolate center:Step 8: Bake to Perfection
Place cookies on the prepared baking sheet and bake for 10-12 minutes.
Look for set edges and a slightly soft center.
Step 9: Final Magical Touch
While cookies are still warm:Tricks to Master Red Velvet Snowball Cookies
Creative Spins on Red Velvet Snowball Cookies
Ways to Serve Red Velvet Snowball Cookies at Any Table
Saving and Storing Red Velvet Snowball Cookies
FAQs
The red food coloring is added to the wet ingredients, creating the classic vibrant red hue that defines red velvet baked goods.
Yes, you can omit the food coloring, but the cookies will lose their signature red velvet appearance and look more like traditional chocolate cookies.
Chilling helps prevent spreading, allows flavors to develop, and makes the dough easier to handle when forming the cookies with chocolate centers.
Buttermilk adds moisture and a slight tanginess characteristic of red velvet recipes, but you can substitute with regular milk mixed with a little vinegar if needed.
Print
Red Velvet Snowball Cookies Recipe
- Total Time: 57 minutes
- Yield: 24 1x
Description
Red velvet snowball cookies delight dessert enthusiasts with their cocoa-infused charm. Powdered sugar coating and crimson crumb create a festive treat that melts in your mouth.
Ingredients
Main Ingredients:
- 1 1/2 cups (190 grams) all-purpose flour
- 1/4 cup (25 grams) unsweetened cocoa powder
- 1/2 cup (113 grams) unsalted butter, softened
- 3/4 cup (150 grams) granulated sugar
- 1/2 cup (85 grams) white chocolate chips
- 1/2 cup (40 grams) shredded coconut
Wet Ingredients:
- 1 large egg
- 1 teaspoon vanilla extract
- 1 tablespoon red food coloring
- 1/4 cup (60 milliliters) buttermilk
Dry and Finishing Ingredients:
- 1 teaspoon baking powder
- 1/4 teaspoon salt
- Sugar syrup for coating
Instructions
- Preheat oven to 350°F and prepare a parchment-lined baking sheet for even cookie placement.
- Sift together flour, cocoa powder, baking powder, and salt to ensure smooth, lump-free dry mixture.
- Cream butter and sugar using an electric mixer until light and airy, approximately 2-3 minutes.
- Incorporate egg, vanilla extract, and red food coloring, mixing until fully integrated and vibrant.
- Gradually blend dry ingredients and buttermilk into butter mixture, alternating to maintain smooth consistency.
- Chill prepared dough in refrigerator for 30 minutes to enhance flavor and ease of handling.
- Shape chilled dough into uniform balls, creating a small indent, inserting chocolate chip, then sealing and rolling.
- Arrange cookie balls on prepared baking sheet, maintaining consistent spacing for even baking.
- Bake for 10-12 minutes until cookie edges appear set and slightly firm.
- While cookies are still warm, delicately brush with light syrup and roll in shredded coconut for festive coating.
Notes
- Chill the dough thoroughly to prevent spreading and maintain cookie shape during baking.
- Use gel food coloring for vibrant red color without affecting dough consistency.
- Ensure butter is room temperature for smoother creaming and better cookie texture.
- Toast coconut briefly for enhanced nutty flavor and crunchier coating.
- Prep Time: 45 minutes
- Cook Time: 12 minutes
- Category: Desserts, Snacks
- Method: Baking
- Cuisine: American
Nutrition
- Serving Size: 24
- Calories: 150
- Sugar: 8 g
- Sodium: 50 mg
- Fat: 7 g
- Saturated Fat: 4 g
- Unsaturated Fat: 2 g
- Trans Fat: 0 g
- Carbohydrates: 21 g
- Fiber: 1 g
- Protein: 2 g
- Cholesterol: 20 mg
Clara Thompson
Recipe Developer & Food Educator
Expertise
Plant-based and vegetarian recipe development, Nutritional analysis and meal planning, Culinary education and workshop facilitation, Content writing with a focus on healthy living
Education
Diploma in Culinary Arts, Mt. San Jacinto College, CA
Focus: Comprehensive culinary training with an emphasis on sustainable cooking practices.
Certificate in Nutrition and Healthy Living, Cornell University (Online Program)
Focus: Understanding the principles of nutrition to create balanced and health-conscious recipes.
Clara lives where fresh ideas and fresh ingredients meet. She pairs her culinary know-how with her passion for healthy, planet-friendly cooking.
For Clara, good food should taste great, nourish your body, and feel easy to make. Her recipes highlight whole foods, colorful produce, and a deep respect for seasonal eating.