
Easy Cheesy Pizza Bombs Recipe: A Fun Twist on Classic Flavors
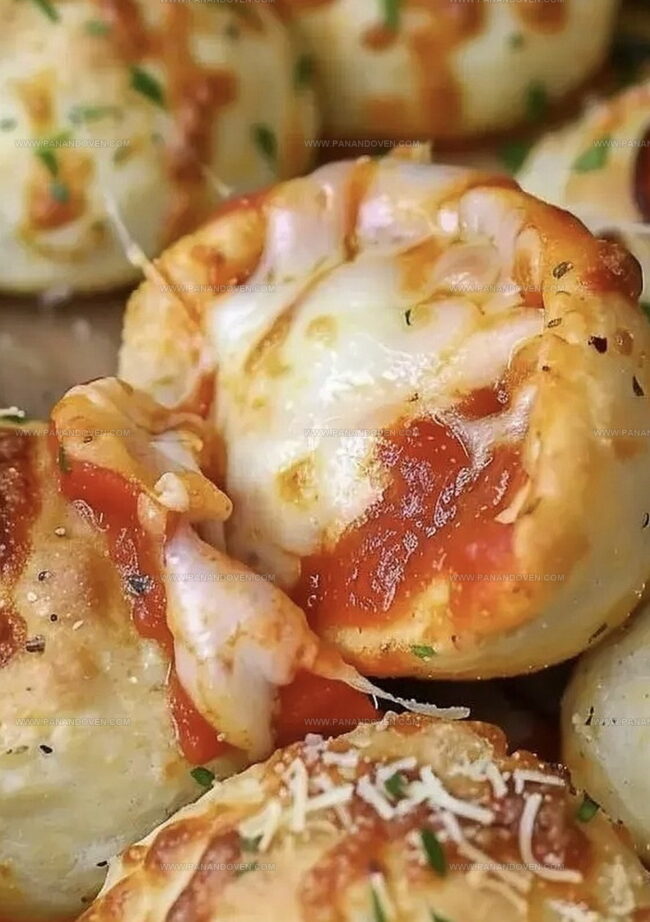
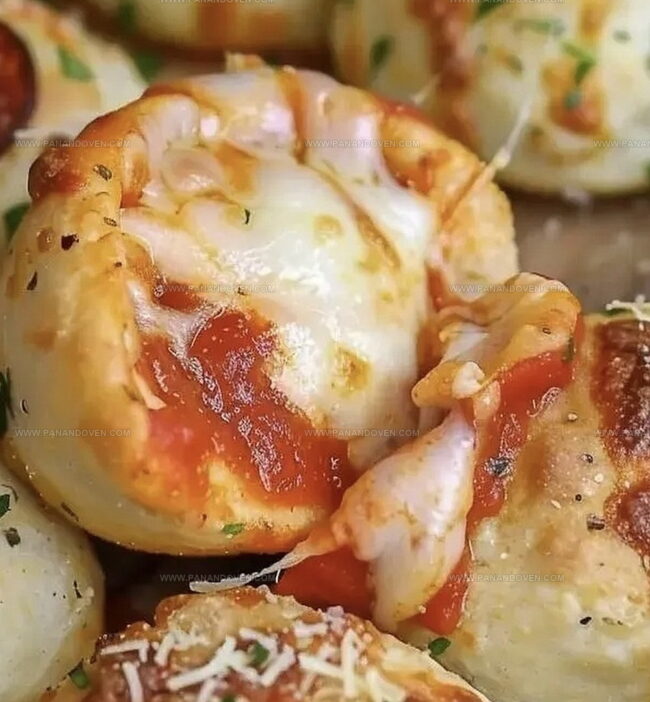
Bursting with flavor and oozing with cheesy goodness, these pizza bombs deliver an explosion of taste in every single bite.
A crowd-pleasing appetizer that combines the beloved pizza flavor with a crispy, golden exterior.
Packed with melted cheese, savory pepperoni, and zesty marinara sauce, these handheld delights are perfect for game nights or casual gatherings.
Each bomb offers a delightful crunch that gives way to a molten center of pure comfort.
You’ll find these irresistible snacks disappear faster than you can say “more, please!” The simple ingredients and easy preparation make these pizza bombs a go-to recipe for anyone seeking a delicious and satisfying treat.
Prepare to be the hero of your next snack spread with these mouthwatering morsels.
Easy Pizza Bombs: Bite-Sized Pockets of Cheesy Pizza Bliss
Ingredients Checklist for the Ultimate Pizza Bombs
Base Ingredients:Sauce and Seasoning Ingredients:Finishing Ingredients:Helpful Tools for Making Pizza Bombs Effortlessly
Crafting and Baking Homemade Pizza Bombs
Step 1: Warm Up the Oven
Preheat the oven to 375 degrees Fahrenheit.
Cover a baking sheet with parchment paper and lightly grease the surface with a thin layer of butter to prevent sticking.
Step 2: Prepare the Dough Base
Slice each refrigerated biscuit into two equal halves.
Use your thumb to gently press and stretch each half into a round, flat circle about the size of your palm.
Step 3: Create Delicious Filling
Place your tasty ingredients in the center of each biscuit round:Step 4: Seal the Goodness
Carefully fold the edges of the biscuit over the filling, pinching and pressing to create a secure seal.
Make sure no filling can escape during baking.
Each pizza bomb should look like a small, plump package.
Step 5: Prepare Flavor Boost
Mix together in a small bowl:Step 6: Add Delicious Coating
Gently brush the butter mixture over each pizza bomb.
Sprinkle freshly grated Parmesan cheese on top for extra flavor and crunch.
Step 7: Bake to Golden Perfection
Place the baking sheet in the preheated oven.
Bake for 15-20 minutes until the pizza bombs turn a beautiful golden brown color and look irresistibly puffy.
Step 8: Serve and Enjoy
Allow the pizza bombs to cool for a few minutes.
Serve warm with extra marinara sauce on the side for dipping.
Watch everyone’s eyes light up with excitement!
Tips for Pizza Bombs That Are Always Ooey-Gooey
Fun Pizza Bombs Flavor Combos Worth Exploring
Creative Serving Suggestions for Pizza Bombs
Best Ways to Store and Reheat Pizza Bombs
FAQs
Pizza bombs are bite-sized, portable versions of pizza that use biscuit dough instead of traditional pizza crust, making them easier and quicker to prepare.
Yes, you can prepare pizza bombs in advance and refrigerate them before baking. Just add a few extra minutes to the cooking time when you’re ready to bake them.
Refrigerated canned biscuit dough works perfectly for pizza bombs. Choose a standard, pre-made buttermilk or classic biscuit dough for the best results.
Carefully seal the edges of each pizza bomb by pinching the dough together and ensuring no gaps exist. Press firmly to create a complete seal before baking.
Print
Pizza Bombs Recipe
- Total Time: 35 minutes
- Yield: 8 1x
Description
Italian-inspired pizza bombs deliver a delightful explosion of cheesy goodness in one handheld snack. Crispy on the outside and melty inside, these bites promise a crowd-pleasing appetizer you can savor with friends and family.
Ingredients
Main Ingredients:
- 1 16 12 oz (465 g) can of biscuit dough
- 8 oz (225 g) ball of mozzarella cheese, cut into cubes
- Sliced pepperoni
- Marinara sauce
Seasoning and Flavoring:
- 1 tablespoon Italian seasoning
- 2 cloves garlic, minced
- Salt, to taste
- Pepper, to taste
Topping and Preparation:
- 3 tablespoons butter, for greasing the pan
- Butter, melted
- Shredded Parmesan cheese, for topping
Instructions
- Preheat the oven to 375°F (190°C) and prepare a parchment-lined baking sheet lightly coated with butter for optimal non-stick performance.
- Separate each biscuit into halves, gently pressing each piece into a thin circular shape using your thumb to create a uniform base.
- Position a small amount of marinara sauce at the center of each biscuit round, followed by a single pepperoni slice and a compact mozzarella cheese cube.
- Carefully fold the biscuit edges upward and inward, meticulously sealing the entire perimeter to prevent any potential filling leakage during baking.
- In a separate small bowl, whisk together melted butter, minced garlic, salt, ground black pepper, and Italian seasoning until thoroughly combined.
- Generously apply the seasoned butter mixture across the surface of each assembled pizza bomb, then sprinkle Parmesan cheese on top for added flavor and texture.
- Transfer the prepared pizza bombs to the preheated oven and bake for 15-20 minutes, monitoring until they achieve a golden-brown exterior and appear crisp and puffy.
- Allow the pizza bombs to cool slightly for safe handling, then serve immediately with additional marinara sauce for dipping.
Notes
- Prevent Leaks: Seal edges thoroughly by pinching and pressing dough completely closed to stop cheese from oozing out during baking.
- Customize Easily: Swap pepperoni for ham, bacon, or vegetarian alternatives like spinach and mushrooms to match personal taste preferences.
- Temperature Matters: Let pizza bombs cool slightly before serving to avoid burning mouths and allow cheese to set properly.
- Make Ahead Friendly: Prepare and assemble pizza bombs in advance, then refrigerate until ready to bake for convenient meal preparation.
- Prep Time: 15 minutes
- Cook Time: 20 minutes
- Category: Snacks, Appetizer, Dinner
- Method: Baking
- Cuisine: Italian
Nutrition
- Serving Size: 8
- Calories: 250
- Sugar: 2 g
- Sodium: 500 mg
- Fat: 15 g
- Saturated Fat: 8 g
- Unsaturated Fat: 7 g
- Trans Fat: 0 g
- Carbohydrates: 24 g
- Fiber: 1 g
- Protein: 10 g
- Cholesterol: 30 mg
Marcus Reed
Founder & Food Content Creator
Expertise
Single-recipe development, Seasonal and local ingredient utilization, Food photography and styling, Culinary writing and content creation
Education
Culinary Arts Certificate, Blue Ridge Community and Technical College, WV
Focus: Fundamentals of culinary techniques, emphasizing hands-on experience in small-scale kitchen settings.
Marcus’s story begins in Asheville, where good food and family kitchens shaped his earliest memories. After hands-on culinary training and a lot of trial (and a little error), he realized that real cooking isn’t about perfection, it’s about connection.
At Pan and Oven, Marcus crafts recipes that are easy to follow, packed with flavor, and built for real kitchens.