Spooky Peanut Butter Spider Cookies Recipe for Halloween Fun
Creepy-crawly treats take center stage with these wickedly delicious peanut butter spider cookies that crawl right into Halloween party platters.
Spooky desserts never looked so tempting and delectable.
Dark chocolate legs stretch across soft, chewy cookie surfaces, creating edible arachnid artwork.
Kids and adults alike will marvel at these playful confections that blend sweet and slightly scary elements.
The recipe combines classic peanut butter cookie comfort with festive Halloween design.
Chocolate candies and creative decorating techniques transform simple cookies into memorable seasonal treats.
Prepare to spin a web of deliciousness that will have everyone asking for seconds.
Peanut Butter Spider Cookies Treats That Bring Smiles

Ingredients for Peanut Butter Spider Cookies
Cookie Base:Binding Ingredients:Decorative Toppings:Additional Elements:Tools and Gadgets for Cookie Crafting
Simple Steps for Peanut Butter Spider Cookies
Step 1: Warm Up the Oven
Fire up your oven to 180°C (350°F).
Grab a large baking sheet and line it with parchment paper to prevent any sticky situations.
Step 2: Blend the Magical Dough
Toss these ingredients into a food processor:Pulse everything together until a smooth, cohesive dough forms.
If the mixture seems too dry, splash in a bit of milk to help it come together.
Step 3: Roll and Shape Cookie Monsters
Use your hands to roll the dough into golf ball-sized rounds.
Place each ball on the prepared baking sheet.
Gently press your thumb or the back of a spoon into the center of each cookie to create a cozy little nest.
Step 4: Bake to Perfection
Slide the baking sheet into the preheated oven.
Bake for 15 minutes until the edges turn a lovely golden brown.
Once done, transfer the cookies to a cooling rack.
While they’re still warm, use a teaspoon to touch up the center indentations if needed.
Step 5: Fill with Spooky Goodness
After the cookies cool completely, dollop a generous spoonful of jelly or jam into each cookie’s center.
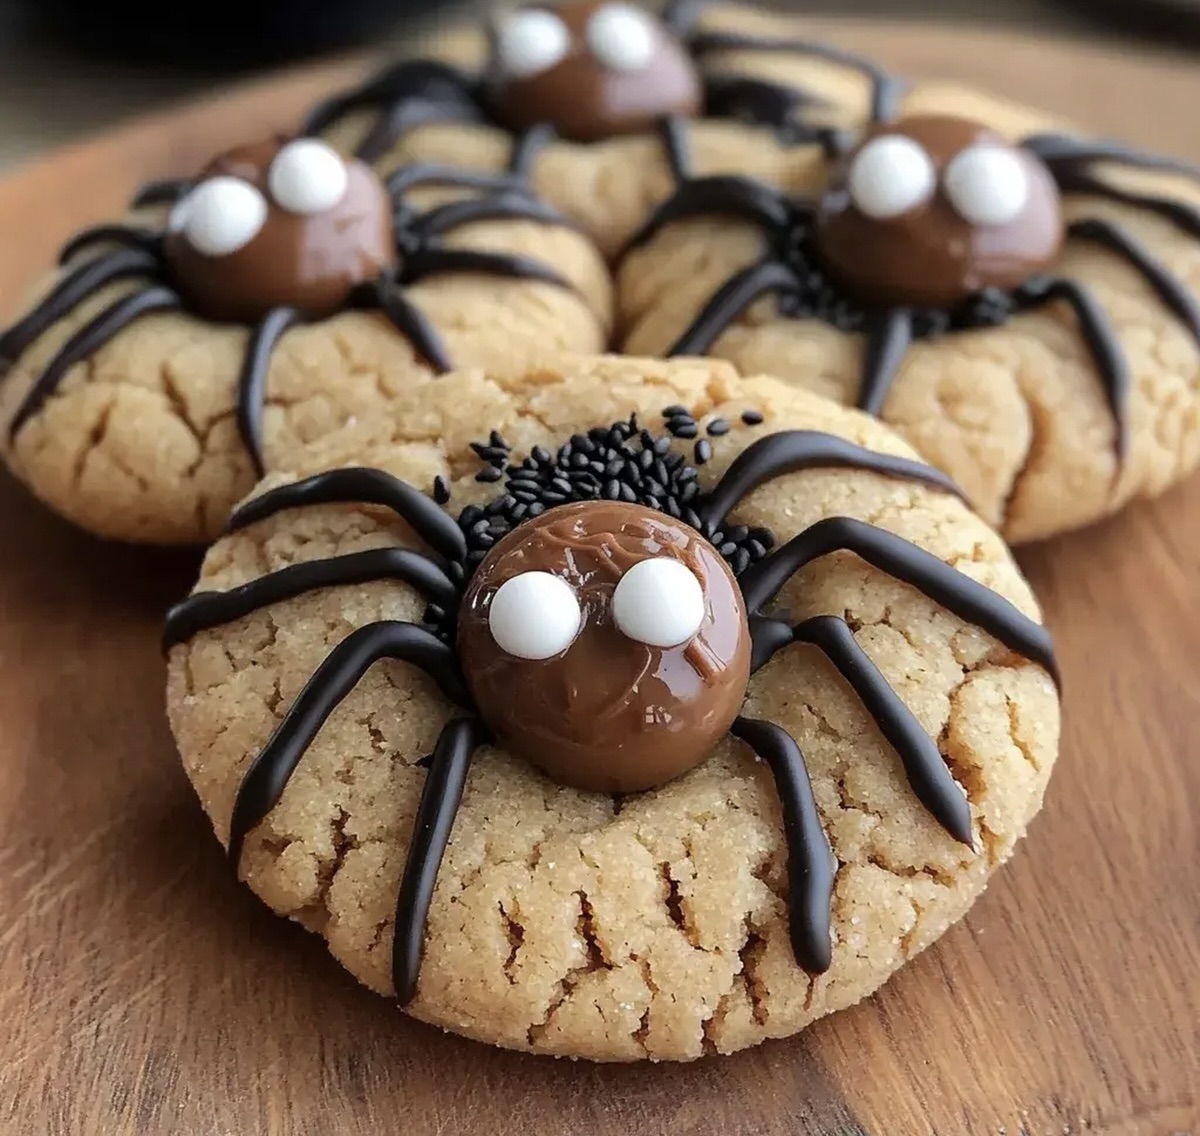
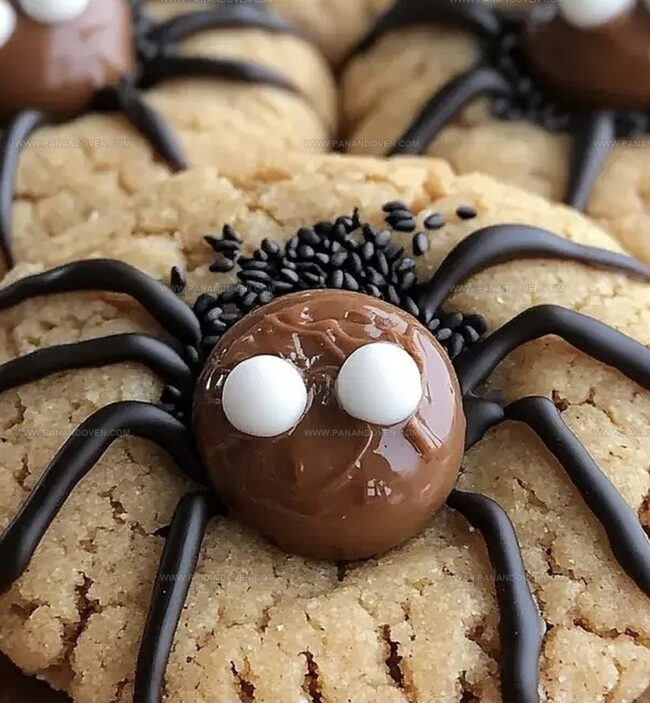
Crown each with a chocolate truffle to create the spider’s body.
Step 6: Create Creepy Spider Eyes
Grab white icing and pipe two tiny dots on top of each truffle.
Place a black sesame seed in the center of each dot to make realistic pupils.
Step 7: Spin Spider Legs
Using black writing icing, carefully pipe four legs on each side of the cookie.
These wiggly lines will transform your treats into adorable edible spiders perfect for Halloween or any spooky celebration!
Pro Tips for Making Spider Cookies at Home
Ideas for Spider Cookie Variations
How to Serve Spider Cookies for Fun
Spider Cookie Storage for Halloween
FAQs
You’ll need a food processor to mix the dough, peanut butter, and other basic baking ingredients. Key toppings include chocolate truffles, jelly or jam, white and black writing icing, and black sesame seeds.
Absolutely! Kids will love creating the spider-shaped cookies. The decorating process is fun and easy, allowing children to help pipe the legs and add eyes to make cute spider-shaped treats.
The dough should stick together easily. If it’s too dry, add milk one tablespoon at a time while blending in the food processor until it forms a cohesive mixture that can be rolled into balls.
Print
Peanut Butter Spider Cookies Recipe
- Total Time: 35 minutes
- Yield: 12 1x
Description
Spooky peanut butter spider cookies combine Halloween whimsy with classic cookie comfort. Chocolate legs and candy eyes make these treats a festive delight you’ll eagerly devour at seasonal gatherings.
Ingredients
Main Ingredients:
- 180 grams (6.3 ounces) smooth peanut butter
- 225 grams (7.9 ounces) coconut sugar
- 1 large egg
- 185 grams (6.5 ounces) plain flour
- 60 grams (2.1 ounces) dairy-free butter
Flavoring and Binding Ingredients:
- 1 teaspoon vanilla essence
- 1/2 teaspoon baking soda
- 1/2 teaspoon baking powder
- 2 tablespoons milk (optional, for dough consistency)
Decorative Ingredients:
- 15 teaspoons boysenberry jelly or any jam of choice
- 15 chocolate truffle balls
- 1 white writing icing tube
- 30 black sesame seeds
- 1 black writing icing tube
Instructions
- Preheat oven to 180°C and line a baking tray with parchment paper, ensuring even surface coverage.
- Blend all ingredients in a food processor until a cohesive dough forms, adjusting consistency with milk if too dry.
- Craft uniform dough balls approximately 45g each, gently pressing a central indentation using fingertips.
- Position cookies on prepared tray and bake for 15 minutes until edges appear lightly golden.
- Transfer warm cookies to cooling rack, using a teaspoon to delicately reinforce center indentations if needed.
- After complete cooling, generously fill each cookie’s center with jelly or jam, creating a smooth, even layer.
- Strategically position chocolate truffle atop the jam filling for spider body effect.
- Utilize white icing to carefully pipe two small eye dots on each truffle surface.
- Place black sesame seeds precisely in white dot centers to create pupils.
- Complete spider design by piping four thin black icing lines on each side of cookie to represent delicate spider legs.
Notes
- Customize the dough consistency by gradually adding milk if it feels too dry, ensuring a perfect texture that holds together without cracking.
- Choose alternate jellies or jams like raspberry, strawberry, or apricot to create different flavor profiles and visual variations for the spider cookies.
- Swap chocolate truffles with vegan chocolate balls or dark chocolate spheres for dietary accommodations, maintaining the playful spider design.
- Keep cookie sizes consistent by using a kitchen scale or cookie scoop to guarantee uniform baking and professional-looking results.
- Prep Time: 20 minutes
- Cook Time: 15 minutes
- Category: Desserts, Snacks
- Method: Baking
- Cuisine: American
Nutrition
- Serving Size: 12
- Calories: 215
- Sugar: 18g
- Sodium: 150mg
- Fat: 10g
- Saturated Fat: 3g
- Unsaturated Fat: 6g
- Trans Fat: 0g
- Carbohydrates: 28g
- Fiber: 1g
- Protein: 5g
- Cholesterol: 20mg
Marcus Reed
Founder & Food Content Creator
Expertise
Single-recipe development, Seasonal and local ingredient utilization, Food photography and styling, Culinary writing and content creation
Education
Culinary Arts Certificate, Blue Ridge Community and Technical College, WV
Focus: Fundamentals of culinary techniques, emphasizing hands-on experience in small-scale kitchen settings.
Marcus’s story begins in Asheville, where good food and family kitchens shaped his earliest memories. After hands-on culinary training and a lot of trial (and a little error), he realized that real cooking isn’t about perfection, it’s about connection.
At Pan and Oven, Marcus crafts recipes that are easy to follow, packed with flavor, and built for real kitchens.