
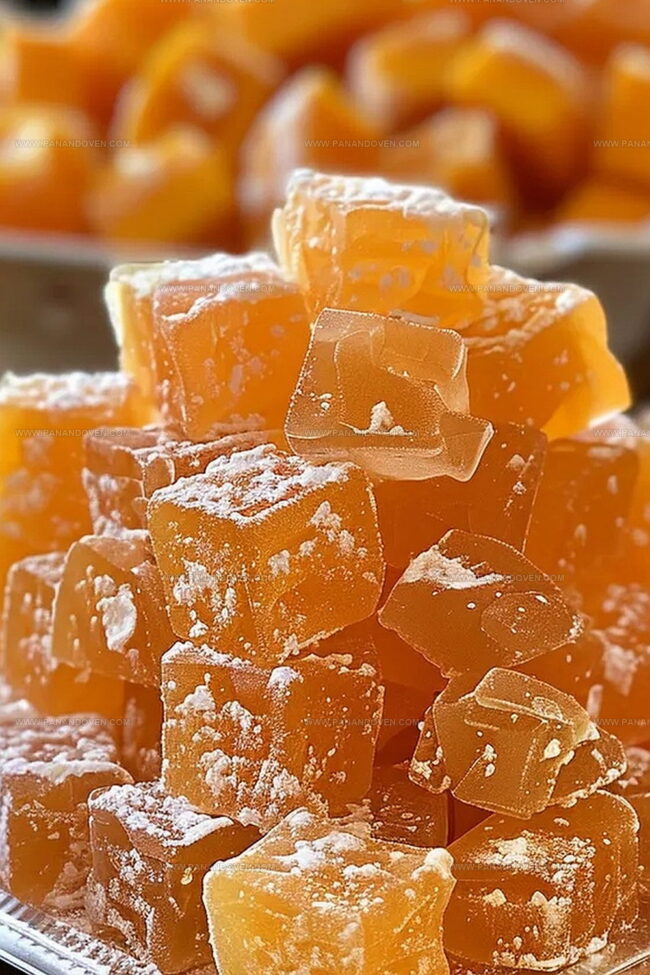
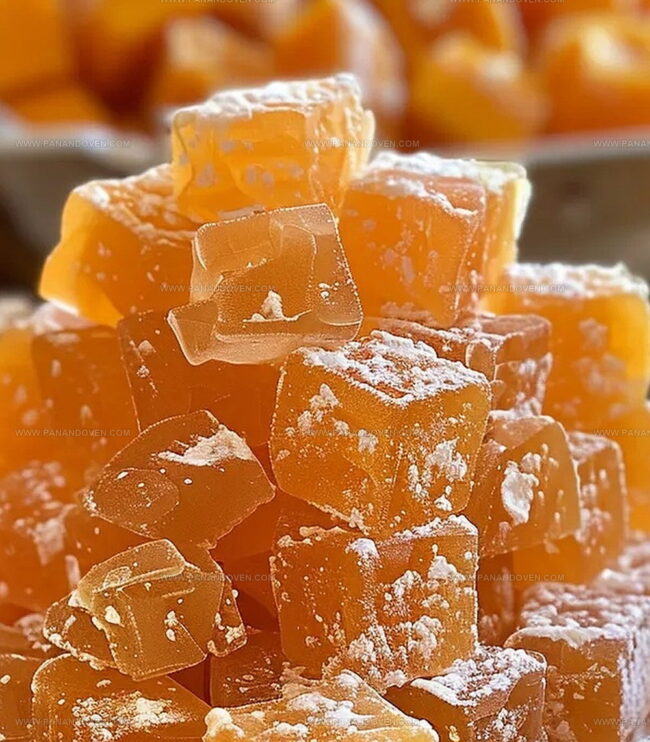
The Irresistible Old Fashioned Orange Candy Recipe You’ll Love
Sweet memories of childhood burst through with this nostalgic old fashioned orange candy recipe that captures the essence of classic confectionery.
Tangy citrus notes dance alongside sugary crystals, creating a delightful treat that transports you back in time.
Generations have cherished these simple yet magical orange candies that melt on your tongue.
Crafted with just a few basic ingredients, this recipe brings pure joy to any dessert table.
The process is straightforward, requiring minimal culinary skill but delivering maximum flavor.
Rich orange zest and pure sugar combine to produce a delectable confection that sparkles with homemade charm.
You’ll fall in love with these bright, sunshine-colored treats that promise to become a new family favorite.
What’s to Love About Old Fashioned Orange Candy
All the Ingredients for Old Fashioned Orange Candy
Main Ingredients:Flavoring Ingredients:Supplementary Ingredients:Equipment for Making Old Fashioned Orange Candy
Directions for Classic Old Fashioned Orange Candy
Step 1: Prepare Baking Surface
Line a baking sheet with parchment paper and lightly coat with cooking spray to prevent sticking.
Ensure the surface is completely covered and smooth for easy candy spreading.
Step 2: Create Sweet Syrup Base
Grab a heavy saucepan and combine:Stir ingredients over medium heat until sugar completely dissolves and mixture becomes transparent and smooth.
Step 3: Boil to Precise Temperature
Crank up the heat to medium-high.
Allow the mixture to bubble without stirring until it reaches the hard-crack stage between 300°F and 310°F.
This process typically takes 7-10 minutes.
Use a candy thermometer for precise monitoring.
Step 4: Infuse Vibrant Flavors
Remove the saucepan from heat.
Carefully fold in:Stir gently to distribute flavors evenly throughout the candy mixture.
Step 5: Spread Molten Mixture
Pour the hot candy onto the prepared baking sheet.
Use a heat-resistant silicone spatula to spread the mixture into an ultra-thin, even layer.
Work quickly before the candy begins to set.
Step 6: Transform Into Delicate Pieces
Let the candy cool completely at room temperature.
Once hardened, tap gently with a kitchen hammer or the back of a sturdy spoon to break into irregular, bite-sized fragments.
Store in an airtight container to maintain crispness.
Handy Advice for Sweet Old Fashioned Orange Candy
Fun Variations for Old Fashioned Orange Candy
Ideas for Serving Old Fashioned Orange Candy
How to Store Old Fashioned Orange Candy Properly
FAQs
Use a candy thermometer to check that the mixture has reached exactly 300F to 310F. At this temperature, a small amount of syrup dropped into cold water will immediately harden into brittle, breakable threads.
Cream of tartar helps prevent sugar crystallization, ensuring a smooth and clear candy texture. It stabilizes the sugar syrup and prevents it from becoming grainy during cooking.
Absolutely! You can substitute orange zest and extract with other flavor combinations like lemon, peppermint, or vanilla. Just ensure you use extracts and zests that can withstand high temperatures.
Print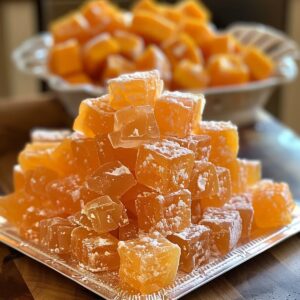
Old Fashioned Orange Candy Recipe
- Total Time: 55 minutes
- Yield: 12 1x
Description
Sweet and tangy old fashioned orange candy delights dessert enthusiasts with its nostalgic charm. Homemade treats blend citrusy zest and sugary perfection, offering you a delectable journey through classic confectionery memories.
Ingredients
Primary Sweet Components:
- 2 cups sugar
- 1/2 cup light corn syrup
Liquid Ingredients:
- 1/2 cup water
Flavor and Enhancement Ingredients:
- 1/4 teaspoon cream of tartar
- 1/4 cup orange zest (finely grated)
- 2 teaspoons orange extract
- Few drops of orange food coloring (optional)
Instructions
- Prepare a baking sheet by lining with parchment paper and lightly coating with oil to prevent sticking.
- Combine sugar, corn syrup, water, and cream of tartar in a heavy saucepan. Heat over medium temperature, stirring gently until sugar completely dissolves.
- Gradually increase heat to medium-high, allowing the mixture to boil without stirring. Monitor closely until the liquid reaches 300F to 310F, which typically takes 7-10 minutes.
- Immediately remove from heat source. Gently incorporate orange zest, orange extract, and optional food coloring, ensuring even distribution.
- Carefully transfer the molten mixture onto the prepared baking sheet. Use a heat-resistant spatula to spread evenly into a thin, uniform layer.
- Allow the candy to cool completely at room temperature for approximately 30-45 minutes.
- Once solidified, fracture the candy into irregular pieces by tapping with a hammer or the back of a sturdy spoon, creating rustic, bite-sized segments.
Notes
- Precision Matters Use a reliable candy thermometer to accurately hit the hard-crack stage, which is crucial for achieving the perfect texture and preventing sugar crystallization.
- Flavor Enhancement Consider using fresh orange zest for a more vibrant, authentic citrus taste that elevates the candy’s natural brightness.
- Safety First Work carefully when handling hot sugar syrup, as it can cause severe burns. Keep children and pets away from the cooking area and use long-handled utensils.
- Dietary Adaptations For a natural coloring option, replace artificial food coloring with a few drops of natural orange or carrot juice to maintain the classic orange hue while keeping the recipe more wholesome.
- Prep Time: 10 minutes
- Cook Time: 45 minutes
- Category: Snacks, Desserts
- Method: Boiling
- Cuisine: American
Nutrition
- Serving Size: 12
- Calories: 118
- Sugar: 22 g
- Sodium: 2 mg
- Fat: 0 g
- Saturated Fat: 0 g
- Unsaturated Fat: 0 g
- Trans Fat: 0 g
- Carbohydrates: 30 g
- Fiber: 0 g
- Protein: 0 g
- Cholesterol: 0 mg
Clara Thompson
Recipe Developer & Food Educator
Expertise
Plant-based and vegetarian recipe development, Nutritional analysis and meal planning, Culinary education and workshop facilitation, Content writing with a focus on healthy living
Education
Diploma in Culinary Arts, Mt. San Jacinto College, CA
Focus: Comprehensive culinary training with an emphasis on sustainable cooking practices.
Certificate in Nutrition and Healthy Living, Cornell University (Online Program)
Focus: Understanding the principles of nutrition to create balanced and health-conscious recipes.
Clara lives where fresh ideas and fresh ingredients meet. She pairs her culinary know-how with her passion for healthy, planet-friendly cooking.
For Clara, good food should taste great, nourish your body, and feel easy to make. Her recipes highlight whole foods, colorful produce, and a deep respect for seasonal eating.