
The Ultimate No-Bake Peanut Butter Cheesecake Recipe You’ll Love
Decadent desserts often surprise us with their simplicity, and this no-bake peanut butter cheesecake recipe proves that point beautifully.
creamy textures and rich flavors combine to create a dreamy treat that requires zero oven time.
The smooth, velvety filling melts in your mouth with each delightful bite.
peanut butter lovers will swoon over the luxurious blend of cream cheese and nutty goodness.
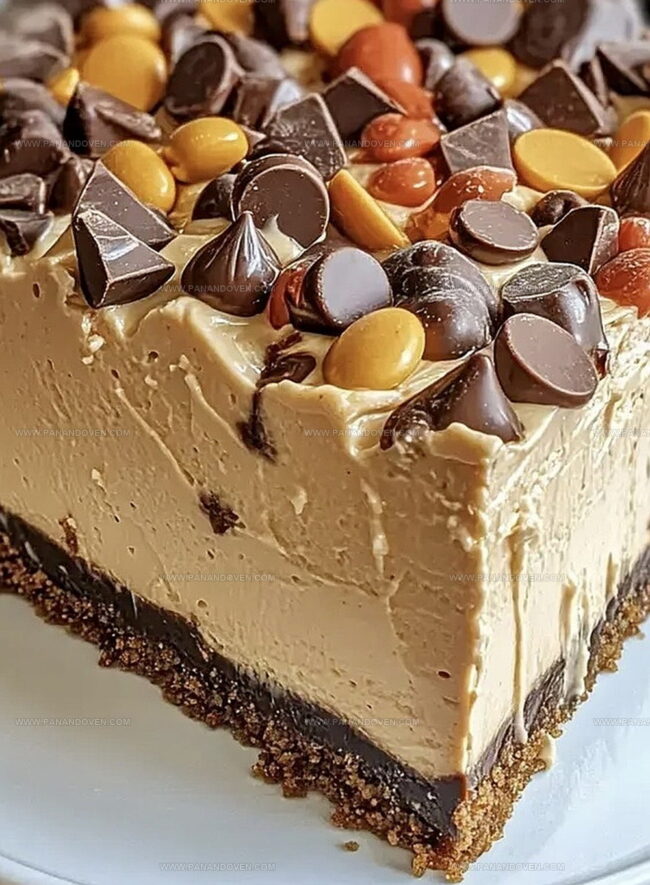
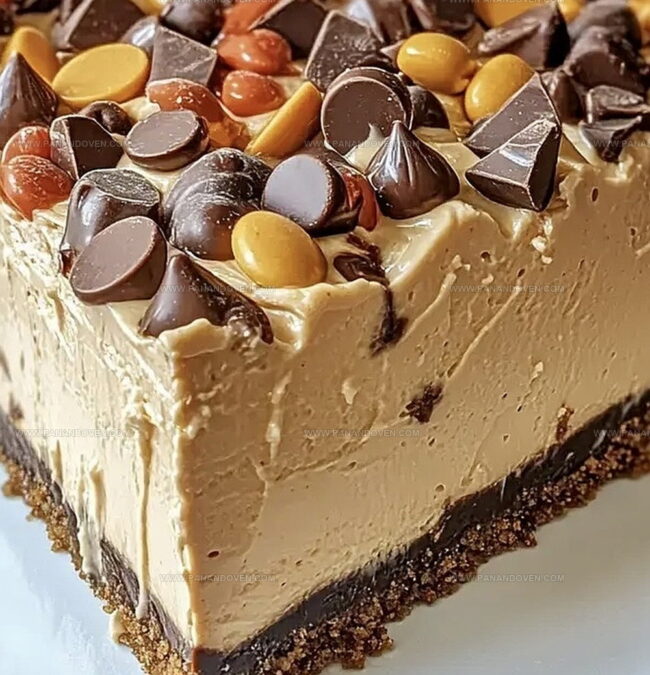
A crisp graham cracker crust provides the perfect foundation for this luscious dessert.
Chilling transforms the ingredients into a silky, indulgent masterpiece that looks far more complicated than it actually is.
One slice will have everyone begging for the recipe.
Why No-Bake Peanut Butter Cheesecake Is So Indulgent
What You Need for No-Bake Peanut Butter Cheesecake
Tools for Easy No-Bake Cheesecake Success
Making a Creamy No-Bake Peanut Butter Cheesecake
Step 1: Create The Crunchy Base
Grab a mixing bowl and toss in graham cracker crumbs, melted butter, and sugar.
Stir everything until it feels like wet sand.
Press this mixture into the bottom of a springform pan, making sure it’s packed down tight.
Pop the pan into the refrigerator to keep the crust cool and firm while you work on the filling.
Step 2: Whip Up The Dreamy Filling
In one bowl, whip heavy cream until it stands in fluffy peaks.
Set this aside.
In another bowl, blend cream cheese, peanut butter, powdered sugar, and vanilla until silky smooth.
Gently fold the whipped cream into the peanut butter mixture.
Sprinkle in some fun extras:Pour this luscious filling over the chilled crust and spread it evenly.
Step 3: Crown With Delicious Toppings
Whip more heavy cream with powdered sugar until it forms beautiful peaks.
Spread or pipe this creamy topping across the cheesecake.
Scatter your favorite chocolate treats on top:Drizzle chocolate syrup for extra decadence.
Step 4: Chill And Indulge
Refrigerate the cheesecake for at least 4 hours or overnight.
When ready, remove the springform pan sides.
Slice into this heavenly dessert and savor every creamy, peanut buttery bite!
Tricks for Perfect No-Bake Peanut Butter Cheesecake
Peanut Butter Cheesecake Variations Worth Trying

Fun Serving Suggestions for Peanut Butter Cheesecake
Storing No-Bake Peanut Butter Cheesecake Just Right
FAQs
Yes, you can substitute peanut butter with almond butter or cashew butter for a different flavor profile. Just ensure the alternative has a similar consistency.
You’ll need a 9-inch springform pan, an electric mixer, and mixing bowls. A piping bag is optional for decorating the top with whipped cream.
This dessert contains dairy, nuts, and gluten, so it’s not recommended for those with lactose intolerance, nut allergies, or gluten sensitivities. Consider alternative ingredients if needed.
Print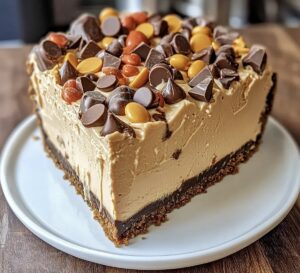
No-Bake Peanut Butter Cheesecake Recipe
- Total Time: 4 hours 30 minutes
- Yield: 8 1x
Description
Creamy no-bake peanut butter cheesecake delivers rich, silky indulgence without oven time. Chocolate graham cracker crust and velvety filling promise delightful satisfaction for dessert enthusiasts.
Ingredients
Main Ingredients:
- 16 ounces (454 grams) cream cheese, softened
- 1 cup (240 ml) creamy peanut butter
- 2 cups (480 ml) heavy cream
- 1 cup (240 ml) heavy cream, whipped
Crust Ingredients:
- 2 cups (240 grams) graham cracker crumbs
- 1/2 cup (113 grams) melted butter
- 1/4 cup (50 grams) granulated sugar
Topping and Decoration Ingredients:
- 1 cup (170 grams) mini chocolate chips
- 1/2 cup (85 grams) mini chocolate chips
- 1 cup (170 grams) Reese’s Pieces candy
- 1/2 cup (85 grams) Reese’s Pieces candy
- 1/2 cup (85 grams) assorted mini chocolate candies
- 1 cup (120 grams) powdered sugar
- 1/4 cup (30 grams) powdered sugar
- 1 teaspoon vanilla extract
- Chocolate syrup for drizzling
Instructions
- Craft a robust foundation by blending graham cracker crumbs with melted butter and sugar until thoroughly integrated. Press the mixture compactly into the bottom of a 9-inch springform pan, ensuring an even surface. Refrigerate the crust for 15 minutes to solidify.
- Whip heavy cream until peaks stand firm and maintain structure. In a separate bowl, blend cream cheese, peanut butter, powdered sugar, and vanilla extract until silky and uniform. Gently incorporate the whipped cream into the peanut butter mixture, maintaining a light, airy texture.
- Carefully fold mini chocolate chips and Reese’s Pieces into the creamy filling, distributing ingredients evenly. Transfer the mixture onto the chilled crust, smoothing the surface with a spatula to create a level landscape.
- Prepare a luxurious topping by whipping additional heavy cream with powdered sugar until peaks form impressively. Spread or elegantly pipe the whipped cream across the cheesecake’s surface.
- Embellish the dessert with a playful scattering of mini chocolate chips, Reese’s Pieces, and assorted chocolate candies. Drizzle chocolate syrup in artistic patterns for visual appeal.
- Refrigerate the cheesecake for a minimum of 4 hours, preferably overnight, allowing flavors to meld and texture to set completely. Before serving, release the springform pan’s sides and slice into decadent portions.
Notes
- Crust Perfection: Press graham cracker mixture firmly and evenly to create a solid, compact base that won’t crumble when slicing the cheesecake.
- Cream Cheese Technique: Ensure cream cheese is at room temperature for smooth, lump-free mixing that creates a silky cheesecake texture.
- Whipping Pro Tip: Use cold heavy cream and chill mixing bowl beforehand to achieve maximum volume and stable whipped cream peaks.
- Dietary Modification: Swap graham crackers with gluten-free cookies or almond flour for a gluten-free version, and use dairy-free cream cheese and whipped coconut cream for a vegan alternative.
- Prep Time: 30 minutes
- Cook Time: 4 hours
- Category: Desserts, Snacks
- Method: Chilling
- Cuisine: American
Nutrition
- Serving Size: 8
- Calories: 520
- Sugar: 38 g
- Sodium: 290 mg
- Fat: 36 g
- Saturated Fat: 17 g
- Unsaturated Fat: 16 g
- Trans Fat: 0 g
- Carbohydrates: 42 g
- Fiber: 1 g
- Protein: 9 g
- Cholesterol: 85 mg
Marcus Reed
Founder & Food Content Creator
Expertise
Single-recipe development, Seasonal and local ingredient utilization, Food photography and styling, Culinary writing and content creation
Education
Culinary Arts Certificate, Blue Ridge Community and Technical College, WV
Focus: Fundamentals of culinary techniques, emphasizing hands-on experience in small-scale kitchen settings.
Marcus’s story begins in Asheville, where good food and family kitchens shaped his earliest memories. After hands-on culinary training and a lot of trial (and a little error), he realized that real cooking isn’t about perfection, it’s about connection.
At Pan and Oven, Marcus crafts recipes that are easy to follow, packed with flavor, and built for real kitchens.