
Quick & Creamy No-Bake M&M Snickers Cheesecake Recipe
When chocolate lovers stumble upon this no-bake M&M Snickers cheesecake recipe, they unlock a dessert paradise of pure indulgence.
Sweet treats rarely come as decadent and easy to prepare as this crowd-pleasing masterpiece.
Packed with creamy layers and irresistible candy chunks, this cheesecake delivers maximum flavor with minimal effort.
Chocolate and caramel dance together in a rich, smooth filling that melts in your mouth.
Crushed cookies form a perfect crunchy base, complementing the luscious cream cheese mixture.
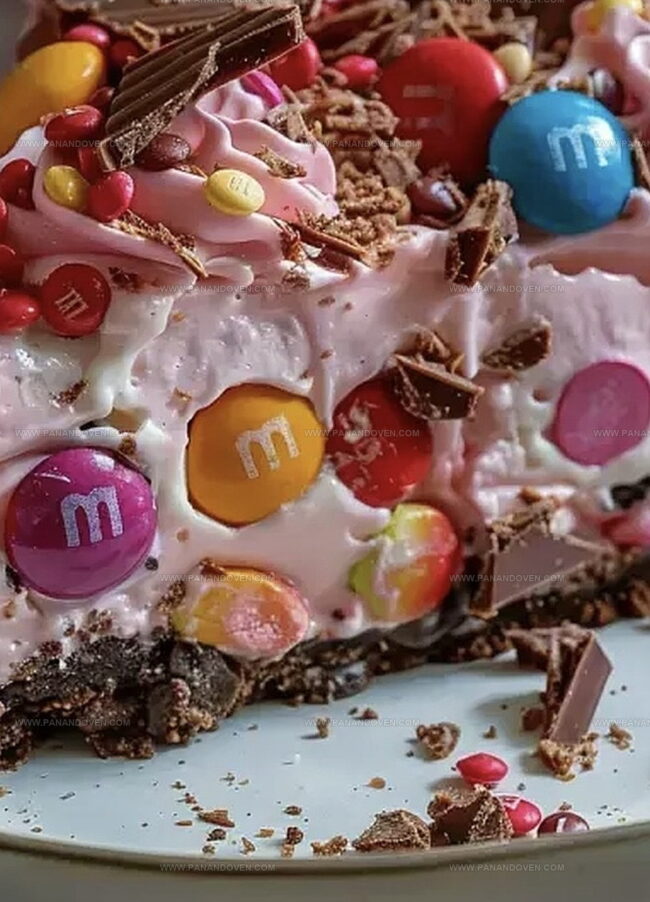
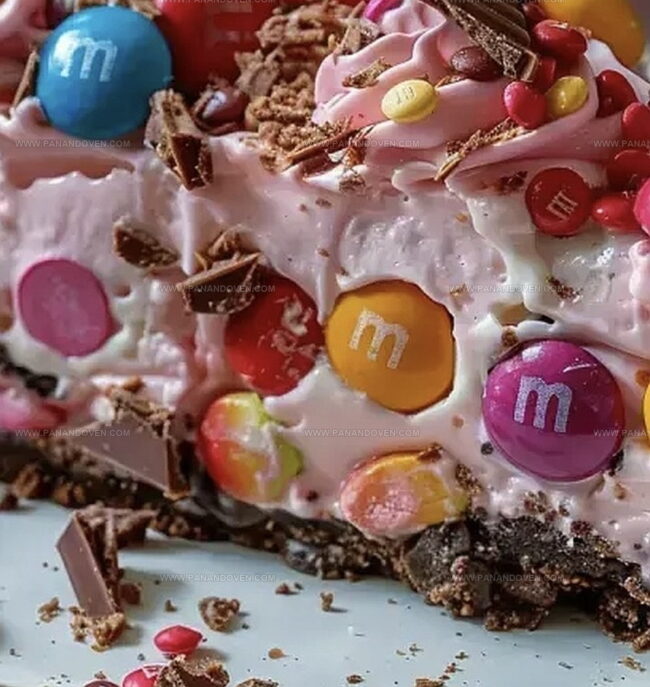
The colorful M&M candies add playful bursts of color and texture to every slice.
Each bite promises a symphony of classic candy bar flavors blended into one spectacular no-bake dessert.
Prepare to dazzle your taste buds and wow everyone at the next gathering with this irresistible sweet sensation.
Pink Paradise Cheesecake That’s a Party Favorite
Sweet Ingredients For M&M & Snickers Bliss
Base:Filling:Whipping and Coloring:Toppings:Tools for Easy No-Bake Cheesecake Layers
Assembling A Picture-Perfect Cheesecake
Step 1: Crush Those Cookies
Grab your chocolate cookies and transform them into fine crumbs using a food processor or by placing them in a sealed bag and crushing with a rolling pin.
Mix the crumbs with melted butter until they stick together perfectly.
Press the mixture firmly into the bottom of a springform pan, creating a solid base.
Pop it in the refrigerator for 30 minutes to set.
Ingredients:Step 2: Melt Chocolate Magic
In a saucepan over medium heat, slowly melt the chocolate chips.
Stir constantly to prevent burning and ensure a smooth, glossy finish.
Remove from heat and let it cool down slightly.
Ingredients:Step 3: Whip Up Creamy Goodness
Using an electric mixer, blend cream cheese, powdered sugar, and vanilla extract until silky smooth.
Gradually pour in the cooled chocolate, beating continuously until fully incorporated.
Ingredients:Step 4: Snickers Chunk Explosion
Roughly chop Snickers bars into delightful chunks.
Gently fold these sweet and nutty pieces into the chocolate mixture, creating pockets of caramel and nougat goodness.
Ingredients:Step 5: Pretty in Pink
Create a soft pink hue by adding a few drops of pink food coloring to a small portion of the chocolate mixture.
Gradually mix this into the main bowl, stirring until you achieve the perfect pink shade.
Ingredients:Step 6: Whipped Cream Cloud
Whip heavy cream until it forms stiff, fluffy peaks.
Carefully fold the whipped cream into the pink chocolate mixture, being careful not to deflate the mixture.
Ingredients:Step 7: Chill and Set
Pour the pink chocolate filling over the chilled crust, smoothing the top with a spatula.
Cover with plastic wrap and refrigerate for at least 4 hours until completely set.
Step 8: Final Fabulous Touch
Unmold the cheesecake from the springform pan.
Decorate with dollops of whipped cream, scatter colorful M&Ms, and sprinkle chopped Snickers bars on top.
Cheesecake Pro Moves for Creamy Results
Candy Cheesecake Variations To Explore
Creative Ways to Serve Pink Paradise
Storage Tips For Sweet Cheesecake Leftovers
FAQs
Use a sharp knife dipped in hot water and wiped clean between each slice. This helps create clean, smooth cuts without pulling apart the crust.
Yes, this cheesecake is perfect for advance preparation. You can make it up to 3 days before serving and keep it refrigerated. The flavors actually develop and become more intense over time.
Leave the cream cheese at room temperature for about 30-45 minutes before starting. This ensures smooth mixing without lumps and creates a creamy texture.
Print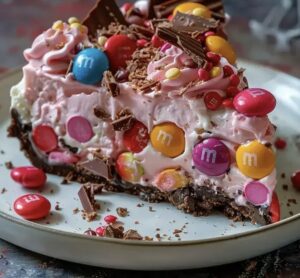
No-Bake M&M Snickers Cheesecake Recipe
- Total Time: 4 hours 30 minutes
- Yield: 8 1x
Description
Indulgent no-bake M&M Snickers cheesecake combines creamy richness with classic candy bar flavors. Chocolate cookie crust and silky cream cheese filling promise pure dessert bliss you’ll savor with each delightful bite.
Ingredients
Crust:
- 1 1/2 cups chocolate cookie crumbs (graham crackers or crushed Oreos)
- 1/3 cup unsalted butter, melted
Filling:
- 3 (8 ounces) packages cream cheese, softened
- 1 cup powdered sugar
- 1/2 cup heavy cream
- 1 teaspoon vanilla extract
- 1 cup chopped Snickers bars (reserve some for garnish)
- 2 cups semi-sweet chocolate chips
- Pink food coloring (gel or liquid)
Topping:
- Whipped cream
- M&Ms
- Chopped Snickers bars (optional)
Instructions
- Prepare the crust by pulverizing chocolate cookies into fine crumbs, either using a food processor or manually crushing in a sealed bag. Blend the crumbs thoroughly with melted butter until fully incorporated.
- Press the cookie mixture evenly and firmly into the bottom of a springform pan, creating a compact base. Refrigerate for 30 minutes to solidify the foundation.
- Melt chocolate chips in a saucepan over medium heat, stirring continuously to prevent scorching. Remove from heat and allow to cool slightly.
- Using an electric mixer, whip cream cheese, powdered sugar, and vanilla extract until achieving a silky, uniform texture. Gradually incorporate the cooled chocolate, blending until completely integrated.
- Delicately fold chopped Snickers bars into the chocolate mixture, distributing evenly throughout.
- Create a pink hue by adding food coloring incrementally to a small portion of the chocolate mixture. Gradually blend the colored mixture back into the main bowl, adjusting until desired pink shade is achieved.
- Whip heavy cream to stiff, peaks-forming consistency. Gently fold the whipped cream into the pink chocolate mixture, maintaining a light, airy texture without overmixing.
- Transfer the pink chocolate filling onto the chilled crust, smoothing the surface with a spatula for an even finish.
- Seal the pan with plastic wrap and refrigerate for minimum 4 hours, ensuring complete setting and optimal flavor melding.
- Upon chilling, carefully release the cheesecake from the springform pan. Embellish with whipped cream, colorful M&Ms, and additional Snickers bar pieces for a festive presentation.
Notes
- Use room temperature cream cheese to ensure a smooth, lump-free filling that blends perfectly without overmixing.
- Crush Snickers bars when they’re slightly chilled to prevent them from becoming too mushy during folding into the mixture.
- Experiment with different food coloring shades to create a unique pink gradient or marble effect in the cheesecake.
- For a gluten-free version, swap chocolate cookies with gluten-free graham crackers or almond flour-based cookie crumbs.
- Prep Time: 30 minutes
- Cook Time: 4 hours
- Category: Desserts, Snacks
- Method: Chilling
- Cuisine: American
Nutrition
- Serving Size: 8
- Calories: 400
- Sugar: 30 g
- Sodium: 250 mg
- Fat: 25 g
- Saturated Fat: 15 g
- Unsaturated Fat: 8 g
- Trans Fat: 0 g
- Carbohydrates: 40 g
- Fiber: 2 g
- Protein: 5 g
- Cholesterol: 50 mg
Marcus Reed
Founder & Food Content Creator
Expertise
Single-recipe development, Seasonal and local ingredient utilization, Food photography and styling, Culinary writing and content creation
Education
Culinary Arts Certificate, Blue Ridge Community and Technical College, WV
Focus: Fundamentals of culinary techniques, emphasizing hands-on experience in small-scale kitchen settings.
Marcus’s story begins in Asheville, where good food and family kitchens shaped his earliest memories. After hands-on culinary training and a lot of trial (and a little error), he realized that real cooking isn’t about perfection, it’s about connection.
At Pan and Oven, Marcus crafts recipes that are easy to follow, packed with flavor, and built for real kitchens.