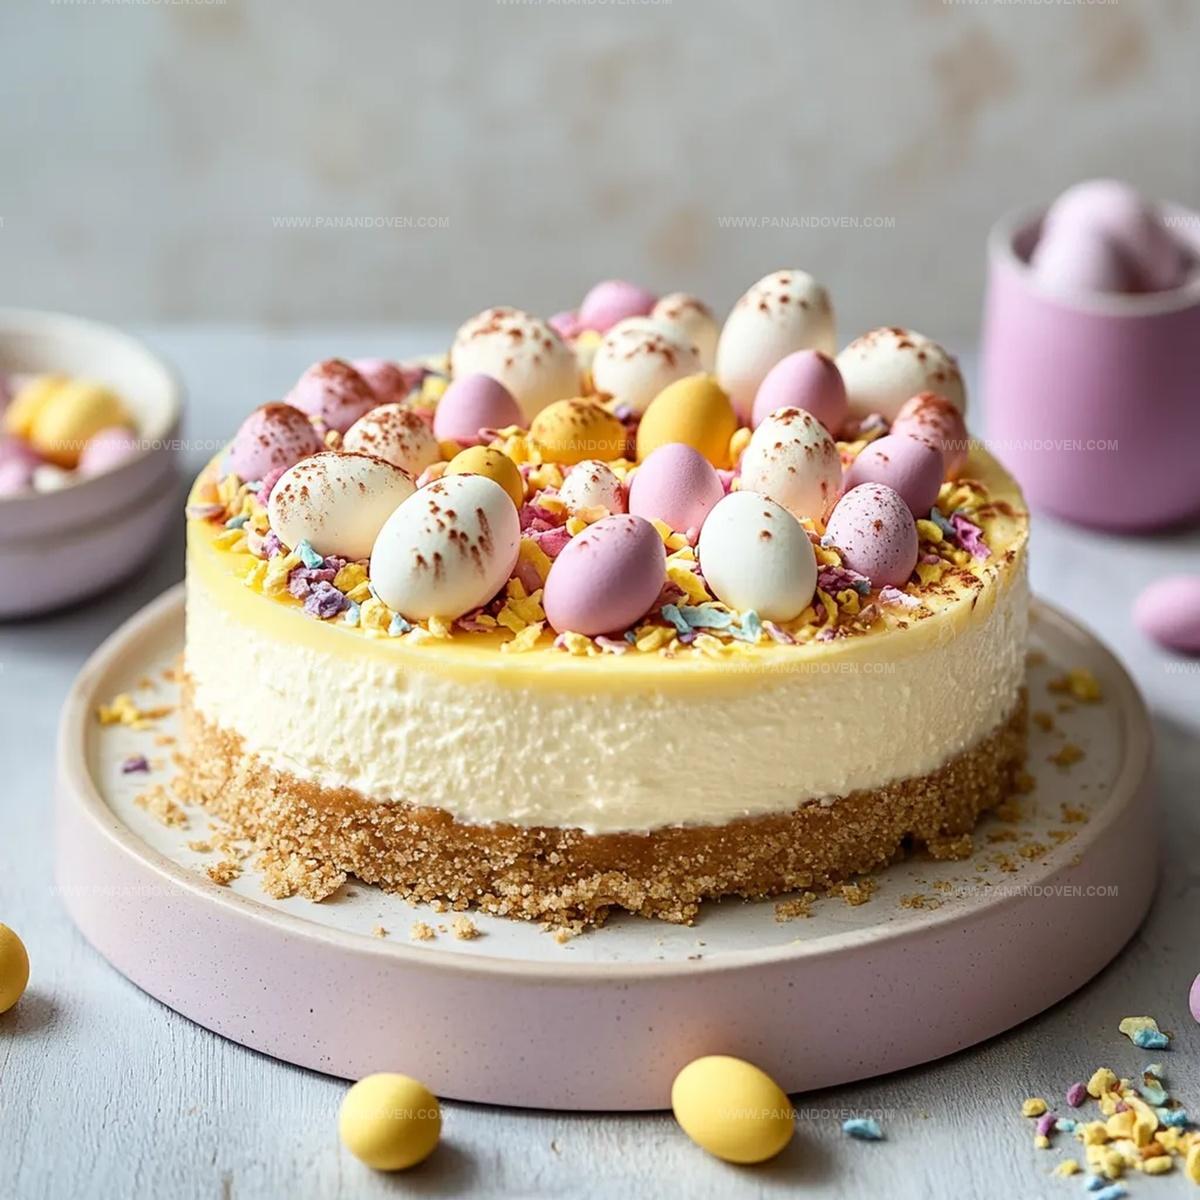
Indulge in Our Swift No-Bake Mini Egg Delight Recipe
Chocolate lovers rejoice as this no-bake mini egg delight recipe delivers pure decadence in every bite.
Sweet treats rarely come this effortless and delicious.
Crushed mini eggs create a spectacular texture that melts hearts instantly.
You’ll adore how simple ingredients combine to create something magical.
Each spoonful promises a crunch of chocolate and creamy smoothness that dances on your palate.
The recipe requires minimal effort but yields maximum satisfaction.
Indulge in this delectable dessert that transforms ordinary moments into sweet celebrations.
Why You’ll Love This No-Bake Mini Egg Delight
The Must-Haves for a Mini Egg Dessert
Biscuit Base:Cheesecake Filling:Decoration:Kitchen Tools to Whip Up Mini Egg Treats
Directions for an Easy No-Bake Mini Egg Dessert
Step 1: Crush Biscuit Base
Grab your favorite cookies and crush them into fine crumbs using a food processor or by placing them in a sealed bag and rolling with a rolling pin.
Mix the crushed biscuits with melted butter until they stick together.
Press the mixture firmly into the bottom of a springform pan, creating a solid, even layer.
Pop the pan into the refrigerator to chill while you prepare the filling.
Step 2: Whip Creamy Filling
In a large mixing bowl, blend cream cheese until smooth and creamy.
Gently fold in:Whip the mixture until it becomes thick and luxurious.
Carefully crush some mini eggs and fold them into the filling, creating pockets of chocolate goodness throughout.
Spread the filling evenly over the chilled biscuit base.
Cover and refrigerate for at least 5-6 hours or overnight to let the cheesecake set perfectly.
Step 3: Create Stunning Topping
Carefully remove the cheesecake from the springform pan.
Melt some chocolate and drizzle it artistically across the top.
Whip additional cream with a touch of powdered sugar and pipe elegant swirls around the edges.
Sprinkle crushed mini eggs over the entire surface for a delightful crunch.
Place a whole mini egg on each slice for a final, eye-catching touch.
Tricks for Getting Perfect Mini Egg Layers
Different Twists for No-Bake Mini Egg Sweets
Serving Your Mini Egg Delight at Any Gathering
Best Storage Tips for No-Bake Mini Egg Desserts
FAQs
Yes, you can substitute digestive biscuits with graham crackers or any other similar sweet, crumbly biscuit. Just ensure they crush well and mix properly with melted butter.
Full-fat cream cheese provides the best texture and richness. Low-fat versions might make the filling less creamy and stable. For the most luxurious result, stick with full-fat cream cheese.
Since this is a no-bake cheesecake, cracking is less likely. Ensure all ingredients are at room temperature, mix gently, and avoid over-whipping the cream to maintain a smooth, creamy texture.
Print
No-Bake Mini Egg Delight Recipe
- Total Time: 30 minutes
- Yield: 12 1x
Description
Chocolate lovers will adore this no-bake mini egg delight combining creamy textures with classic Easter candy. Crisp cookie base and smooth chocolate layers create a memorable dessert perfect for spring celebrations you can quickly prepare at home.
Ingredients
Biscuit Base:
- 300 grams (10.6 ounces) digestive biscuits
- 150 grams (5.3 ounces) unsalted butter or baking spread
Cheesecake Filling:
- 600 grams (21.2 ounces) full-fat soft cream cheese
- 300 milliliters (10.1 fluid ounces) double cream
- 300 grams (10.6 ounces) mini eggs, crushed
- 100 grams (3.5 ounces) icing sugar
- 1 teaspoon vanilla extract
Decoration:
- 150 milliliters (5.1 fluid ounces) double cream
- 50 grams (1.8 ounces) melted milk chocolate
- 100–200 grams (3.5–7.1 ounces) mini eggs
- 2 tablespoons icing sugar
Instructions
- Crush digestive biscuits into fine, uniform crumbs using a food processor or by placing them in a sealed bag and crushing with a rolling pin. Mix thoroughly with melted butter until the mixture resembles wet sand.
- Press the biscuit mixture firmly and evenly into the bottom of a 20 cm springform pan, creating a compact base. Refrigerate for 15 minutes to set while preparing the filling.
- In a large mixing bowl, blend cream cheese until smooth and creamy. Gradually incorporate powdered sugar and vanilla extract, whisking until fully integrated and free of lumps.
- In a separate bowl, whip double cream until it forms soft, billowy peaks. Gently fold the whipped cream into the cream cheese mixture, maintaining a light, airy texture.
- Carefully crush mini eggs into smaller pieces, reserving some whole for decoration. Fold the crushed eggs into the cheesecake filling, distributing them evenly throughout.
- Retrieve the chilled base and spread the creamy filling uniformly across the surface. Use a spatula to create a smooth, even layer.
- Cover the cheesecake and refrigerate for 6-8 hours, or preferably overnight, allowing it to set completely and develop a rich, creamy consistency.
- Melt chocolate using a double boiler or microwave, ensuring a smooth, glossy finish. Drizzle the melted chocolate artfully across the top of the chilled cheesecake.
- Whip additional cream with powdered sugar until it forms stiff peaks. Transfer to a piping bag and create elegant swirls around the edges of the cheesecake.
- Garnish with whole and crushed mini eggs, strategically placing them to create an appealing and tempting presentation. Serve chilled and enjoy.
Notes
- Crush biscuits thoroughly to ensure a compact, even base that holds together well when sliced.
- For gluten-free option, swap traditional digestive biscuits with gluten-free graham crackers or almond flour-based cookies.
- Chill cream cheese to room temperature before mixing to prevent lumpy texture and create smoother filling.
- Use high-quality chocolate for drizzling to enhance overall flavor and presentation of the dessert.
- Prep Time: 30 minutes (excluding chilling time)
- Cook Time: 0 minutes
- Category: Desserts, Snacks
- Method: Chilling
- Cuisine: American
Nutrition
- Serving Size: 12
- Calories: 426
- Sugar: 24 g
- Sodium: 110 mg
- Fat: 30 g
- Saturated Fat: 17 g
- Unsaturated Fat: 10 g
- Trans Fat: 0 g
- Carbohydrates: 36 g
- Fiber: 1 g
- Protein: 5 g
- Cholesterol: 80 mg
Clara Thompson
Recipe Developer & Food Educator
Expertise
Plant-based and vegetarian recipe development, Nutritional analysis and meal planning, Culinary education and workshop facilitation, Content writing with a focus on healthy living
Education
Diploma in Culinary Arts, Mt. San Jacinto College, CA
Focus: Comprehensive culinary training with an emphasis on sustainable cooking practices.
Certificate in Nutrition and Healthy Living, Cornell University (Online Program)
Focus: Understanding the principles of nutrition to create balanced and health-conscious recipes.
Clara lives where fresh ideas and fresh ingredients meet. She pairs her culinary know-how with her passion for healthy, planet-friendly cooking.
For Clara, good food should taste great, nourish your body, and feel easy to make. Her recipes highlight whole foods, colorful produce, and a deep respect for seasonal eating.