
The Ultimate No-Bake Cookie Lasagna Recipe: Sweet & Simple Joy
Creamy layers of decadence await you in this no-bake cookie lasagna that promises pure dessert magic.
The classic Italian-inspired treat takes an unexpected twist with a delightful no-bake approach.
Silky smooth cream cheese blends perfectly with crisp cookie layers, creating a dessert that melts hearts and delights taste buds.
Each spoonful delivers a rich combination of textures and flavors that dance across your palate.
Forget complicated baking techniques and complicated steps – this dessert comes together with minimal effort and maximum satisfaction.
The recipe transforms simple ingredients into an extraordinary sweet experience.
Prepare to fall in love with a dessert that’s as easy to make as it is irresistible to devour.
No Bake Cookie Lasagna Dessert Fun for All
Shopping for Cookie Lasagna Ingredients
Cookie Base:Cream Cheese Layer:Pudding and Topping Layers:Equipment for Making Cookie Lasagna
Cookie Lasagna Assembly Directions
Step 1: Create Crumbly Cookie Base
Grab a stack of Oreo cookies and crush them into fine, sandy crumbs using a food processor or rolling pin.
Drizzle melted butter over the crumbs and mix thoroughly.
Press the mixture firmly into the bottom of a 9×13 inch pan, creating an even, compact layer.
Pop the pan into the refrigerator to set while you prepare the next layer.
Step 2: Whip Up Creamy Cheese Mixture
In a large mixing bowl, blend cream cheese until smooth and velvety.
Add powdered sugar, milk, and vanilla extract.
Whip until the mixture becomes light and fluffy.
Gently fold in whipped topping to create a cloud-like texture.
Carefully spread this dreamy layer over the chilled Oreo crust, ensuring an even distribution.
Step 3: Layer Decadent Pudding Flavors
Prepare chocolate and vanilla pudding mixes according to package instructions, using milk for a richer consistency.
Allow each pudding to set slightly until it begins to thicken.
Carefully pour the chocolate pudding as the first layer over the cream cheese mixture, then top with a layer of vanilla pudding.
Use a spatula to create clean, distinct layers.
Step 4: Add Final Flourishes
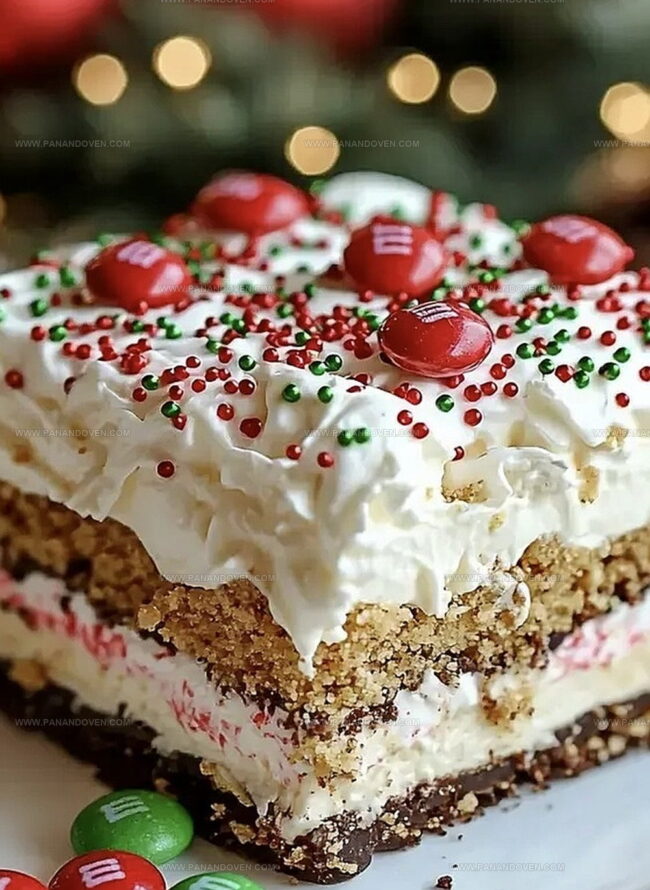
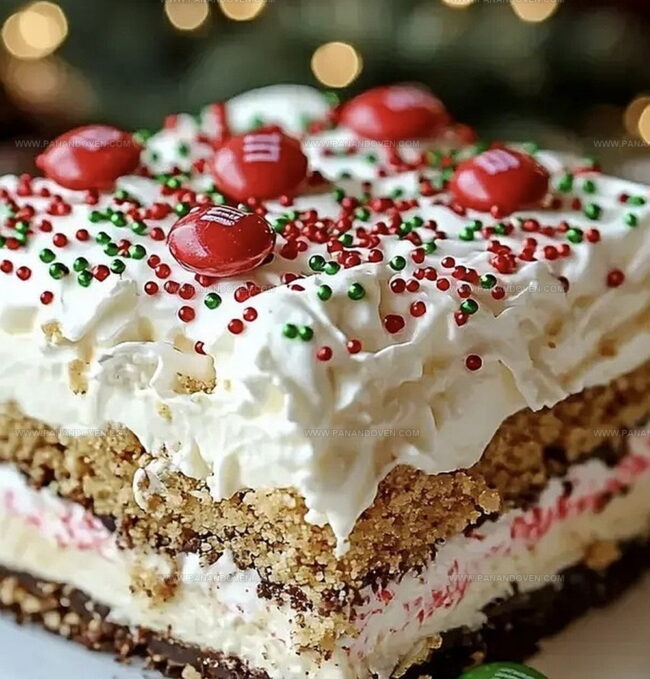
Crown your dessert with a generous layer of whipped topping, creating soft peaks and swirls.
Sprinkle an array of colorful candy pieces and chocolate shavings over the top for extra pizzazz.
Refrigerate the dessert for at least 4 hours, or ideally overnight, to allow all the flavors to meld together and set perfectly.
Tips for a Perfect Cookie Lasagna Every Time
Cookie Lasagna Flavorful Mix Ins
How to Serve Cookie Lasagna for Dessert
Cookie Lasagna Storage Suggestions
FAQs
You’ll need Oreo cookies, butter, cream cheese, sugar, milk, vanilla extract, whipped topping, chocolate pudding mix, vanilla pudding mix, and optional sprinkles or candies for decoration.
Absolutely! Kids will love helping crush Oreos, mixing layers, and adding colorful sprinkles. It’s a fun dessert that doesn’t require baking, making it safe and easy for children to participate.
The actual preparation takes about 20-30 minutes, but you’ll need to chill the dessert for 4 hours or overnight to set properly. This makes it a great make-ahead dessert for parties or gatherings.
Print
No-Bake Cookie Lasagna Recipe
- Total Time: 30 minutes
- Yield: 12 1x
Description
Indulgent no-bake cookie lasagna brings layers of creamy chocolate and crisp cookies into a delightful dessert. Cool Italian-inspired treats promise sweet satisfaction without turning on the oven.
Ingredients
Main Ingredients:
- 36 Oreo cookies, crushed
- 8 ounces (226 grams) cream cheese, softened
- 1 box instant vanilla pudding (3.4 ounces/96 grams)
- 1 box instant chocolate pudding (3.4 ounces/96 grams)
- 3 cups cold milk
Sweeteners and Flavoring:
- 1/2 cup (113 grams) unsalted butter, melted
- 1/4 cup granulated sugar
- 1 teaspoon vanilla extract
Toppings and Finishing:
- 3 cups whipped topping
- Christmas sprinkles
- Mini M&Ms or holiday candies
- 2 tablespoons milk
Instructions
- Pulverize Oreo cookies into fine crumbs, blending thoroughly with melted butter until cohesive. Press mixture firmly into a 9×13 inch pan, creating an even, compact base. Refrigerate for 15 minutes to solidify.
- Whip cream cheese with sugar, incorporating milk and vanilla extract until silky smooth. Gently fold in whipped topping, maintaining a light, airy texture. Carefully spread this creamy mixture evenly over the chilled cookie crust.
- Prepare chocolate pudding using precise measurements, stirring until thickened and glossy. Allow to set slightly at room temperature. Carefully distribute chocolate pudding as the first layer, ensuring complete coverage of cream cheese mixture.
- Craft vanilla pudding with consistent technique, achieving a smooth, luxurious consistency. Delicately spread vanilla pudding as the second layer, creating a distinct contrast against the chocolate layer.
- Crown the dessert with a generous layer of whipped topping, spreading edge to edge. Embellish with colorful sprinkles and decorative candies for visual appeal. Refrigerate for minimum 4 hours, preferably overnight, to allow flavors to meld and texture to set perfectly.
Notes
- Crushing cookies perfectly requires a food processor or sealed bag with rolling pin for ultra-fine, consistent texture.
- Room temperature cream cheese ensures smooth, lump-free layer without overmixing.
- Layering puddings while slightly warm helps them settle evenly without creating distinct separation lines.
- Chilling time matters: minimum 4 hours lets flavors meld, but overnight produces superior taste and firmer texture.
- Prep Time: 30 minutes
- Cook Time: 0 minutes
- Category: Desserts, Snacks
- Method: None
- Cuisine: American
Nutrition
- Serving Size: 12
- Calories: 380
- Sugar: 24 g
- Sodium: 200 mg
- Fat: 20 g
- Saturated Fat: 10 g
- Unsaturated Fat: 9 g
- Trans Fat: 0 g
- Carbohydrates: 45 g
- Fiber: 1 g
- Protein: 4 g
- Cholesterol: 30 mg
Clara Thompson
Recipe Developer & Food Educator
Expertise
Plant-based and vegetarian recipe development, Nutritional analysis and meal planning, Culinary education and workshop facilitation, Content writing with a focus on healthy living
Education
Diploma in Culinary Arts, Mt. San Jacinto College, CA
Focus: Comprehensive culinary training with an emphasis on sustainable cooking practices.
Certificate in Nutrition and Healthy Living, Cornell University (Online Program)
Focus: Understanding the principles of nutrition to create balanced and health-conscious recipes.
Clara lives where fresh ideas and fresh ingredients meet. She pairs her culinary know-how with her passion for healthy, planet-friendly cooking.
For Clara, good food should taste great, nourish your body, and feel easy to make. Her recipes highlight whole foods, colorful produce, and a deep respect for seasonal eating.