
Creamy Mint Aero Cheesecake Recipe: A Fresh Twist on Sweet
Sweet creamy desserts that combine chocolate and mint always spark excitement at gatherings.
This incredible mint Aero cheesecake recipe delivers a delightful blend of rich flavors and smooth textures.
Cool mint meets indulgent chocolate in a dreamy no-bake cheesecake that melts hearts instantly.
The velvety filling captures the signature crunch of mint Aero bars, creating a decadent treat.
Each slice promises a refreshing burst of minty goodness with a luxurious chocolate twist.
Chocolate lovers and dessert enthusiasts will adore this simple yet impressive cheesecake that comes together effortlessly.
Prepare to wow everyone with this irresistible crowd-pleasing dessert that’s sure to become a new favorite.
Mint Aero Cheesecake What Sets This Dessert Apart

Ingredients for Whipping Up Mint Aero Cheesecake
Base Ingredients:Cheesecake Filling Ingredients:Decoration Ingredients:Kitchen Tools Needed for Mint Aero Cheesecake Magic
Steps to Master Mint Aero Cheesecake at Home
Step 1: Craft The Crispy Base
Grab your food processor and transform biscuits into fine, sandy crumbs.
Transfer the crumbs into a mixing bowl and drizzle melted butter over them.
Mix thoroughly until the mixture feels like wet sand.
Press this delightful blend into an 8-inch springform pan, creating a smooth, even layer.
Pop the pan into the refrigerator and let it chill for a solid hour, allowing the base to set perfectly.
Step 2: Whip Up The Creamy Filling
Bring out your stand mixer with the paddle attachment.
Combine cream cheese, icing sugar, peppermint extract, and double cream.
Beat the ingredients until they transform into a silky, smooth mixture.
Add a few drops of green food colouring gel to create a dreamy mint-green shade.
Take a moment to taste and adjust the peppermint extract to your liking.
Gently fold in chopped Mint Aero chocolate, ensuring an even distribution of chocolatey goodness.
Step 3: Build Your Cheesecake Masterpiece
Pour the luscious cheesecake filling over the chilled biscuit base.
Use an offset spatula to create a perfectly smooth surface.
Return the pan to the refrigerator and let it set for a minimum of 6 hours, though overnight is ideal for maximum flavor development.
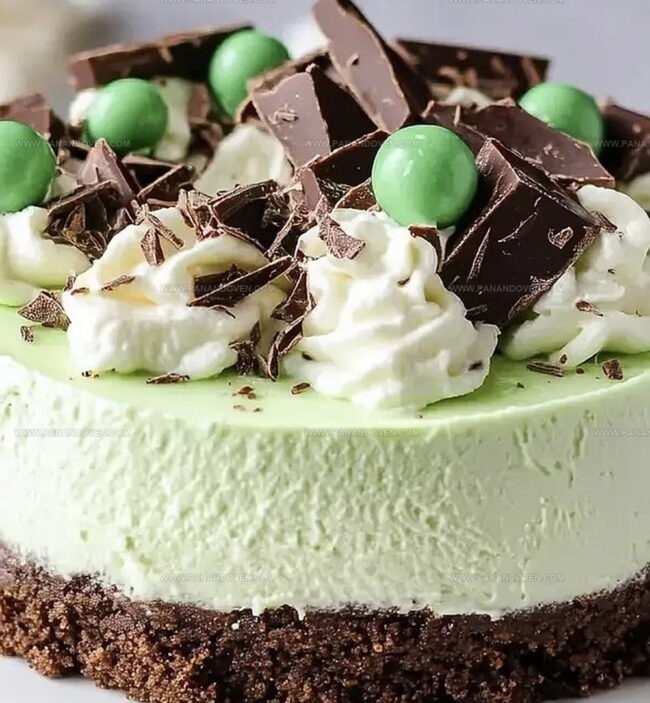
Step 4: Add The Finishing Touches
When you’re ready to serve, whip the remaining double cream with icing sugar until it forms stiff, billowy peaks.
Pipe the whipped cream onto the cheesecake’s surface in elegant swirls.
Sprinkle Mint Aero bubbles on top for a show-stopping presentation that will impress everyone at the table.
Tips for Creamy and Minty Aero Cheesecake Every Time
Mint Aero Cheesecake Flavor Twists to Try Next
Ways to Serve Mint Aero Cheesecake for Any Occasion
Keeping Mint Aero Cheesecake Fresh and Tasty
FAQs
Yes, you can substitute Mint Aero with other mint-flavored chocolates or regular chocolate. If using regular chocolate, consider adding extra peppermint extract to maintain the mint flavor profile.
Avoid overmixing the filling, use room temperature ingredients, and bake in a water bath. For this no-bake cheesecake, ensure you chill it slowly and evenly in the refrigerator to prevent cracks.
Peppermint extract is crucial for creating the signature mint flavor. Without it, the cheesecake will lack the distinctive minty taste. If you don’t have peppermint extract, you can use mint syrup or finely chopped fresh mint leaves.
Print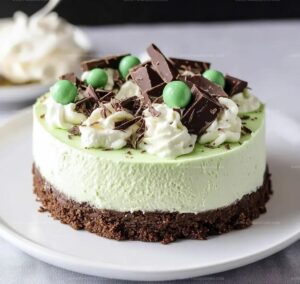
Mint Aero Cheesecake Recipe
- Total Time: 7 hours 30 minutes
- Yield: 12 1x
Description
Indulgent mint aero cheesecake delights dessert enthusiasts with creamy layers of chocolate and mint. Rich, velvety filling nestles atop a crumbly base, promising pure delight for chocolate lovers eager to savor each delectable bite.
Ingredients
Main Ingredients:
- 500 g (17.6 ounces) full-fat cream cheese, softened
- 300 ml (10.1 fluid ounces) double cream (heavy cream)
- 200 g (7.1 ounces) mint aero chocolate (or mint chocolate), chopped
Crust Ingredients:
- 250 g (8.8 ounces) dark chocolate digestive biscuits (or oreo cookies)
- 60 g (2.1 ounces) unsalted butter, melted
Topping and Flavoring Ingredients:
- 75 g (2.6 ounces) icing sugar (powdered sugar)
- 1 teaspoon peppermint extract
- Green food colouring gel
- 12 mint aero bubbles
- 100 ml (3.4 fluid ounces) double cream (heavy cream)
- 25 g (0.9 ounces) icing sugar (powdered sugar)
Instructions
- Prepare the foundation by pulverizing biscuits into fine, uniform crumbs using a food processor. Transfer crumbs to a mixing bowl and incorporate melted butter, stirring until the mixture resembles wet sand.
- Press the buttery crumb mixture firmly and evenly into an 8-inch springform pan, creating a compact base. Refrigerate for 60 minutes to set and solidify the crust.
- In a stand mixer, combine cream cheese, powdered sugar, peppermint extract, and heavy cream. Blend until silky and completely smooth, ensuring no lumps remain.
- Introduce a few drops of green food coloring gel to achieve a delicate mint-green hue. Taste and adjust peppermint intensity according to preference.
- Gently fold chopped Mint Aero chocolate into the creamy mixture, distributing pieces evenly throughout the filling.
- Carefully pour the mint-infused filling over the chilled crust, using an offset spatula to create a perfectly level surface.
- Refrigerate the cheesecake for a minimum of 6 hours, preferably overnight, to allow complete setting and flavor development.
- Before serving, whip remaining cream with powdered sugar until stiff, voluminous peaks form.
- Artfully pipe whipped cream across the cheesecake’s surface and garnish with scattered Mint Aero chocolate bubbles for a visually appealing finish.
Notes
- Customize the biscuit base by swapping digestive biscuits with gluten-free alternatives like almond or coconut flour cookies for a celiac-friendly version.
- Enhance the mint flavor by using fresh mint leaves or adding a splash of creme de menthe liqueur for a more intense, sophisticated taste.
- Control the sweetness by gradually adding icing sugar and tasting the filling, ensuring the perfect balance between the cream cheese and peppermint extract.
- Create a dairy-free option by substituting cream cheese with coconut cream and using vegan chocolate for a plant-based friendly dessert.
- Prep Time: 30 minutes
- Cook Time: 7 hours
- Category: Desserts
- Method: Chilling
- Cuisine: British
Nutrition
- Serving Size: 12
- Calories: 405
- Sugar: 25 g
- Sodium: 200 mg
- Fat: 28 g
- Saturated Fat: 17 g
- Unsaturated Fat: 8 g
- Trans Fat: 0 g
- Carbohydrates: 36 g
- Fiber: 1 g
- Protein: 4 g
- Cholesterol: 90 mg
Marcus Reed
Founder & Food Content Creator
Expertise
Single-recipe development, Seasonal and local ingredient utilization, Food photography and styling, Culinary writing and content creation
Education
Culinary Arts Certificate, Blue Ridge Community and Technical College, WV
Focus: Fundamentals of culinary techniques, emphasizing hands-on experience in small-scale kitchen settings.
Marcus’s story begins in Asheville, where good food and family kitchens shaped his earliest memories. After hands-on culinary training and a lot of trial (and a little error), he realized that real cooking isn’t about perfection, it’s about connection.
At Pan and Oven, Marcus crafts recipes that are easy to follow, packed with flavor, and built for real kitchens.