
Quick & Juicy Mac ‘n’ Cheese Burger Wrap Recipe for Dinner Fun
Comfort food meets pure indulgence in this mac ‘n’ cheese burger wrap that promises to tantalize your taste buds.
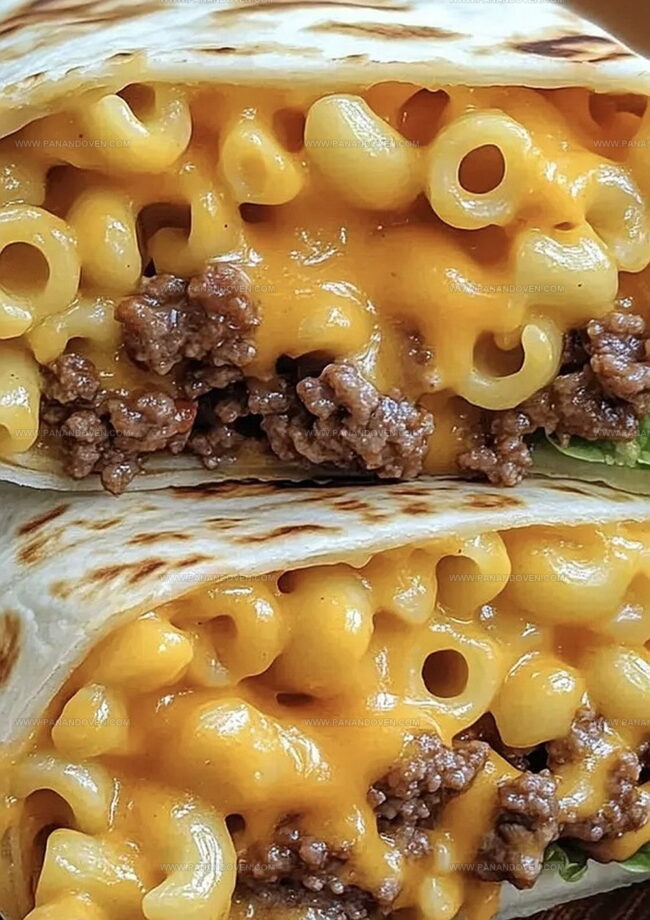
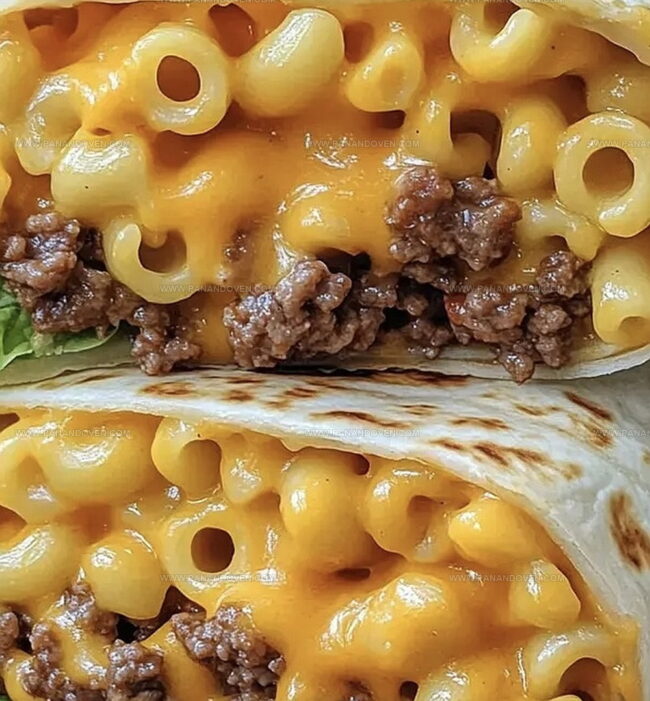
Creamy, cheesy macaroni blends seamlessly with juicy ground beef inside a warm tortilla.
Every bite delivers a delightful explosion of flavors and textures that will make your mouth water.
The classic mac ‘n’ cheese gets a delicious upgrade with this innovative twist on a beloved favorite.
Crispy edges and melted cheese create a mouthwatering experience you won’t forget.
Prepare to elevate your weeknight dinner with this simple yet spectacular recipe that transforms ordinary ingredients into an extraordinary meal.
Savor each delectable bite and watch as this wrap becomes an instant family favorite.
Mac and Cheese Burger Wrap Appeal
Burger Wrap Ingredient List
Main Ingredients:Optional Toppings:Seasoning and Binding:Tools for Easy Burger Wrap Assembly
Cooking Mac and Cheese Burger Wraps
Step 1: Brown Ground Beef
Heat a skillet over medium flame and cook ground beef until it turns completely brown.
Break up the meat with a wooden spoon while cooking to ensure even browning.
Once fully cooked, carefully drain any remaining grease from the skillet.
Step 2: Prepare Cheesy Macaroni Mixture
In a large mixing bowl, combine the following ingredients:Stir everything together until the ingredients are well blended and the cheese starts to melt slightly.
Step 3: Create Delicious Wrap Base
Grab a soft flour tortilla and lay it flat on a clean surface.
Spoon the hot beef and macaroni mixture directly into the center of the tortilla.
If desired, add fresh crisp lettuce leaves for extra crunch.
Step 4: Wrap Like a Pro
Carefully fold the bottom of the tortilla up towards the center.
Next, fold in both side edges to create a tight seal.
Roll the wrap from the bottom upward, ensuring all ingredients are securely tucked inside.
Step 5: Serve and Enjoy
Place the wrap on a cutting board and slice diagonally if you prefer smaller portions.
Serve immediately while the wrap is still warm and the cheese remains gooey.
Pair with a side of crispy chips or a fresh salad for a complete meal.
Burger Wrap Tips for Cheesy Goodness

Wrap Variations for Burger Fans
Serving Burger Wraps for Any Meal
Storing Mac and Cheese Wraps Right
FAQs
You’ll need ground beef, macaroni, cheddar cheese, tortillas, and optional lettuce. Basic pantry staples make this recipe easy to prepare.
Absolutely! While cheddar works great, you can experiment with monterey jack, pepper jack, or a cheese blend for different flavor profiles.
Yes, mac ‘n’ cheese and beef in a wrap create a fun, handheld meal that kids typically love. The combination is familiar and tasty for all ages.
Use lean ground beef, whole wheat tortillas, and add more vegetables like spinach or diced bell peppers to boost nutritional value.
Print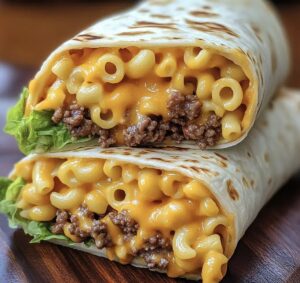
Mac ‘n’ Cheese Burger Wrap Recipe
- Total Time: 18 minutes
- Yield: 4 1x
Description
Savory mac ‘n’ cheese burger wrap combines comfort classics into one mouthwatering dish. Creamy pasta, juicy beef, and melted cheese create a satisfying meal packed with irresistible flavors you will crave.
Ingredients
Main Ingredients:
- 1 lb ground beef
- 2 cups macaroni, cooked
- 1 cup shredded cheddar cheese
Wrap Components:
- 4 large tortillas
Optional Garnish:
- Lettuce leaves
Instructions
- Sizzle the ground beef in a skillet over medium-high heat until thoroughly browned and no pink remains, approximately 6-8 minutes.
- Drain excess grease from the cooked meat, ensuring a lean and flavorful base for the wrap filling.
- Transfer the beef to a spacious mixing bowl and incorporate the pre-cooked macaroni and freshly shredded cheddar cheese, stirring until the ingredients are evenly integrated.
- Position a large tortilla on a clean surface and center a hearty portion of the beef, macaroni, and cheese mixture, leaving adequate space around the edges for folding.
- Optional: Layer crisp lettuce leaves atop the filling for added texture and freshness.
- Carefully fold the tortilla’s sides inward, then tightly roll the wrap to create a secure, compact package.
- Slice the wrap diagonally for easier handling and visual appeal, then serve immediately while the filling remains warm and the cheese is still melted.
Notes
- Customize Spice Level Adjust the heat by adding jalapeños or hot sauce to the beef mixture for those who enjoy a kick.
- Healthier Protein Swap ground beef with lean turkey or plant-based crumbles to reduce fat content and accommodate different dietary preferences.
- Gluten-Free Option Use gluten-free tortillas and pasta to make this recipe suitable for individuals with gluten sensitivities.
- Meal Prep Friendly Prepare the beef and mac ‘n’ cheese filling in advance and store separately in the refrigerator for quick assembly later, perfect for busy weeknights.
- Prep Time: 10 minutes
- Cook Time: 8 minutes
- Category: Lunch, Dinner, Snacks
- Method: Frying
- Cuisine: American
Nutrition
- Serving Size: 4
- Calories: 620
- Sugar: 3g
- Sodium: 800mg
- Fat: 32g
- Saturated Fat: 15g
- Unsaturated Fat: 12g
- Trans Fat: 1g
- Carbohydrates: 54g
- Fiber: 2g
- Protein: 30g
- Cholesterol: 80mg
Marcus Reed
Founder & Food Content Creator
Expertise
Single-recipe development, Seasonal and local ingredient utilization, Food photography and styling, Culinary writing and content creation
Education
Culinary Arts Certificate, Blue Ridge Community and Technical College, WV
Focus: Fundamentals of culinary techniques, emphasizing hands-on experience in small-scale kitchen settings.
Marcus’s story begins in Asheville, where good food and family kitchens shaped his earliest memories. After hands-on culinary training and a lot of trial (and a little error), he realized that real cooking isn’t about perfection, it’s about connection.
At Pan and Oven, Marcus crafts recipes that are easy to follow, packed with flavor, and built for real kitchens.