
The Sweet Magic of Kentucky Cream Pull Candy Recipe
Sweet memories of grandma’s kitchen come alive with this classic Kentucky cream pull candy recipe that generations have cherished.
The silky smooth confection whispers tales of traditional southern desserts.
Generations of candy makers have perfected this delightful treat passed down through family cookbooks.
Creamy, rich, and utterly irresistible, this candy demands patience and skill.
Sugar, cream, and a dash of love merge into a mesmerizing dance of texture and flavor.
Each pull stretches the candy into a delicate, glossy masterpiece that melts in your mouth.
Prepare to transform simple ingredients into a nostalgic confection that celebrates the art of candy making.
Why Kentucky Cream Pull Candy Has Southern Charm

What’s Needed for Cream Pull Candy Success
Base Ingredients:Liquid Ingredients:Flavoring Ingredient:Preparation Ingredient:Candy-Making Equipment Essentials
Step-by-Step Cream Pull Candy Creation
Step 1: Create Sugar Syrup
Blend sugar, salt, and boiling water in a large cooking pot.
Allow the mixture to reach a rolling boil, cover the pot, and let it simmer for 5 minutes.
Step 2: Introduce Cream
Remove the lid and adjust the heat to medium.
Position a candy thermometer inside the pot.
Gently incorporate cream without stirring.
Continue cooking until the temperature reaches 260F (127C).
Step 3: Transfer And Flavor
Remove the pot from heat and carefully pour the hot mixture onto a cold, buttered marble surface.
Sprinkle vanilla evenly across the candy.
Step 4: Manipulate Candy Surface
Carefully fold the edges toward the center and flip the candy to help it cool evenly.
Step 5: Stretch And Aerate
Once the candy is cool enough to handle safely, slice it in half.
Begin stretching and pulling the candy for 3-4 minutes until it becomes lighter in color and develops a glossy sheen.
Step 6: Form Candy Pieces
Transform the pulled candy into long, slender ropes.
Slice the ropes into bite-sized segments approximately 1.5 inches long.
Step 7: Rest And Develop
Delicately cover the candy pieces with a clean kitchen towel.
Allow the candies to rest overnight, enabling them to develop a creamy texture.
Candy Tips for Pulling Off Perfection
Flavorful Variations on Classic Pull Candy
Presenting Cream Pull Candy with Flair
Storage for Homemade Pull Candy
FAQs
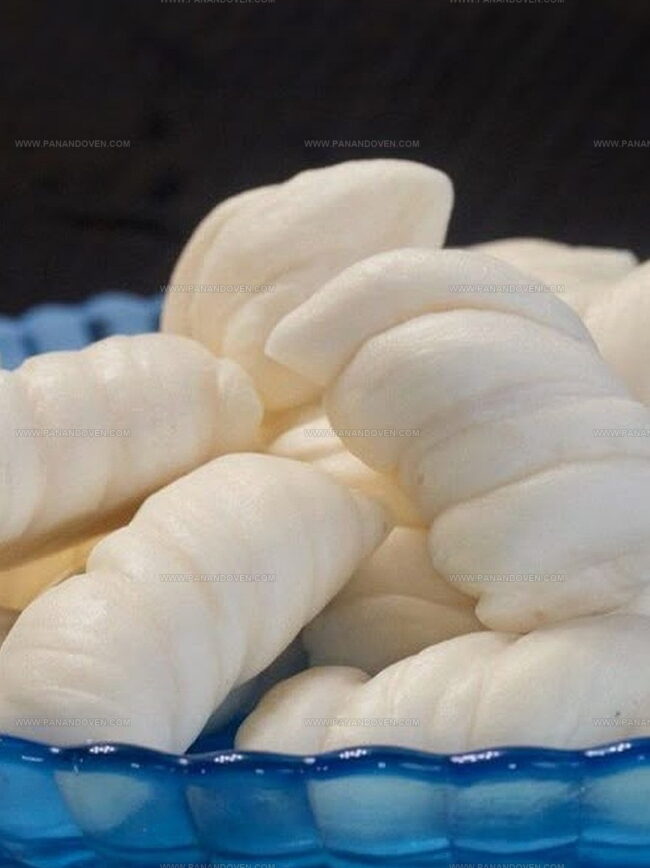
A traditional Kentucky confection made by pulling sugar, cream, and vanilla into a light, creamy, and glossy candy with a unique texture and sweet flavor.
You’ll need a candy thermometer and preferably a marble slab, but a well-buttered baking sheet can work as an alternative surface for cooling and pulling.
Pulling aerates the candy, making it lighter, smoother, and giving it a signature shiny appearance while creating a softer, creamier texture.
It requires some skill and patience, especially with temperature control and pulling technique, but is achievable with careful attention and practice.
Print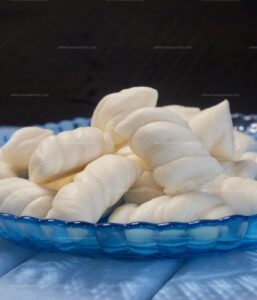
Kentucky Cream Pull Candy Recipe
- Total Time: 50 minutes
- Yield: 16 1x
Description
Kentucky cream pull candy celebrates the art of traditional confectionery with a delightful sweet treat. Generations of candy makers have perfected this classic recipe, offering a creamy, stretchy delight you’ll savor with each delectable bite.
Ingredients
Main Ingredients:
- 4 cups (800g) granulated sugar
- 1 cup (240 milliliters) boiling water
- 1 cup (240 milliliters) heavy whipping cream
Seasoning:
- 1/8 teaspoon salt
- 1 teaspoon pure vanilla extract
Preparation:
- 2 tablespoons butter, for greasing
Instructions
- In a large pot, combine sugar, salt, and boiling water. Bring the mixture to a rolling boil, cover, and simmer for 5 minutes.
- Remove the lid and reduce heat to medium. Attach a candy thermometer and gradually incorporate cream without stirring. Continue cooking until the temperature reaches precisely 260°F.
- Carefully transfer the molten mixture onto a chilled, buttered marble surface. Gracefully drizzle vanilla extract across the hot candy.
- Use a spatula to fold the edges toward the center, then gently flip the mass to distribute heat evenly and initiate cooling.
- Once the candy is comfortable to handle, divide it in half. Begin rhythmic pulling and stretching for 3-4 minutes until the texture transforms into a lighter, glossy consistency.
- Manipulate the pulled candy into elegant, elongated ropes. Slice these ropes into uniform 1½-inch segments using a sharp knife.
- Drape a pristine kitchen towel over the candy pieces, allowing them to rest and develop a creamy texture overnight.
Notes
- Choose a marble slab for the best heat distribution and smooth candy-making process.
- Invest in a reliable candy thermometer to achieve precise temperature control for perfect texture.
- Use unsalted butter when greasing the marble slab to prevent unwanted salt interference with the candy’s flavor.
- Work quickly during the pulling stage to prevent the candy from hardening before achieving the desired glossy appearance.
- Keep hands slightly buttered to prevent sticking and make pulling easier during the candy-making process.
- Store the finished candy in an airtight container at room temperature to maintain its creamy texture and prevent hardening.
- Avoid humid days for candy making, as moisture can affect the candy’s crystallization and final consistency.
- Prep Time: 20 minutes
- Cook Time: 30 minutes
- Category: Desserts, Snacks
- Method: Boiling
- Cuisine: American
Nutrition
- Serving Size: 16
- Calories: 170
- Sugar: 30g
- Sodium: 0.1mg
- Fat: 7g
- Saturated Fat: 4g
- Unsaturated Fat: 3g
- Trans Fat: 0g
- Carbohydrates: 26g
- Fiber: 0g
- Protein: 1g
- Cholesterol: 25mg
Marcus Reed
Founder & Food Content Creator
Expertise
Single-recipe development, Seasonal and local ingredient utilization, Food photography and styling, Culinary writing and content creation
Education
Culinary Arts Certificate, Blue Ridge Community and Technical College, WV
Focus: Fundamentals of culinary techniques, emphasizing hands-on experience in small-scale kitchen settings.
Marcus’s story begins in Asheville, where good food and family kitchens shaped his earliest memories. After hands-on culinary training and a lot of trial (and a little error), he realized that real cooking isn’t about perfection, it’s about connection.
At Pan and Oven, Marcus crafts recipes that are easy to follow, packed with flavor, and built for real kitchens.