
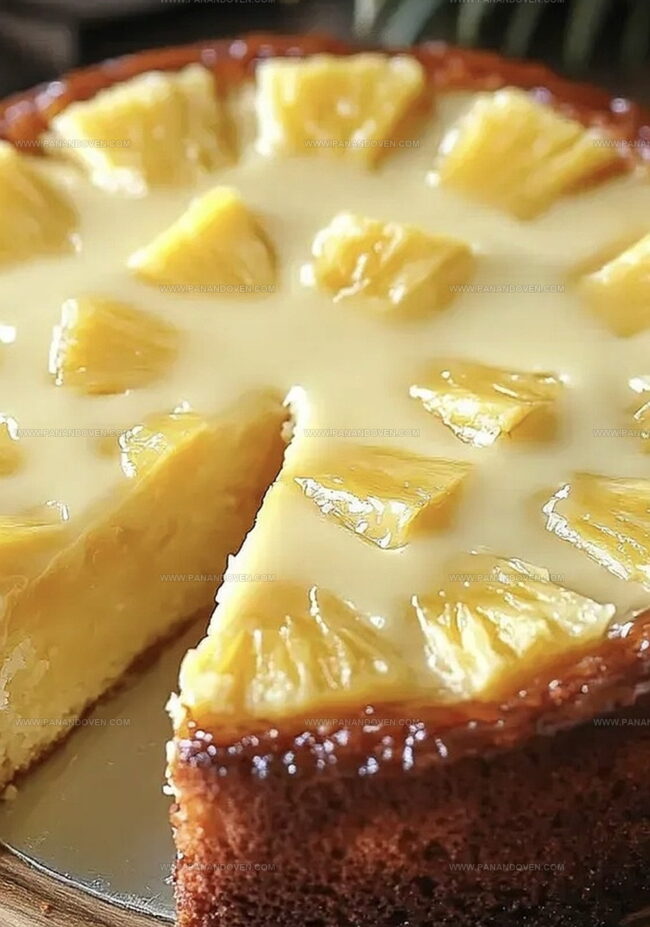
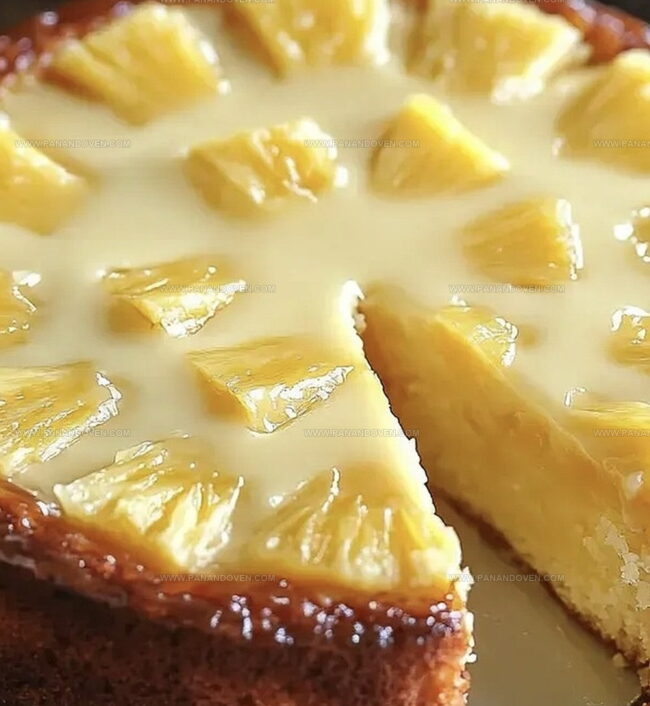
The Sunniest Juicy Pineapple Cake Recipe for Sweet Moments
Sweet summer memories dance through this mouthwatering pineapple cake recipe that brings tropical sunshine right to your plate.
Bursting with golden chunks of tangy pineapple, this delectable dessert promises pure delight in every bite.
Soft, moist layers blend tropical flavors with classic cake comfort, creating a treat that feels both familiar and exotic.
The pineapple weaves its magic through tender crumb, infusing each slice with bright, refreshing notes.
Delicate and rich, this cake transforms simple ingredients into a spectacular dessert that will have everyone asking for seconds.
Bake this crowd-pleasing creation and watch smiles bloom around your table.
Juicy Pineapple Cake Highlights
Must-Have Ingredients for Pineapple Cake
Cake Base Ingredients:Leavening and Seasoning:Moisture and Flavor Enhancers:Topping:Tools for Baking Juicy Pineapple Cake
Steps to Sweet Pineapple Cake Bliss
Step 1: Warm Up The Oven
Prepare your oven by heating it to 350F.
Grab an 8-inch round cake pan and coat it with butter and flour to prevent sticking.
Step 2: Create A Creamy Base
In a spacious mixing bowl, whip together butter and sugar until the mixture becomes fluffy and light, creating a smooth foundation for your cake.
Step 3: Introduce Eggs And Flavor
Add eggs one at a time, mixing thoroughly after each addition.
Blend in the vanilla extract to enhance the overall taste profile.
Step 4: Combine Dry Ingredients
In a separate bowl, gently whisk together:Ensure all dry ingredients are evenly mixed without any lumps.
Step 5: Merge Wet And Dry Mixtures
Gradually incorporate the dry ingredients into the wet mixture.
Alternate between adding dry ingredients and milk, starting and ending with the flour mixture.
This technique helps create a smooth, consistent batter.
Step 6: Welcome The Pineapple
Carefully fold in crushed pineapple and its juice, mixing just until combined.
Be gentle to maintain the cake’s delicate texture.
Step 7: Bake To Perfection
Pour the batter into the prepared pan, smoothing the top for an even surface.
Bake for 30-35 minutes.
Check doneness by inserting a toothpick – it should come out clean when the cake is ready.
Step 8: Craft A Luscious Glaze
While the cake bakes, prepare a glaze by mixing:Stir until the mixture becomes smooth and silky.
Step 9: Soak And Cool
Remove the cake from the oven and let it rest in the pan for 10 minutes.
Create small holes across the cake’s surface and pour the glaze over, allowing it to seep into every delicious crevice.
Step 10: Final Tropical Touch
Once completely cooled, garnish the top with fresh pineapple chunks, adding a burst of tropical brightness to your cake.
Tips for Moist Pineapple Cake
Pineapple Cake Flavor Twists to Try
How to Serve Pineapple Cake Anytime

Best Storage for Pineapple Cake Freshness

FAQs
Yes, canned crushed pineapple works perfectly. Just drain excess liquid before adding to ensure the right cake consistency.
You can substitute the all-purpose flour with a gluten-free flour blend, but the texture might slightly change. Add xanthan gum for better binding.
Insert a toothpick into the center of the cake. If it comes out clean with no wet batter, the cake is done. The top should also be golden brown and slightly springy when touched.
You can reduce sugar by 25%, but it might affect the cake’s moisture and texture. Consider using natural sweeteners like honey or maple syrup as alternatives.
Print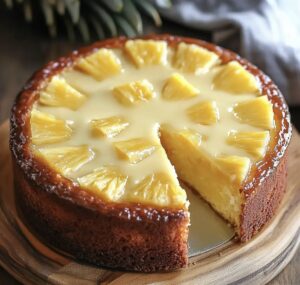
Juicy Pineapple Cake Recipe
- Total Time: 1 hour
- Yield: 8 1x
Description
Delightful pineapple cake embodies tropical sunshine with its moist crumb and tangy sweetness. Luscious layers combine fresh fruit and rich frosting for a memorable dessert that transports you to island paradise.
Ingredients
Main Ingredients:
- 1 1/2 cups (360 milliliters) all-purpose flour
- 3 large eggs
- 1 cup (200 grams) granulated sugar
- 1/2 cup (113 grams) unsalted butter, softened
- 1 cup crushed pineapple, drained
- 1/2 cup (120 milliliters) whole milk
Flavoring Ingredients:
- 1 teaspoon vanilla extract
- 1/2 cup (120 milliliters) pineapple juice
- 1/2 cup pineapple chunks (for topping)
Leavening and Seasoning Ingredients:
- 1 teaspoon baking powder
- 1/4 teaspoon salt
- 1/2 cup sweetened condensed milk (for glaze)
Instructions
- Prepare an 8-inch round cake pan by greasing and flouring the surface, then set the oven to 350F (175C) for optimal baking conditions.
- Using an electric mixer, whip butter and sugar together until the mixture becomes airy and pale, creating a smooth base for the cake.
- Incorporate eggs individually into the butter mixture, ensuring thorough blending after each addition. Introduce vanilla extract to enhance the flavor profile.
- In a separate mixing bowl, sift together flour, baking powder, and salt to eliminate potential lumps and ensure even distribution of dry ingredients.
- Gradually integrate the dry ingredient mixture into the wet ingredients, alternating with milk. Maintain a consistent folding technique to preserve the batter’s delicate texture.
- Gently fold crushed pineapple and its accompanying juice into the batter, maintaining a light touch to prevent overmixing.
- Transfer the batter to the prepared pan, smoothing the surface evenly. Bake for 30-35 minutes, checking doneness with a toothpick that should emerge clean when inserted.
- During baking, craft the glaze by whisking sweetened condensed milk with pineapple juice until achieving a silky, uniform consistency.
- Allow the cake to rest in the pan for 10 minutes after removing from the oven, then carefully create small holes across the surface for optimal glaze absorption.
- Drizzle the prepared glaze over the warm cake, ensuring it penetrates the entire dessert for maximum moisture and flavor.
- Once completely cooled, garnish the cake with fresh pineapple chunks to add a vibrant, tropical finishing touch.
Notes
- Choose ripe, fresh pineapple for the most intense tropical flavor and natural sweetness in your cake.
- Use room temperature eggs and butter to ensure smoother, more even cake batter and better incorporation of ingredients.
- For a gluten-free version, substitute all-purpose flour with almond flour or a gluten-free baking blend to accommodate dietary restrictions.
- To enhance moisture, drain pineapple chunks thoroughly but reserve the juice for adding extra flavor and preventing dryness in the cake.
- Prep Time: 25 minutes
- Cook Time: 35 minutes
- Category: Desserts
- Method: Baking
- Cuisine: American
Nutrition
- Serving Size: 8
- Calories: 280
- Sugar: 24 g
- Sodium: 160 mg
- Fat: 12 g
- Saturated Fat: 7 g
- Unsaturated Fat: 4 g
- Trans Fat: 0 g
- Carbohydrates: 39 g
- Fiber: 1 g
- Protein: 4 g
- Cholesterol: 70 mg
Marcus Reed
Founder & Food Content Creator
Expertise
Single-recipe development, Seasonal and local ingredient utilization, Food photography and styling, Culinary writing and content creation
Education
Culinary Arts Certificate, Blue Ridge Community and Technical College, WV
Focus: Fundamentals of culinary techniques, emphasizing hands-on experience in small-scale kitchen settings.
Marcus’s story begins in Asheville, where good food and family kitchens shaped his earliest memories. After hands-on culinary training and a lot of trial (and a little error), he realized that real cooking isn’t about perfection, it’s about connection.
At Pan and Oven, Marcus crafts recipes that are easy to follow, packed with flavor, and built for real kitchens.