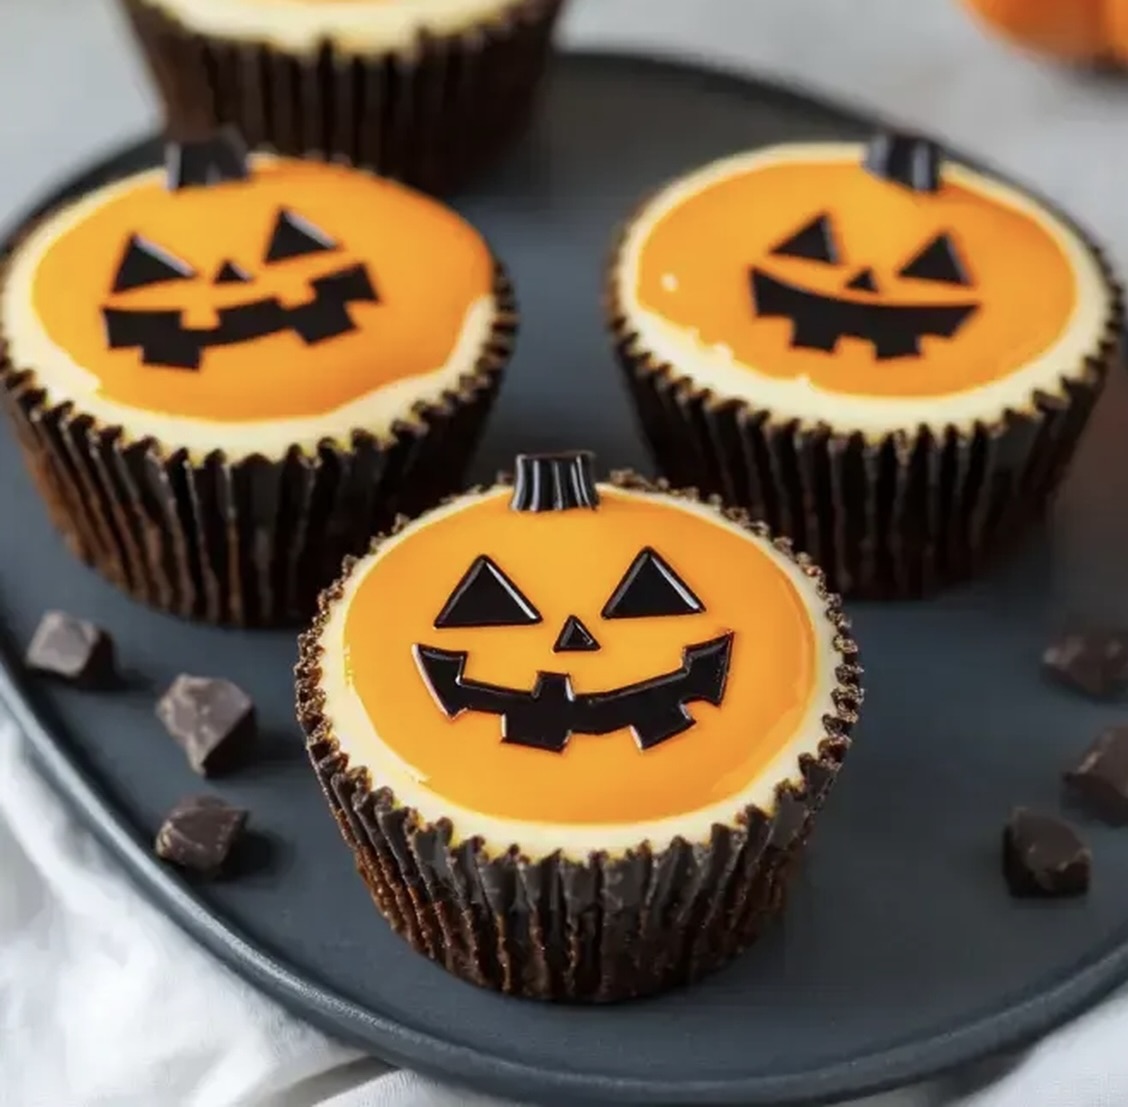
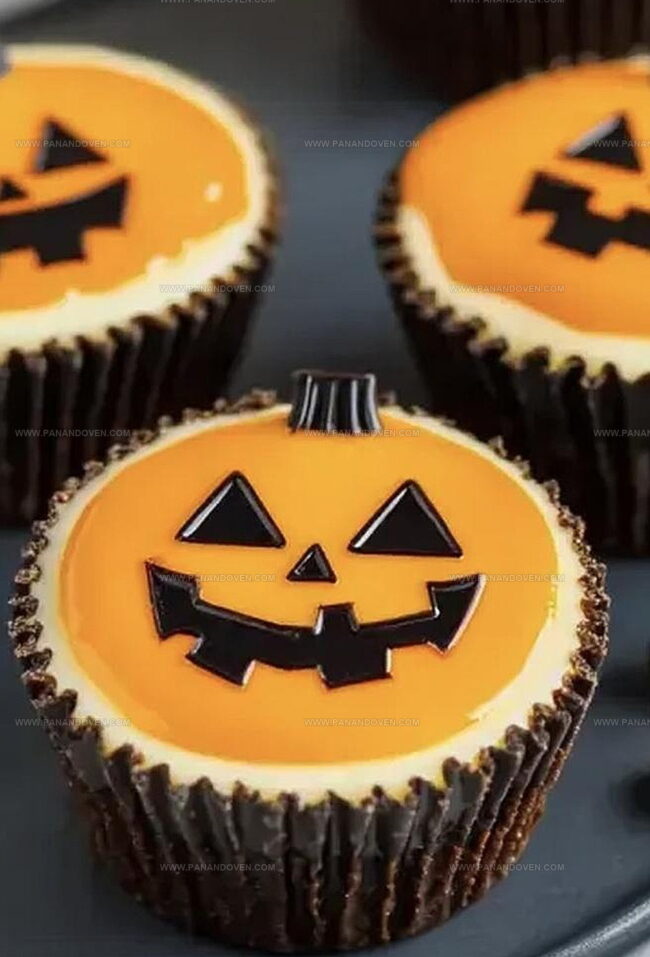
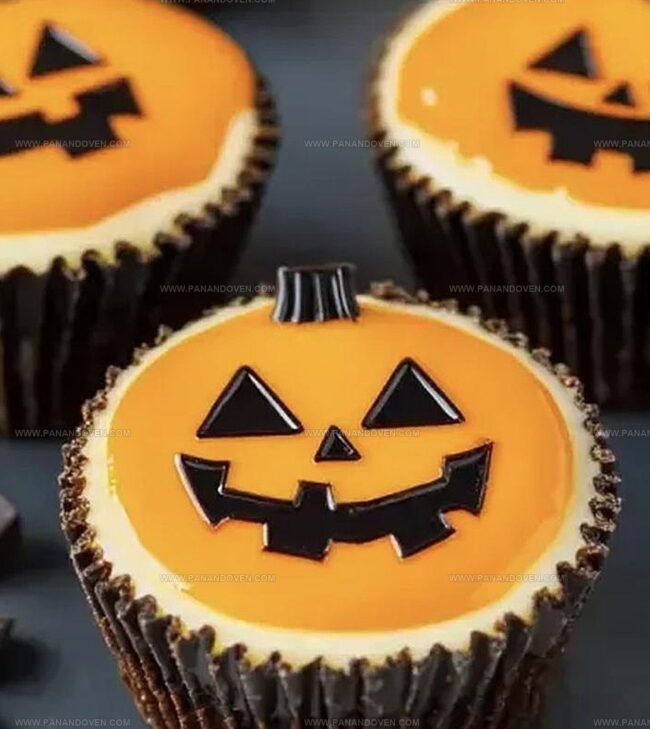
Spooky Jack-o’-Lantern Cheesecakes Recipe: Fun Halloween Treat
Spooky season calls for something wickedly delicious like these jack-o’-lantern cheesecakes that blend creamy textures with festive Halloween charm.
Pumpkin-inspired desserts always steal the show during autumn celebrations.
These individual treats capture the essence of October’s most playful holiday.
Sweet cream cheese mingles with warm spices, creating a dessert that looks as stunning as it tastes.
Adorable mini cheesecakes shaped like charming jack-o’-lanterns will delight guests of all ages.
Each bite promises a perfect balance of smooth cheesecake and seasonal spirit.
Prepare to become the star of any Halloween gathering with this show-stopping dessert.
Halloween Cheesecake Jack-o-Lanterns: The Fun Factor
Everything Needed for Halloween Cheesecake Faces
Tools for Festive Jack-o-Lantern Cheesecakes
How to Make Halloween Cheesecake Jack-o-Lanterns
Step 1: Craft Spooky Crust
Create a hauntingly delicious base by crushing Oreo cookies into fine crumbs.
Mix the crumbs with melted butter to form a dark, crumbly foundation.
Gently press the mixture into cupcake liners, creating a smooth bottom layer.
Pop the pan into the oven and bake briefly to set the crust.
Step 2: Whip Up Creamy Filling
In a large mixing bowl, blend the key ingredients for a silky smooth cheesecake filling:Ensure the mixture is completely smooth and free of any lumps.
Step 3: Paint with Festive Colors
Divide the cheesecake filling into three separate bowls.
Transform the mixture with Halloween-inspired hues:Step 4: Layer with Spooky Style
Carefully pour the colored fillings into the cupcake liners.
Start with the yellow layer, followed by the orange, and finish with the white layer.
This creates a gradient effect reminiscent of jack-o’-lantern colors.
Step 5: Bake to Perfection
Place the cupcake pan in the oven and bake until the cheesecakes are set but still slightly jiggly in the center.
Allow them to cool completely at room temperature.
Step 6: Crown with Ghostly Cream
Whip heavy cream with sugar until it forms stiff, billowing peaks.
Generously top each cheesecake with the ethereal white cream.
Step 7: Add Haunting Touches
Embellish your Halloween cheesecake mini-pies with:Serve and watch your guests be enchanted by these festive treats!
Tips for Decorating Spooky Cheesecakes
Unique Jack-o-Lantern Cheesecake Styles
Serving Suggestions for Halloween Cheesecakes
Storing Jack-o-Lantern Cheesecake Treats
FAQs
Carefully spoon each colored filling (yellow, orange, white) into the cupcake liners, ensuring clean and distinct layers by gently pouring each color and avoiding mixing.
Absolutely! You can experiment with traditional Halloween colors like green, purple, or black to create unique color combinations that match your festive mood.
Regular chocolate Oreo cookies are ideal, but you can also use golden Oreos or even themed Halloween Oreos for an extra festive touch to your cheesecake base.
Print
Jack-o’-Lantern Cheesecakes Recipe
- Total Time: 55 minutes
- Yield: 12 1x
Description
Spooky jack-o’-lantern cheesecakes bring Halloween spirit to dessert tables with adorable pumpkin-shaped treats. Creamy orange-tinted cheesecake nestles inside chocolate cookie crusts, delighting guests with festive seasonal charm.
Ingredients
Crust:
- 1 1/2 cups Oreo cookies, crushed
- 1/4 cup granulated sugar
- 6 tablespoons (90 milliliters) melted butter
Cheesecake Filling:
- 12 ounces (340 grams) cream cheese, softened
- 1/2 cup (100 grams) granulated sugar
- 2 tablespoons all-purpose flour
- 1/2 cup (120 milliliters) sour cream
- 1 teaspoon vanilla extract
- 2 large eggs
Topping and Decoration:
- 1 cup (240 milliliters) heavy cream
- 2 tablespoons (25 grams) granulated sugar
- Gel icing colors (yellow and orange)
- Optional: little ghost decorations
- Optional: candy corn
Instructions
- Prepare a cupcake pan by lining with festive paper liners and lightly coating with cooking spray to prevent sticking.
- Create a crumbly crust by pulverizing Oreo cookies with sugar and melted butter, then distribute evenly across the liners. Briefly bake at 350°F for 5 minutes to set the base.
- In a large mixing bowl, blend cream cheese until smooth, gradually incorporating sugar, flour, sour cream, vanilla extract, and eggs until the mixture becomes silky and uniform.
- Divide the cheesecake batter into three separate bowls, using food coloring to transform one portion into vibrant yellow, another into rich orange, while leaving the third portion pristine white.
- Carefully layer the colored batters into each cupcake liner, starting with yellow at the bottom, followed by orange, and topped with the white layer to create a gradient effect.
- Bake the mini cheesecakes in a preheated oven at 325°F for approximately 20 minutes, ensuring the centers are just set but still slightly jiggly.
- Allow the cheesecakes to cool completely at room temperature, then refrigerate for at least 2 hours to firm up.
- Whip heavy cream with sugar until it forms stiff, billowy peaks, then generously pipe or spread the cream atop each cheesecake.
- Add playful Halloween-themed decorations like candy corn or spooky ghost sprinkles to complete the festive jack-o’-lantern-inspired desserts.
Notes
- Choose high-quality cream cheese at room temperature for smoother, creamier filling without lumps.
- Gently fold eggs into cheesecake mixture to prevent over-mixing and maintain light, fluffy texture.
- Use gel food coloring instead of liquid for vibrant Halloween colors without altering batter consistency.
- Consider using parchment paper liners for easier removal and cleaner presentation of individual cheesecakes.
- Prep Time: 30 minutes
- Cook Time: 25 minutes
- Category: Desserts, Snacks
- Method: Baking
- Cuisine: American
Nutrition
- Serving Size: 12
- Calories: 404
- Sugar: 22 g
- Sodium: 300 mg
- Fat: 30 g
- Saturated Fat: 18 g
- Unsaturated Fat: 10 g
- Trans Fat: 0 g
- Carbohydrates: 31 g
- Fiber: 1 g
- Protein: 5 g
- Cholesterol: 105 mg
Marcus Reed
Founder & Food Content Creator
Expertise
Single-recipe development, Seasonal and local ingredient utilization, Food photography and styling, Culinary writing and content creation
Education
Culinary Arts Certificate, Blue Ridge Community and Technical College, WV
Focus: Fundamentals of culinary techniques, emphasizing hands-on experience in small-scale kitchen settings.
Marcus’s story begins in Asheville, where good food and family kitchens shaped his earliest memories. After hands-on culinary training and a lot of trial (and a little error), he realized that real cooking isn’t about perfection, it’s about connection.
At Pan and Oven, Marcus crafts recipes that are easy to follow, packed with flavor, and built for real kitchens.