
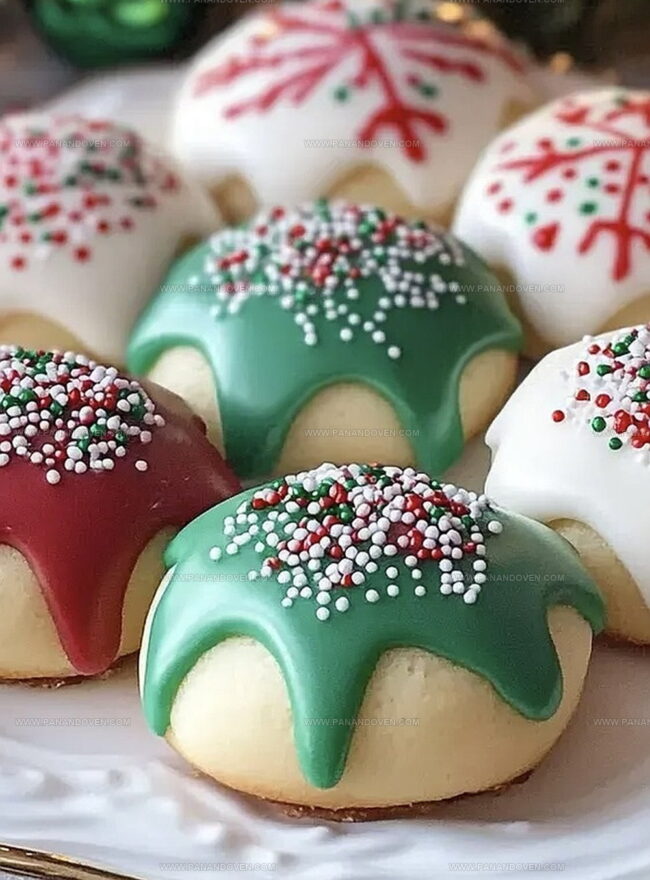
Jolly Italian Christmas Cookies Recipe for Sweet Holiday Magic
Festive baking takes a delightful turn with these authentic Italian Christmas cookies that blend tradition and sweetness.
Generations of Italian families have cherished this treasured recipe passed down through decades.
Crisp edges and soft centers define these delectable treats that melt in your mouth.
Each bite carries a whisper of nostalgia and warm holiday memories.
The simple ingredients come together effortlessly, creating a magical blend of flavors.
These cookies promise to become your new holiday favorite, filling your kitchen with warmth and irresistible aromas.
Serve them alongside espresso or share them with loved ones for a truly memorable Christmas celebration.
Italian Christmas Cookie Joys
Italian Cookie Ingredient Guide

Tools for Italian Cookies
Steps for Italian Cookies

Step 1: Warm Up The Oven
Prepare your kitchen by heating the oven to a cozy 350F (175C).
Grab a baking sheet and line it with parchment paper for easy cookie removal.
Step 2: Whip Butter And Sugar
Grab a spacious mixing bowl and blend softened butter with sugar until the mixture becomes light and airy.
The goal is to create a fluffy, creamy base that will make your cookies irresistibly tender.
Step 3: Blend Wet Ingredients
Introduce these ingredients to your butter mixture:Stir everything together until the ingredients are harmoniously combined.
Step 4: Mix Dry Components
In a separate bowl, combine:Gently fold the dry ingredients into the wet mixture, creating a soft, cohesive dough.
Step 5: Shape Cookie Delights
Roll the dough into adorable little balls, each about the size of a small walnut.
Arrange these cookie gems on your prepared baking sheet, leaving some breathing room between each one.
Step 6: Bake To Perfection
Slide the baking sheet into the preheated oven.
Let the cookies transform into golden-edged treats in about 10-12 minutes.
Once done, let them rest on the baking sheet briefly before transferring to a cooling rack.
Step 7: Craft Festive Icing
In a medium bowl, blend powdered sugar with milk (or water) until you achieve a smooth, spreadable consistency.
Feel free to divide the icing and add vibrant food coloring for a playful touch.
Step 8: Decorate With Joy
Once cookies have completely cooled, dip their tops into the colorful icing.
Sprinkle with festive decorations to add that extra spark of holiday cheer.
Allow the icing to set before serving these delightful treats.
Italian Cookie Pro Tips

Italian Cookie Variations
Serving Italian Christmas Cookies
Storing Holiday Cookies Tips
FAQs
Yes, these cookies have roots in traditional Italian holiday baking, particularly popular in regions like Sicily and southern Italy during Christmas celebrations.
Absolutely! You can omit the almond extract or substitute it with vanilla extract for a similar flavor profile.
Chill the dough for 30 minutes before rolling and baking. This helps the cookies maintain their shape and prevents excessive spreading.
Use festive holiday sprinkles like nonpareils, sanding sugar, or colored sugar crystals. Choose colors that match the Christmas theme for a more traditional look.
Print
Italian Christmas Cookies Recipe
- Total Time: 37 minutes
- Yield: 24 1x
Description
Festive Italian Christmas Cookies showcase traditional holiday sweetness from Naples. Powdered sugar-dusted treats bring family memories and delightful flavors you’ll cherish during seasonal celebrations.
Ingredients
Main Ingredients:
- 3 cups (720 ml) all-purpose flour
- 1 cup (240 ml) sugar
- 1 cup (240 ml) butter (softened)
- 3 large eggs
- 1 tablespoon baking powder
- 1/2 teaspoon salt
Flavor Enhancers:
- 1 teaspoon vanilla extract
- 1 teaspoon almond extract
- 1/2 teaspoon grated lemon zest (optional)
Glaze and Decoration:
- 2 cups (480 ml) powdered sugar
- 2–3 tablespoons milk (or water)
- 1 teaspoon vanilla extract
- Food coloring (red, green, or any festive colors)
- Sprinkles (for decoration)
Instructions
- Prepare the oven at 350F (175C) and line baking sheets with parchment paper for even baking and easy cookie removal.
- Whip softened butter and sugar in a large mixing bowl until the mixture becomes airy and pale, creating a smooth base for the cookies.
- Incorporate eggs, vanilla extract, almond extract, and lemon zest into the butter mixture, blending thoroughly to distribute flavors evenly.
- Sift flour, baking powder, and salt in a separate bowl, then gradually fold these dry ingredients into the wet mixture until a cohesive dough forms.
- Shape the dough into small, uniform balls approximately 1 inch in diameter, placing them carefully on prepared baking sheets with sufficient spacing.
- Slide the baking sheets into the preheated oven and bake for 10-12 minutes, watching for delicate golden edges as an indicator of doneness.
- Transfer cookies to wire cooling racks, allowing them to rest and firm up completely before decorating.
- Craft a smooth icing by whisking powdered sugar with milk, adjusting liquid to achieve desired consistency and separating into different bowls.
- Embellish cooled cookies by dipping tops into colored icing and sprinkling with festive decorations, then permit icing to set before serving.
Notes
- Choose room temperature butter for smoother creaming and better cookie texture, ensuring even mixing without lumps.
- Sift dry ingredients to prevent clumping and create a lighter, more uniform cookie consistency.
- Use gel food coloring for vibrant icing colors that won’t thin out the glaze, giving a more professional decorative finish.
- Store cookies in an airtight container with parchment between layers to maintain freshness and prevent sticking for up to 5 days.
- Prep Time: 25 minutes
- Cook Time: 12 minutes
- Category: Desserts, Snacks
- Method: Baking
- Cuisine: Italian
Nutrition
- Serving Size: 24
- Calories: 180
- Sugar: 12 g
- Sodium: 70 mg
- Fat: 8 g
- Saturated Fat: 5 g
- Unsaturated Fat: 2 g
- Trans Fat: 0 g
- Carbohydrates: 25 g
- Fiber: 0.5 g
- Protein: 2 g
- Cholesterol: 40 mg
Marcus Reed
Founder & Food Content Creator
Expertise
Single-recipe development, Seasonal and local ingredient utilization, Food photography and styling, Culinary writing and content creation
Education
Culinary Arts Certificate, Blue Ridge Community and Technical College, WV
Focus: Fundamentals of culinary techniques, emphasizing hands-on experience in small-scale kitchen settings.
Marcus’s story begins in Asheville, where good food and family kitchens shaped his earliest memories. After hands-on culinary training and a lot of trial (and a little error), he realized that real cooking isn’t about perfection, it’s about connection.
At Pan and Oven, Marcus crafts recipes that are easy to follow, packed with flavor, and built for real kitchens.