
Irresistible Homemade Cronuts Recipe: Sweet Morning Magic
Sweet-toothed pastry enthusiasts go crazy for this irresistible homemade cronuts recipe that bridges the delectable gap between donuts and croissants.
Flaky, golden layers merge with decadent sugary notes in a culinary creation that melts in your mouth.
Perfecting this trendy dessert requires patience and precise technique.
Professional bakers and home cooks alike adore these buttery, crisp pastries that sparkle with a delicate sugar coating.
Each bite delivers a symphony of textures – crisp exterior giving way to soft, airy interior.
The magic happens through careful lamination and strategic folding of rich, yeasted dough.
This recipe transforms ordinary ingredients into an extraordinary treat that will have everyone asking for seconds.
Prepare to elevate your baking skills and become the star of any gathering with these show-stopping cronuts.
Homemade Cronuts The Secret to Bakery-Style Goodness
Gather Ingredients for Flaky Cronuts at Home
Main Ingredients:Liquid Ingredients:Frying and Finishing Ingredients:Optional Filling Ingredients:Tools for Crisp and Airy Homemade Cronuts
Directions for Crafting Cronuts from Scratch

Step 1: Kickstart The Yeast Magic
Grab a small bowl and gently dissolve yeast in warm milk.
Let it hang out for about 5 minutes until it becomes wonderfully foamy and alive.
Step 2: Create Dough Foundation
In a large mixing bowl, bring together:Toss in cold butter cubes and work them into the dry ingredients until the mixture looks like rough, crumbly breadcrumbs.
Step 3: Blend And Develop Dough
Pour in the yeast mixture, crack in an egg, and add a splash of vanilla extract.
Mix everything until a soft, supple dough forms.
Transfer to a lightly floured surface and knead lovingly for 5-7 minutes until smooth and elastic.
Step 4: Chill Dough
Wrap the dough in plastic wrap like a cozy blanket and let it rest in the refrigerator for at least 1 hour.
This helps develop incredible flavor and texture.
Step 5: Layer And Fold
Roll out the chilled dough into a beautiful rectangle.
Fold it like a business letter, then roll out again.
Repeat this folding dance 3 times to create those dreamy, flaky layers.
Step 6: Shape And Proof
Use a round cutter to transform the dough into perfect circular shapes.
Cover and let them rise for 30 minutes, allowing them to become puffy and light.
Step 7: Fry To Golden Perfection
Heat oil in a pot to 350F.
Carefully lower cronuts into the hot oil, frying in small batches for 2-3 minutes per side until they turn a gorgeous golden brown.
Drain on paper towels to remove excess oil.
Step 8: Final Touches
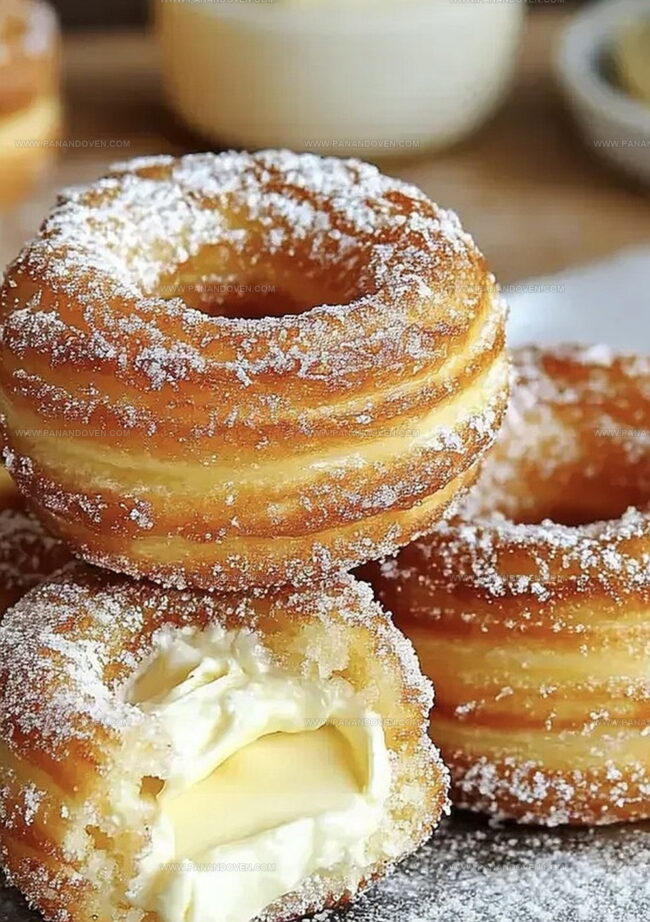
While still warm, roll the cronuts in sugar for a sweet crunch.
Use a piping bag to fill each cronut with luscious pastry cream or fluffy whipped cream.
Tips for Perfectly Flaky Cronuts Every Time
Flavor Ideas for Changing Up Your Cronuts
How to Present Cronuts for Breakfast or Dessert
Storing Cronuts to Keep Them Fresh
FAQs
The laminating technique of repeatedly folding and rolling the dough creates those signature buttery, flaky layers. By folding the dough like a letter and rolling it out multiple times, you’re creating thin alternating layers of butter and dough.
Chilling helps solidify the butter and relax the gluten, which prevents the dough from shrinking during rolling and ensures a tender, flaky texture. Cold dough is also easier to handle and roll out smoothly.
When you dissolve yeast in warm milk, it should become foamy and bubbly within 5 minutes. If the mixture doesn’t foam, your yeast might be old or the milk was too hot or cold.
Print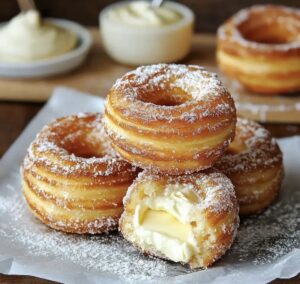
Irresistible Homemade Cronuts Recipe
- Total Time: 1 hour 55 minutes
- Yield: 12 1x
Description
Cronut magic combines French pastry techniques with American doughnut creativity in this incredible recipe. Sweet layers of buttery, laminated dough create a delightful dessert you’ll crave again and again.
Ingredients
Main Ingredients:
- 2 cups all-purpose flour
- 1/2 cup unsalted butter, cold and cubed
- 1 cup pastry cream or whipped cream
- 2 cups vegetable oil for frying
Dry Ingredients:
- 1/4 cup sugar
- 1 teaspoon salt
- 1 packet active dry yeast (2 1/4 teaspoons)
- 1/2 cup sugar for coating
Wet Ingredients:
- 1/2 cup milk, warmed
- 1 egg
- 1 teaspoon vanilla extract
- 1 tablespoon vanilla extract
Instructions
- Awaken the yeast by whisking it into lukewarm milk, allowing the mixture to bloom and become frothy for approximately 5 minutes.
- Create a foundational blend by combining flour, sugar, and salt in a spacious mixing vessel. Incorporate cold butter cubes, slicing them into the dry ingredients until the texture mimics coarse, crumbly terrain.
- Transform the mixture by introducing the activated yeast liquid, egg, and vanilla extract. Gently amalgamate until a supple dough emerges, then transfer to a lightly dusted work surface. Knead rhythmically for 5-7 minutes, developing a smooth, elastic consistency.
- Encase the dough in plastic wrap and nestle in the refrigerator for a minimum of 1 hour, allowing it to solidify and develop complex flavor profiles.
- Unleash the lamination technique by rolling the chilled dough into a rectangular shape. Execute a precise tri-fold reminiscent of a business letter, then roll out again. Repeat this folding choreography three times to construct delicate, flaky layers.
- Sculpt circular shapes using a round cutter, then allow the dough to rest and expand, covered, for 30 minutes to achieve optimal volume.
- Prepare a deep pot of oil, heating to precisely 350F (175C). Gently submerge cronuts in small batches, frying for 2-3 minutes per side until achieving a radiant golden hue. Transfer to absorbent paper towels to eliminate excess oil.
- While still warm, coat the cronuts in a delicate sugar dusting. Employ a piping bag to generously fill each pastry with luxurious pastry cream or ethereal whipped cream.
Notes
- Use lukewarm milk to activate yeast perfectly, ensuring it’s not too hot or cold which can kill or slow down the yeast’s growth.
- Chill butter and flour mixture thoroughly to create those signature flaky, layered cronut textures similar to croissant pastry.
- Handle dough gently during folding to maintain delicate air pockets that create the signature light, airy interior.
- Maintain consistent oil temperature around 350F while frying to prevent greasy or unevenly cooked cronuts.
- Prep Time: 1 hour 45 minutes
- Cook Time: 10 minutes
- Category: Breakfast, Snacks, Desserts
- Method: Frying
- Cuisine: French
Nutrition
- Serving Size: 12
- Calories: 350
- Sugar: 20 g
- Sodium: 200 mg
- Fat: 25 g
- Saturated Fat: 15 g
- Unsaturated Fat: 8 g
- Trans Fat: 0 g
- Carbohydrates: 30 g
- Fiber: 1 g
- Protein: 4 g
- Cholesterol: 40 mg
Marcus Reed
Founder & Food Content Creator
Expertise
Single-recipe development, Seasonal and local ingredient utilization, Food photography and styling, Culinary writing and content creation
Education
Culinary Arts Certificate, Blue Ridge Community and Technical College, WV
Focus: Fundamentals of culinary techniques, emphasizing hands-on experience in small-scale kitchen settings.
Marcus’s story begins in Asheville, where good food and family kitchens shaped his earliest memories. After hands-on culinary training and a lot of trial (and a little error), he realized that real cooking isn’t about perfection, it’s about connection.
At Pan and Oven, Marcus crafts recipes that are easy to follow, packed with flavor, and built for real kitchens.