
Heavenly Hawaiian Roll Garlic Bread Recipe for Cozy Gatherings
Soft, pillowy Hawaiian roll garlic bread beckons with irresistible aromas that fill your kitchen.
These delectable rolls blend sweet Hawaiian bread with savory garlic goodness.
Each bite promises a mouthwatering experience that elevates simple side dishes.
The recipe combines rich butter, minced garlic, and herbs into a simple yet incredible creation.
Melted cheese adds a decadent touch that makes these rolls impossible to resist.
Crispy edges and a tender center create a perfect balance of textures.
You’ll want to serve these alongside pasta, soups, or enjoy them as a standalone snack that sparks joy at any gathering.
Hawaiian Roll Garlic Bread: Why It’s So Irresistible

What You’ll Need for Hawaiian Roll Garlic Bread
Rolls:Cheese:Flavor Enhancers:Kitchen Must-Haves for Garlic Bread Perfection
How to Prepare Hawaiian Roll Garlic Bread

Step 1: Fire Up The Oven
Crank the oven to a toasty 400F (200C) and get ready for some serious garlic bread magic.
Step 2: Arrange Slider Rolls
Gently nestle those fluffy Hawaiian rolls into a spacious 9 x 13-inch baking dish.
Step 3: Create Cheese Pockets
Carefully slice two strategic slits into each roll, cutting about one-third deep without slicing completely through.
Step 4: Cheese Stuffing
Generously tuck shredded Mozzarella into those delightful little pockets you’ve just created.
Step 5: Whip Up Flavor Explosion
In a small mixing bowl, transform melted butter into a flavor powerhouse by blending:Step 6: Lavish With Butter Goodness
Drizzle and spread the zesty butter mixture across the tops of the rolls, ensuring every inch gets some love.
Step 7: Bake To Perfection
Slide the baking dish into the preheated oven and let the rolls transform for 9 to 11 minutes until the cheese melts and edges turn a gorgeous golden brown.
Step 8: Serve And Devour
Pull out these irresistible garlic bread sliders while they’re hot and watch them disappear in moments.
Tips for the Most Flavorful Garlic Bread Rolls
Flavor Options for Hawaiian Roll Garlic Bread
Best Dishes to Pair with Hawaiian Roll Garlic Bread
Keeping Hawaiian Roll Garlic Bread Soft and Fresh
FAQs
Yes, you can substitute Mozzarella with cheddar, provolone, or monterey jack cheese for different flavor profiles.
Cover the baking dish with foil for the first 5-6 minutes of baking to keep the rolls moist and prevent excessive browning.
Add red pepper flakes or a dash of cayenne pepper to the butter mixture to give the garlic bread a spicy kick.
You can assemble the rolls with cheese and butter mixture up to 4 hours in advance, then refrigerate and bake just before serving.
Print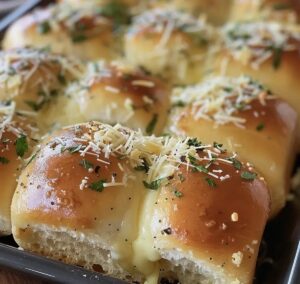
Hawaiian Roll Garlic Bread Recipe
- Total Time: 25 minutes
- Yield: 12 1x
Description
Savory Hawaiian Roll Garlic Bread delights with buttery, cheesy goodness and zesty garlic flavors. Golden-brown edges and melted cheese make this side dish irresistible for home cooks seeking a quick, delicious accompaniment.
Ingredients
Main Ingredients:
- 12 Hawaiian slider rolls
- 1 cup (237 ml) mozzarella cheese
- 1/2 cup (113 g) butter, softened
Seasoning Ingredients:
- 2 teaspoons minced garlic
- 1 teaspoon garlic powder
- 1 teaspoon parsley
- 1/2 teaspoon sea salt
Cheese Topping:
- 1 tablespoon grated Parmesan cheese
Instructions
- Preheat the oven to 400°F (200°C), ensuring the rack is positioned in the center for even heating.
- Arrange Hawaiian slider rolls compactly in a 9 x 13-inch baking dish, keeping them close together.
- Create strategic diagonal cuts approximately one-third deep into each roll’s surface, being careful not to slice completely through.
- Carefully nestle shredded Mozzarella cheese into the prepared slits, distributing evenly across the rolls.
- Melt butter in a mixing bowl, then incorporate garlic powder, finely chopped parsley, sea salt, minced garlic, and grated Parmesan cheese, stirring until thoroughly combined.
- Generously drizzle and brush the aromatic butter mixture over the rolls, ensuring complete and uniform coverage.
- Transfer the prepared dish to the preheated oven and bake for 9-11 minutes, watching for golden-brown edges and fully melted cheese.
- Remove from oven and let rest for 2-3 minutes to allow cheese to set, then serve immediately while warm and fragrant.
Notes
- Experiment with different cheese varieties like sharp cheddar or Swiss for unique flavor profiles.
- Create a gluten-free version by using gluten-free Hawaiian rolls or making your own alternative bread base.
- Customize the herb blend by adding dried oregano or basil to enhance the aromatic complexity of the garlic butter.
- Prevent over-browning by tenting the rolls with aluminum foil if they start to darken too quickly during baking.
- Prep Time: 15 minutes
- Cook Time: 10 minutes
- Category: Appetizer, Snacks, Dinner
- Method: Baking
- Cuisine: Hawaiian
Nutrition
- Serving Size: 12
- Calories: 210
- Sugar: 1 g
- Sodium: 300 mg
- Fat: 16 g
- Saturated Fat: 10 g
- Unsaturated Fat: 4 g
- Trans Fat: 0 g
- Carbohydrates: 18 g
- Fiber: 0 g
- Protein: 3 g
- Cholesterol: 30 mg
Marcus Reed
Founder & Food Content Creator
Expertise
Single-recipe development, Seasonal and local ingredient utilization, Food photography and styling, Culinary writing and content creation
Education
Culinary Arts Certificate, Blue Ridge Community and Technical College, WV
Focus: Fundamentals of culinary techniques, emphasizing hands-on experience in small-scale kitchen settings.
Marcus’s story begins in Asheville, where good food and family kitchens shaped his earliest memories. After hands-on culinary training and a lot of trial (and a little error), he realized that real cooking isn’t about perfection, it’s about connection.
At Pan and Oven, Marcus crafts recipes that are easy to follow, packed with flavor, and built for real kitchens.