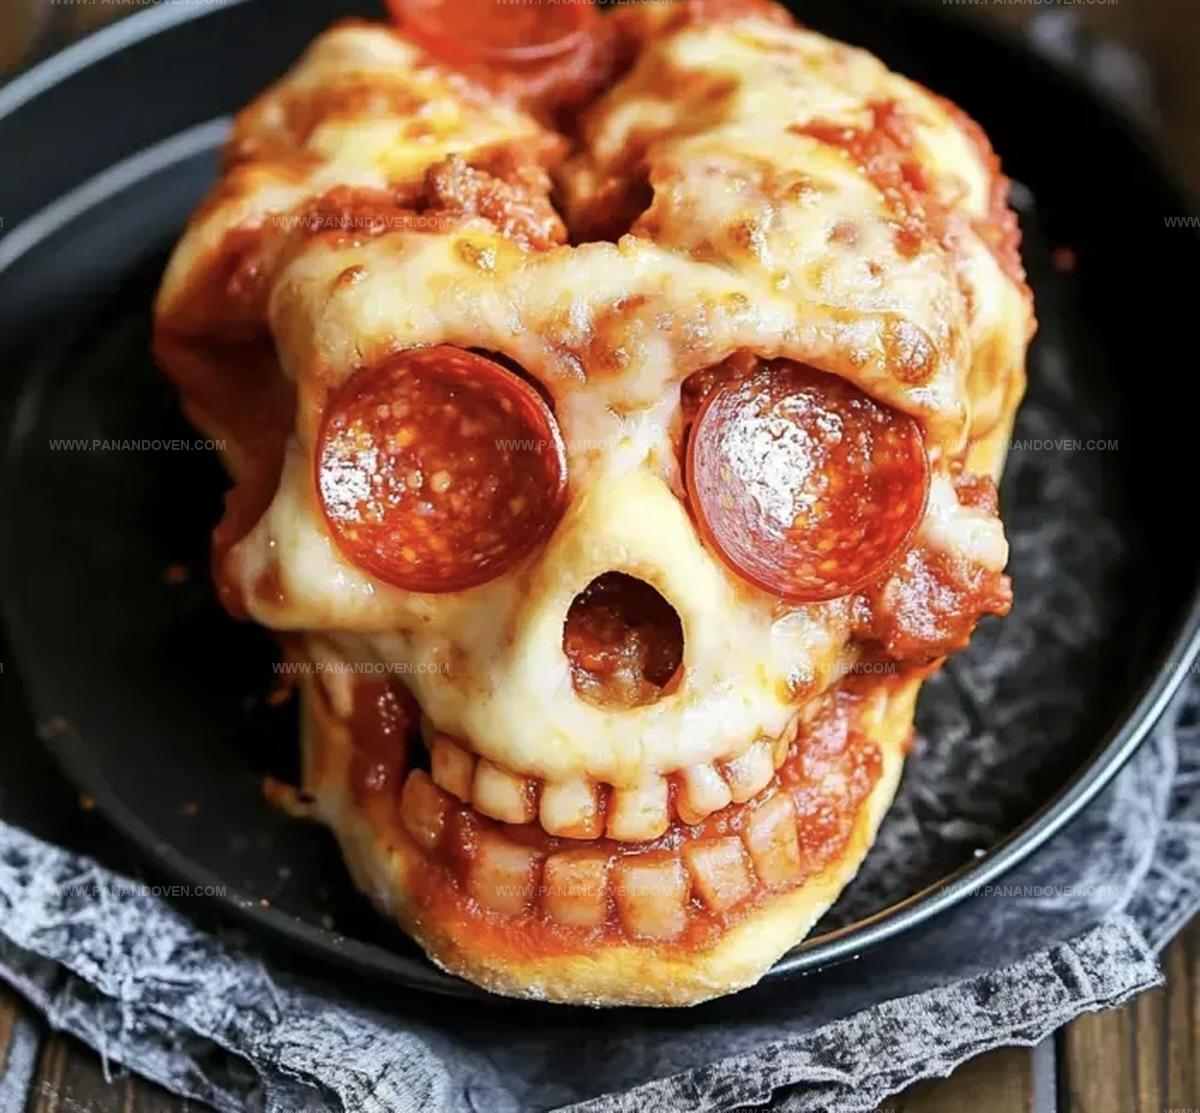
Spooky & Fun Halloween Pizza Skulls Recipe for Party Thrills
Creepy culinary magic meets cheesy Halloween pizza skulls that will send shivers down your spine.
Ghoulish gatherings demand killer appetizers that spark conversation and delight.
These spine-chilling pizza creations combine classic comfort with eerie Halloween spirit.
Crafted with simple ingredients, you can quickly assemble these delightful skull-shaped treats.
Cheese melts into haunting patterns while crispy edges promise a satisfying crunch.
Each bite delivers a playful twist on traditional pizza that transforms your meal into a festive experience.
Prepare to wow your guests with these wickedly delicious Halloween pizza skulls that are sure to become a seasonal sensation.
Why Halloween Pizza Skulls Steal the Show
Pizza Skull Ingredient Checklist
Pizza Base:Cheese and Sauce:Meat Toppings:Equipment for Crafting Pizza Skulls
Making Halloween Pizza Skulls Easily
Step 1: Warm Up the Oven
Crank the oven to a toasty 375°F.
Grab a skull-shaped cake pan and give it a quick spray with cooking oil to prevent sticking.
Step 2: Stretch the Dough
Take out the chilled pizza dough and roll it into a generous rectangle.
Slice the dough into six even strips, preparing for some spooky pizza magic.
Step 3: Dress the Skull Cavities
Carefully drape each dough strip into the skull-shaped pan, pressing and stretching to cover every nook and cranny of the mold.
Step 4: Layer the Cheesy Base
Create a delicious foundation by sprinkling:into the bottom of each skull cavity.
Step 5: Add Haunting Toppings
Sprinkle in some creepy-delicious ingredients:Spread these over the sauce layer to create a frightfully tasty filling.
Step 6: Seal the Spooky Surprise
Top with another layer of mozzarella cheese.
Fold the dough over the filling, pinching and pressing the edges to create a completely sealed skull pocket.
Step 7: Bake to Perfection
Slide the pan into the preheated oven.
Bake for 18 to 20 minutes until the dough turns a gorgeous golden brown and looks completely cooked through.
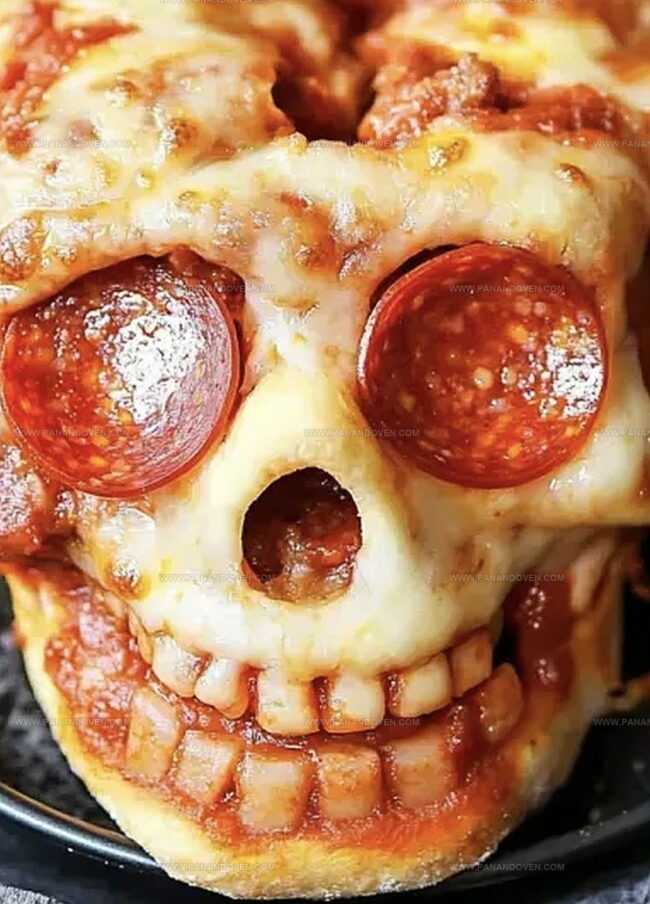
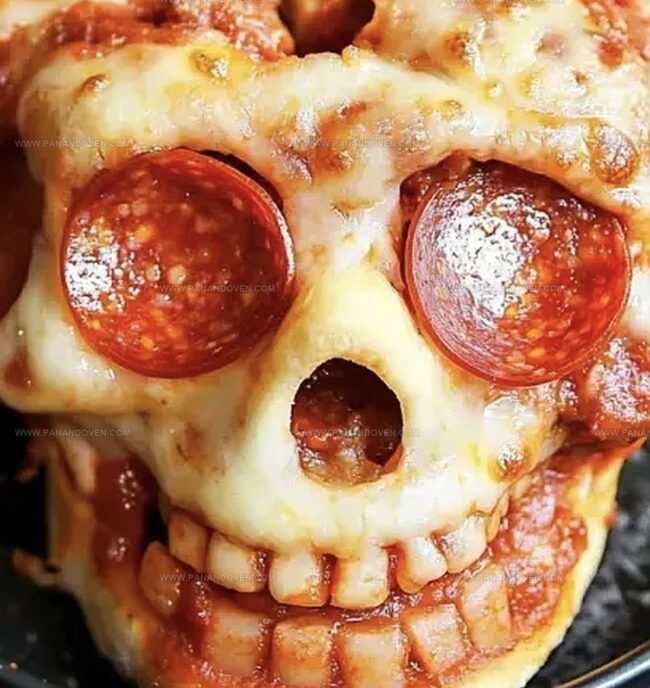
Step 8: Serve the Scary Treats
Allow the pizza skulls to cool for a few minutes.
Carefully remove them from the pan and get ready to devour these ghoulishly good Halloween treats!
Tips for Golden Pizza Skulls
Fun Variations for Pizza Skulls
Serving Pizza Skulls for Parties

Storing Pizza Skulls for Future Fun

FAQs
You’ll need a skull-shaped cake pan, which is essential for creating the unique skull design. A rolling pin helps press the pizza dough, and basic kitchen tools like a knife for cutting pepperoni and a baking spray will complete your setup.
Absolutely! Replace the pepperoni and Italian sausage with vegetarian alternatives like chopped bell peppers, mushrooms, or plant-based meat substitutes. The core technique remains the same, allowing you to customize the filling.
This recipe is beginner-friendly and requires basic cooking skills. The most challenging part is draping the dough into the skull pan, but with patience, anyone can master it.
Print
Halloween Pizza Skulls Recipe
- Total Time: 35 minutes
- Yield: 4 1x
Description
Spooky halloween pizza skulls showcase macabre culinary creativity with ghoulish cheese and pepper designs. Meat lovers and vegetarian guests will devour these frighteningly delicious party treats that bring ghoulish fun to seasonal gatherings.
Ingredients
Main Ingredients:
- 1 (13.8 ounces / 391 grams) can refrigerated pizza dough
- 1 1/2 cups shredded mozzarella cheese
- 24 slices pepperoni, chopped
Meat Ingredients:
- 1/4 cup cooked and crumbled Italian sausage
Sauce Ingredient:
- 6 tablespoons pizza sauce
Instructions
- Prepare the oven by heating to 375°F and coat a skull-shaped cake pan with cooking spray.
- Roll out pizza dough into a 15×10-inch rectangle and slice into 6 equal strips.
- Carefully arrange each dough strip inside the skull pan cavities, ensuring complete coverage of sides and bottom.
- Layer the bottom of each cavity with shredded mozzarella cheese as a base.
- Spread pizza sauce over the cheese layer in each skull cavity.
- Distribute chopped pepperoni slices and crumbled Italian sausage evenly across the sauce.
- Top the meat with additional mozzarella cheese to create a rich filling.
- Fold dough edges over the filling, pressing and sealing the seams completely to prevent leakage.
- Transfer the skull pan to the preheated oven and bake for 18-20 minutes until the dough turns golden brown and crispy.
- Remove from oven and allow pizza skulls to rest for 2-3 minutes before carefully extracting from the pan.
- Plate the Halloween pizza skulls and serve immediately while hot and fresh.
Notes
- Customize Toppings Swap pepperoni and sausage with vegetarian alternatives like roasted bell peppers, mushrooms, or plant-based protein crumbles for dietary flexibility.
- Perfect Dough Stretch ensure pizza dough covers entire skull cavity completely, preventing sauce and cheese leakage during baking.
- Cheese Hack Use a blend of mozzarella and provolone for enhanced melting and deeper flavor profile in your pizza skulls.
- Gluten-Free Option Replace traditional pizza dough with gluten-free pre-made dough or cauliflower crust for individuals with wheat sensitivities.
- Prep Time: 15 minutes
- Cook Time: 20 minutes
- Category: Dinner, Snacks
- Method: Baking
- Cuisine: American
Nutrition
- Serving Size: 4
- Calories: 370
- Sugar: 2 g
- Sodium: 860 mg
- Fat: 20 g
- Saturated Fat: 9 g
- Unsaturated Fat: 8 g
- Trans Fat: 0 g
- Carbohydrates: 30 g
- Fiber: 1 g
- Protein: 17 g
- Cholesterol: 40 mg
Marcus Reed
Founder & Food Content Creator
Expertise
Single-recipe development, Seasonal and local ingredient utilization, Food photography and styling, Culinary writing and content creation
Education
Culinary Arts Certificate, Blue Ridge Community and Technical College, WV
Focus: Fundamentals of culinary techniques, emphasizing hands-on experience in small-scale kitchen settings.
Marcus’s story begins in Asheville, where good food and family kitchens shaped his earliest memories. After hands-on culinary training and a lot of trial (and a little error), he realized that real cooking isn’t about perfection, it’s about connection.
At Pan and Oven, Marcus crafts recipes that are easy to follow, packed with flavor, and built for real kitchens.