Spooky Halloween Cookies Recipe: Sweet Treats for Ghostly Fun
Spooky season calls for delightful Halloween cookies that will enchant every sweet tooth at your festive gathering.
These creepy-cute treats blend classic sugar cookie magic with playful decorative twists.
Dark chocolate and vibrant orange icing create spine-tingling designs perfect for haunting dessert tables.
Rich buttery dough provides the ideal canvas for spooky shapes like bats, ghosts, and pumpkins.
Delicate frosting techniques and edible decorations bring each cookie to life with ghoulish charm.
Cookie enthusiasts and Halloween lovers will adore these wickedly delicious nibbles that transform ordinary baking into a celebration of seasonal fun.
Unleash your inner pastry artist and craft a batch of memorable Halloween treats that will delight guests of all ages.
Hocus Pocus Cookie Fun Features

Ingredients for Hocus Pocus Cookies
Cookie Tools for Magic Bakes
Steps for Hocus Pocus Cookies
Step 1: Warm Up the Oven
Get your baking space ready by heating the oven to 350F.
Line a cookie sheet with parchment paper or a non-stick silicone baking mat for easy cleanup.
Step 2: Sort Halloween Colors
Separate the magical M&M’s in Halloween colors:Place these colorful candies in a small bowl for later decoration.
Step 3: Create Dry Magic Mixture
In a mixing bowl, sift together the magical dry ingredients:Ensure everything is well combined and lump-free.
Step 4: Whip Up Creamy Base
Use an electric mixer to cream together:Mix until the mixture becomes light and fluffy.
Step 5: Blend Wet Ingredients
Add to the creamy mixture:Continue mixing until everything is smoothly combined.
Step 6: Merge Magical Mixtures
Gradually add the dry ingredients to the wet ingredients.
Mix until a consistent dough forms.
Step 7: Sprinkle Colorful Candies
Stir half of the sorted M&M’s into the cookie dough, distributing them evenly.
Step 8: Shape Enchanted Cookies
Roll the dough into balls about 2 inches in size.
Press the remaining M&M’s onto the surface of each dough ball.
Step 9: Bake to Perfection
Place the cookie dough balls on the prepared sheet.
Bake for 9-11 minutes at 350F.
After baking, let cookies cool slightly on the sheet before transferring to a wire rack.
Step 10: Prepare Magical Frosting
Scoop white frosting into a microwave-safe bowl.
Heat for 15 seconds to soften.
Step 11: Create Spooky Green Frosting
Add neon green gel food coloring to the frosting.
Stir until the frosting turns a bright, eerie green.
Step 12: Inject Mysterious Filling
Fill a flavor injector with the green frosting.
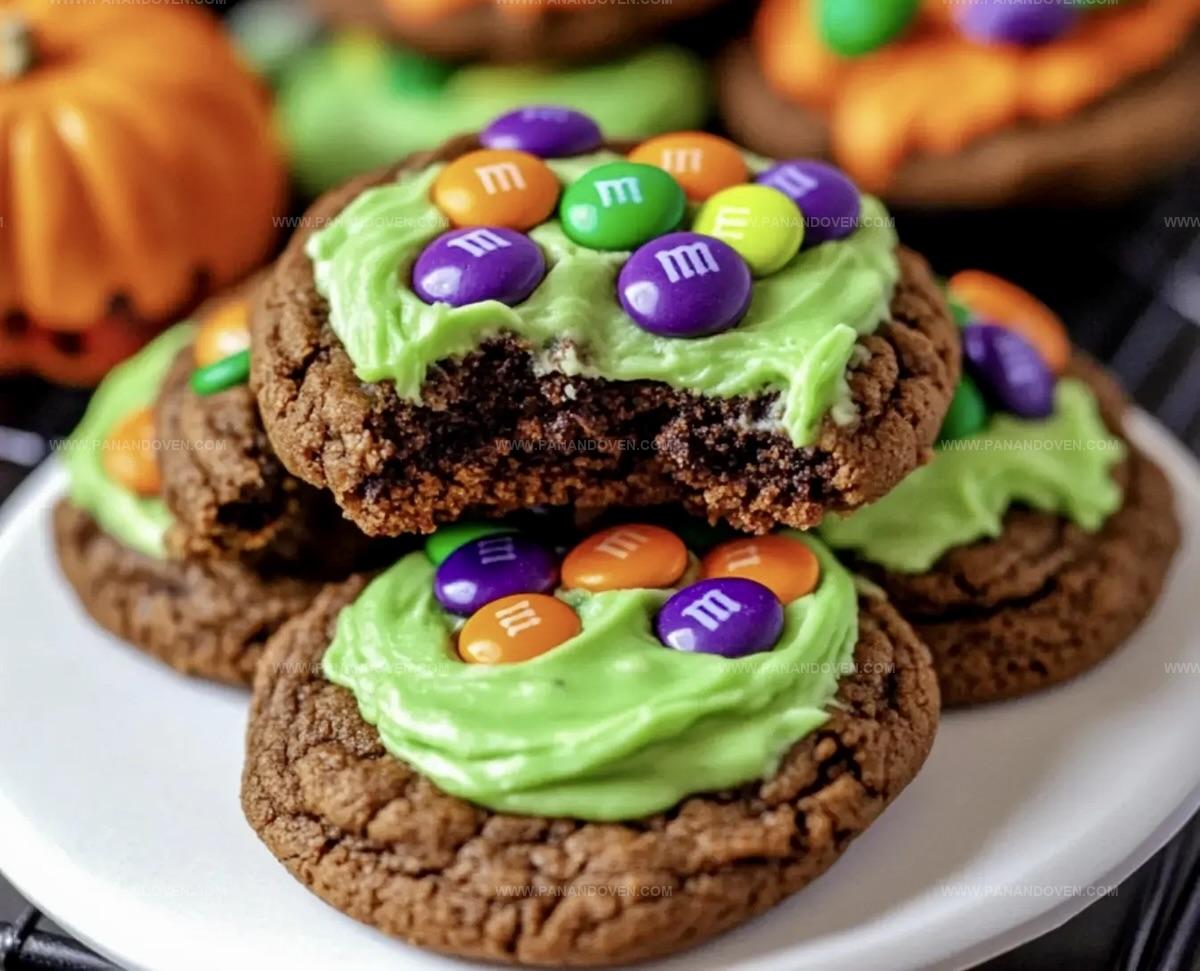
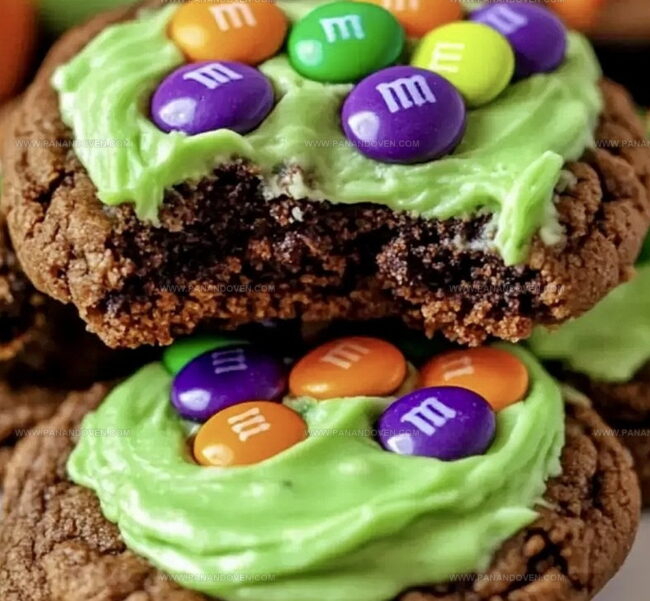
Carefully inject frosting into the cookies from the side, creating slight cracks on the cookie tops.
Repeat for all cookies.
Baking Tips for Cookie Magic

Hocus Pocus Cookie Switch-Ups
Hocus Pocus Cookie Serving Tips

Spooky Serving Magic: Creative Halloween Cookie Presentation
Cookie Storage You Can Trust

FAQs

The key ingredients include flour, cocoa powder, butter, sugar, brown sugar, eggs, vanilla extract, and colorful M&M’s in orange, green, and purple colors. The recipe also uses white frosting and neon green gel food coloring for a magical touch.
Injecting frosting creates a fun, surprise element inside the cookies. When you bite into the cookie, the green frosting oozes out, making it look like a spooky Halloween treat with a magical twist.
While the recipe suggests using orange, green, and purple M&M’s for a Halloween theme, you can certainly use other colors.
Print
Halloween Cookies Recipe
- Total Time: 35 minutes
- Yield: 24 1x
Description
Spooky halloween cookies bring festive spirit to seasonal celebrations. Cookie crafting becomes a delightful experience when bakers combine playful design with delicious ingredients you’ll enjoy creating and sharing.
Ingredients
Main Ingredients:
- 1 cup (226 grams) sweet cream unsalted butter
- 2 large eggs
- 2.25 cups (270 grams) all-purpose flour
- 0.67 cup (50 grams) unsweetened cocoa powder
Sweeteners:
- 0.75 cup (150 grams) sugar
- 0.67 cup (145 grams) packed brown sugar
Finishing and Decoration:
- 1 teaspoon vanilla extract
- 1 teaspoon baking soda
- 0.25 teaspoon salt
- 16 ounces (454 grams) white frosting
- 5 drops neon green gel food coloring
- M&M candies (orange, green, and purple)
Instructions
- Prepare the workspace by positioning an oven rack in the center and heating to 350°F. Line a baking sheet with parchment paper or silicone mat.
- Organize M&M’s by separating orange, green, and purple colors into a small dish for later decoration.
- Sift flour, baking soda, salt, and cocoa powder together in a medium mixing bowl, ensuring smooth incorporation of dry ingredients.
- Using an electric mixer, cream butter with white and brown sugars until light and fluffy, creating a smooth base.
- Incorporate eggs and vanilla extract into the butter mixture, blending thoroughly until fully integrated.
- Gradually fold dry ingredients into wet ingredients, mixing until a uniform cookie dough forms.
- Gently fold half of the sorted M&M’s into the prepared cookie dough, distributing evenly.
- Shape dough into uniform 2-inch balls, strategically pressing remaining M&M’s onto the exterior of each cookie sphere.
- Arrange cookie dough balls on prepared baking sheet, leaving space between each. Bake for 9-11 minutes until edges are set but centers remain slightly soft.
- Allow cookies to rest on baking sheet for 3-4 minutes before transferring to a wire cooling rack.
- Microwave white frosting for 15 seconds to achieve a soft, spreadable consistency.
- Add neon green gel food coloring to frosting, mixing until achieving a vibrant green hue.
- Load green frosting into a flavor injector, carefully inserting into cookie sides until slight surface cracking occurs, repeating for each cookie.
Notes
- Customize M&M’s Selection get creative by mixing different colored M&M’s for unique Halloween or seasonal variations.
- Make Ahead Prepare cookie dough in advance and refrigerate for up to 3 days to enhance flavor development and convenience.
- Gluten-Free Option substitute all-purpose flour with a gluten-free blend to accommodate dietary restrictions without compromising taste.
- Temperature Control allow cookies to cool slightly on the baking sheet to prevent breaking, ensuring perfect texture and shape.
- Prep Time: 25 minutes
- Cook Time: 10 minutes
- Category: Desserts, Snacks
- Method: Baking
- Cuisine: American
Nutrition
- Serving Size: 24
- Calories: 182
- Sugar: 10 g
- Sodium: 100 mg
- Fat: 8 g
- Saturated Fat: 5 g
- Unsaturated Fat: 3 g
- Trans Fat: 0 g
- Carbohydrates: 26 g
- Fiber: 1 g
- Protein: 2 g
- Cholesterol: 30 mg
Marcus Reed
Founder & Food Content Creator
Expertise
Single-recipe development, Seasonal and local ingredient utilization, Food photography and styling, Culinary writing and content creation
Education
Culinary Arts Certificate, Blue Ridge Community and Technical College, WV
Focus: Fundamentals of culinary techniques, emphasizing hands-on experience in small-scale kitchen settings.
Marcus’s story begins in Asheville, where good food and family kitchens shaped his earliest memories. After hands-on culinary training and a lot of trial (and a little error), he realized that real cooking isn’t about perfection, it’s about connection.
At Pan and Oven, Marcus crafts recipes that are easy to follow, packed with flavor, and built for real kitchens.