
Spooky & Sweet Halloween Brownies Recipe for Festive Treats
Chocolate lovers rejoice as these decadent Halloween brownies bring spooky sweetness to your dessert table.
Dark, rich, and wonderfully festive, these treats combine classic brownie magic with seasonal charm.
The fudgy base provides a perfect canvas for creative Halloween decorations.
Creepy sprinkles, candy corn, and orange-tinted frosting turn ordinary brownies into a haunting delight.
Guests will be enchanted by the playful Halloween twist on this beloved dessert.
These brownies promise to cast a delicious spell at any Halloween gathering.
Prepare to indulge in a wickedly good chocolate experience that captures the spirit of the season.
Gooey Halloween Brownies That Steal the Spotlight
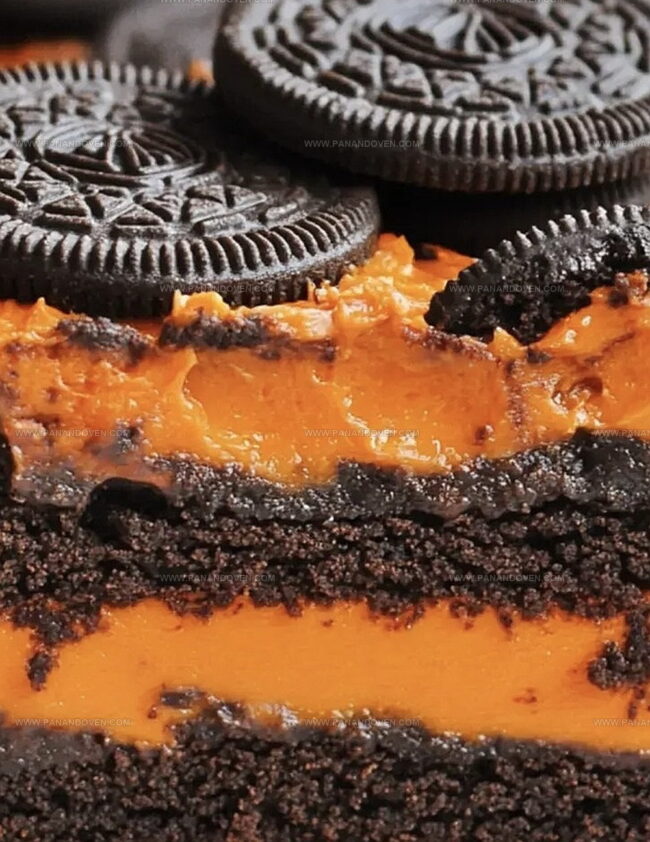
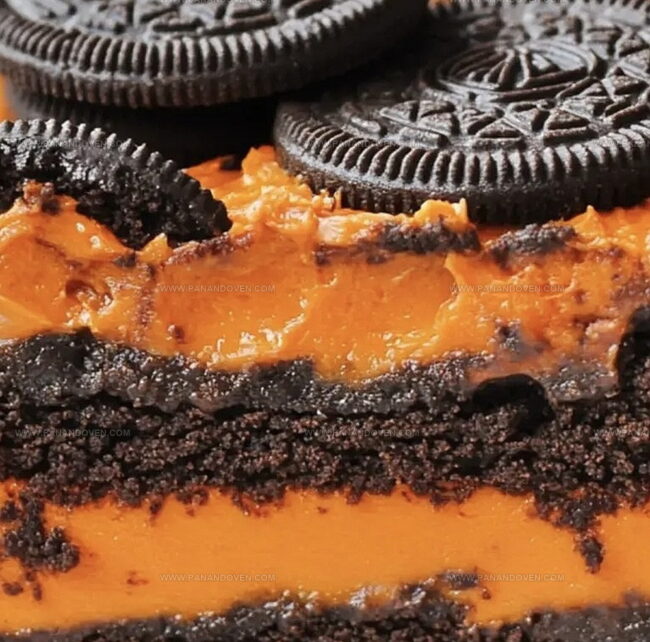
Ingredients for Festive Oreo Halloween Brownies

Tools to Layer Brownies Like a Pro
Easy Steps to Festive Halloween Oreo Brownies
Step 1: Warm Up the Oven
Crank up your oven to 350F (175C).
Grab a 9×9-inch baking pan and line it with parchment paper, making sure the paper covers the bottom and sides completely.
Step 2: Create Brownie Base
In a large mixing bowl, whisk together:Blend everything until the mixture looks smooth and chocolate-rich.
Step 3: Build the Cookie Layer
Pour the brownie batter into the prepared pan.
Carefully place Oreo cookies across the surface, gently pressing them into the batter so they’re slightly embedded.
Step 4: Bake to Perfection
Slide the pan into the preheated oven.
Bake for 25-30 minutes.
Check doneness by inserting a toothpick into the center – it should come out mostly clean with a few moist crumbs.
Step 5: Craft Spooky Orange Frosting
While brownies cool, create the Halloween-themed frosting:Mix these ingredients until you achieve a vibrant orange color.
Step 6: Frost and Chill
Spread the orange frosting evenly across the cooled brownies.
Place the pan in the refrigerator for 30 minutes to help the frosting set.
Step 7: Final Frightful Touches
Drizzle milk chocolate frosting over the orange layer.
Crumble remaining Oreos and sprinkle them on top for a festive, crumbly decoration.
Step 8: Slice and Serve
Cut the brownies into 3×2-inch squares.
Serve these spine-chilling treats at your Halloween gathering!
Brownie Tips for Rich, Fudgy Halloween Layers
Creative Oreo Brownie Ideas for More Fun
Halloween Brownie Serving Suggestions for Parties
Storing Brownies to Keep Them Chewy and Moist
FAQs
Yes, you can substitute Oreos with similar chocolate sandwich cookies or any Halloween-themed cookies available.
Insert a toothpick into the center of the brownies. If it comes out with a few moist crumbs but no wet batter, the brownies are done.
You can use regular liquid food coloring or mix yellow and red food coloring to create orange. Start with small amounts and adjust until you get the desired shade.
Absolutely! You can prepare these brownies a day in advance and store them in an airtight container in the refrigerator until ready to serve.
Print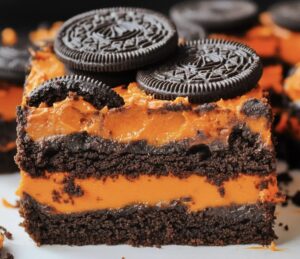
Halloween Brownies Recipe
- Total Time: 50 minutes
- Yield: 12 1x
Description
Spooky halloween brownies deliver a haunting chocolate experience with creepy decorative elements. Chocolate lovers will delight in this festive dessert that combines rich flavor and playful Halloween spirit.
Ingredients
Main Ingredients:
- 1 brownie mix
- 2 eggs
- 1/3 cup (79 ml) oil
- 1/3 cup (79 ml) milk
- 1 package of Oreo’s with orange filling
Frosting and Decoration:
- 1 can milk chocolate frosting
- 1 can white or vanilla frosting
- Orange food coloring gel
Instructions
- Prepare the oven at 350°F (175°C) and line a 9×9-inch baking pan with parchment paper, ensuring complete coverage of the bottom and sides.
- In a large mixing bowl, thoroughly combine brownie mix, eggs, oil, and milk until the batter achieves a smooth, consistent texture without lumps.
- Gently transfer the brownie mixture into the prepared pan, creating an even layer across the surface.
- Carefully arrange whole Oreo cookies atop the batter, lightly pressing them to partially submerge into the mixture.
- Place the pan in the preheated oven and bake for 25-30 minutes, checking doneness by inserting a toothpick into the center – it should emerge with minimal, moist crumbs.
- Remove from oven and allow brownies to cool completely at room temperature, which typically takes approximately 1 hour.
- Create vibrant orange frosting by blending vanilla frosting with crushed orange Oreo centers and orange food coloring gel until achieving a consistent, bright color.
- Once brownies have cooled, spread the orange frosting evenly across the surface using a spatula.
- Refrigerate the frosted brownies for 30 minutes to help the frosting set and firm up.
- Apply milk chocolate frosting over the orange layer, creating decorative swirls or patterns.
- Sprinkle crushed Oreo cookies over the top for added texture and Halloween-themed appearance.
- Slice into 3×2-inch squares and serve the festive, layered Halloween brownies.
Notes
- Swap regular Oreos with gluten-free or vegan alternatives to accommodate dietary restrictions and make the recipe more inclusive.
- Use a light hand when pressing Oreos into the batter to prevent them from sinking too deep and maintain their visual appeal.
- Consider reducing the baking time by 2-3 minutes if you prefer gooier, fudgier brownies with a more intense chocolate experience.
- Experiment with different food coloring shades to create unique Halloween-themed color variations, like deep purple or spooky green frosting.
- Prep Time: 20 minutes
- Cook Time: 30 minutes
- Category: Desserts, Snacks
- Method: Baking
- Cuisine: American
Nutrition
- Serving Size: 12
- Calories: 260
- Sugar: 24g
- Sodium: 320mg
- Fat: 12g
- Saturated Fat: 3.5g
- Unsaturated Fat: 6g
- Trans Fat: 0g
- Carbohydrates: 36g
- Fiber: 1g
- Protein: 3g
- Cholesterol: 30mg
Marcus Reed
Founder & Food Content Creator
Expertise
Single-recipe development, Seasonal and local ingredient utilization, Food photography and styling, Culinary writing and content creation
Education
Culinary Arts Certificate, Blue Ridge Community and Technical College, WV
Focus: Fundamentals of culinary techniques, emphasizing hands-on experience in small-scale kitchen settings.
Marcus’s story begins in Asheville, where good food and family kitchens shaped his earliest memories. After hands-on culinary training and a lot of trial (and a little error), he realized that real cooking isn’t about perfection, it’s about connection.
At Pan and Oven, Marcus crafts recipes that are easy to follow, packed with flavor, and built for real kitchens.