
Sizzling Garlic Parmesan Cheeseburger Bombs Recipe for Flavor Fans
Crispy, golden bombs of garlic parmesan cheeseburger magic await you in this mouthwatering recipe.
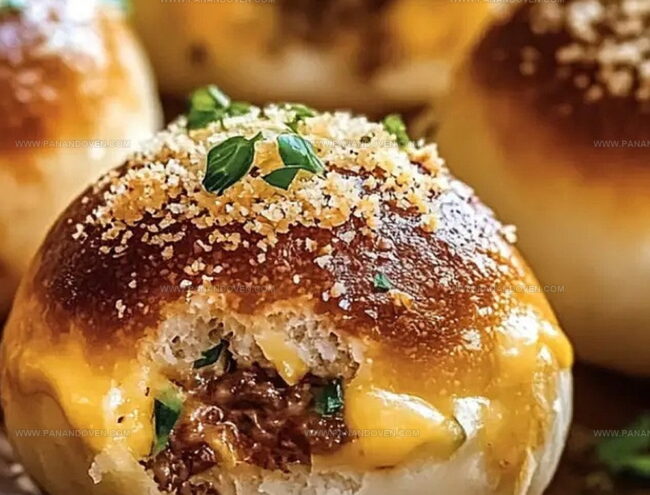
Melted cheese oozes from tender meat pockets that burst with flavor.
Juicy ground beef mingles with sharp parmesan and aromatic garlic to create an irresistible blend.
Small handheld delights promise to revolutionize your dinner routine with minimal effort.
Each bite delivers a symphony of savory ingredients that dance across your palate.
Weekend gatherings and casual dinners will never be the same once you master these delectable bites.
Dive in and become the culinary hero your friends and family deserve.
Reasons to Love Garlic Parmesan Cheeseburger Bombs

What You Need for Garlic Parmesan Cheeseburger Bombs
Meat Base:Cheese Group:Dough and Coating:How to Make Garlic Parmesan Cheeseburger Bombs
Step 1: Prepare Baking Station
Warm up your oven to 375°F.
Grab a baking sheet and line it with parchment paper for easy cleanup and perfect golden edges.
Step 2: Brown and Season Beef
In a skillet, cook ground beef over medium heat until it’s completely browned.
Drain out extra grease.
Sprinkle in:Stir in cream cheese and shredded cheddar until the mixture becomes a creamy, savory filling.
Remove from heat.
Step 3: Shape the Dough
Open the biscuit can and separate each piece.
Using your hands, gently press and stretch each biscuit into a wider, flatter circle.
Step 4: Create Delicious Pockets
Place a generous spoonful of the beef and cheese mixture right in the center of each biscuit circle.
Carefully fold the dough edges over the filling, pinching and sealing completely to prevent leaks.
Step 5: Add Garlic Parmesan Topping
Melt butter and mix with grated Parmesan cheese.
Generously brush this flavor-packed mixture over the top of each bomb.
Step 6: Bake to Golden Perfection
Arrange the bombs on the prepared baking sheet.
Slide into the oven and bake for 12-15 minutes until they turn a beautiful golden brown.
Step 7: Final Touches
Allow the bombs to cool slightly.
Sprinkle some fresh chopped parsley on top for a burst of color and added freshness.
Step 8: Serve and Devour
Serve these cheesy, garlicky bombs while they’re warm.
Watch everyone’s eyes light up with the first delicious bite!
Insider Tips for Garlic Parmesan Cheeseburger Bombs
Storing Garlic Parmesan Cheeseburger Bombs
Best Bites to Serve with Garlic Parmesan Cheeseburger Bombs
Garlic Parmesan Cheeseburger Bombs Flavor Swaps
FAQs
Ground turkey, chicken, or plant-based ground meat work perfectly as alternatives. They provide similar texture and can be seasoned identically to maintain the recipe’s flavor profile.
Yes, you can prepare them up to 24 hours in advance. Assemble the bombs, cover, and refrigerate. When ready to serve, brush with garlic Parmesan mixture and bake as directed. They’ll stay fresh and taste just as delicious.
Absolutely! After assembling, you can freeze uncooked bombs on a baking sheet. Once frozen, transfer to a freezer bag. When ready to eat, bake directly from frozen, adding 3-5 extra minutes to cooking time.
Use your fingers to press and pinch edges firmly. Avoid overfilling, which can make sealing difficult. A fork can help crimp edges for a tighter seal, preventing filling from leaking during baking.
Print
Garlic Parmesan Cheeseburger Bombs Recipe
- Total Time: 30 minutes
- Yield: 8 1x
Description
Garlic parmesan cheeseburger bombs explode with savory goodness, blending classic burger flavors into irresistible handheld bites. Crispy on the outside and molten with cheese inside, you’ll devour these crowd-pleasing morsels in seconds flat.
Ingredients
Meat and Cheese:
- 1 pound (454 grams) ground beef
- 1 cup (113 grams) shredded cheddar cheese
- 1/4 cup (25 grams) grated Parmesan cheese
- 1/2 cup (113 grams) cream cheese, softened
Seasonings:
- 1 teaspoon garlic powder
- 1 teaspoon onion powder
- Salt, to taste
- Black pepper, to taste
Dough and Topping:
- 1 can (16 ounces/454 grams) refrigerated biscuit dough
- 2 tablespoons butter, melted
- Fresh parsley, chopped (for garnish)
Instructions
- Warm the oven to 375°F and prepare a parchment-lined baking sheet for the cheeseburger bombs.
- Sizzle ground beef in a skillet over medium heat, thoroughly cooking and eliminating excess fat. Season the meat with garlic powder, onion powder, salt, and pepper.
- Incorporate cream cheese and shredded cheddar into the seasoned beef, mixing until the ingredients meld together smoothly. Remove from heat and let the mixture cool slightly.
- Gently separate each biscuit from the dough can and transform them into thin, round discs using your fingertips.
- Deposit a generous spoonful of the savory beef and cheese mixture directly into the center of each biscuit circle.
- Carefully encase the filling by folding the dough edges over and meticulously sealing the perimeter to prevent leakage during baking.
- Craft a luxurious topping by whisking melted butter with grated Parmesan cheese until well combined.
- Lavishly brush the exterior of each sealed bomb with the Parmesan-butter glaze, ensuring complete coverage.
- Strategically place the prepared bombs on the parchment-lined sheet, maintaining equal spacing.
- Slide the baking sheet into the preheated oven and bake for 12-15 minutes until the bombs transform into a golden, crispy exterior.
- Allow the bombs to rest momentarily after removing from the oven, letting the internal temperature settle.
- Garnish with freshly chopped parsley for a vibrant visual appeal and serve these delectable, cheese-filled morsels while warm.
Notes
- Mix ground beef and cheese filling in advance, storing it in the refrigerator for up to 24 hours for quick assembly.
- Swap biscuit dough with gluten-free biscuit mix or almond flour-based dough to accommodate dietary restrictions.
- Replace ground beef with ground turkey, plant-based crumbles, or finely chopped mushrooms for diverse protein preferences.
- Brush bombs with extra melted butter before baking to achieve a more golden, crunchy surface that looks and tastes irresistible.
- Prep Time: 15 minutes
- Cook Time: 15 minutes
- Category: Dinner, Appetizer, Snacks
- Method: Baking
- Cuisine: American
Nutrition
- Serving Size: 8
- Calories: 360
- Sugar: 2 g
- Sodium: 800 mg
- Fat: 24 g
- Saturated Fat: 12 g
- Unsaturated Fat: 10 g
- Trans Fat: 1 g
- Carbohydrates: 26 g
- Fiber: 1 g
- Protein: 18 g
- Cholesterol: 70 mg
Clara Thompson
Recipe Developer & Food Educator
Expertise
Plant-based and vegetarian recipe development, Nutritional analysis and meal planning, Culinary education and workshop facilitation, Content writing with a focus on healthy living
Education
Diploma in Culinary Arts, Mt. San Jacinto College, CA
Focus: Comprehensive culinary training with an emphasis on sustainable cooking practices.
Certificate in Nutrition and Healthy Living, Cornell University (Online Program)
Focus: Understanding the principles of nutrition to create balanced and health-conscious recipes.
Clara lives where fresh ideas and fresh ingredients meet. She pairs her culinary know-how with her passion for healthy, planet-friendly cooking.
For Clara, good food should taste great, nourish your body, and feel easy to make. Her recipes highlight whole foods, colorful produce, and a deep respect for seasonal eating.