Garlic Cheddar Biscuits (Garlic Cheese Bombs) Recipe

Irresistible Garlic Cheddar Biscuits (Garlic Cheese Bombs) Recipe

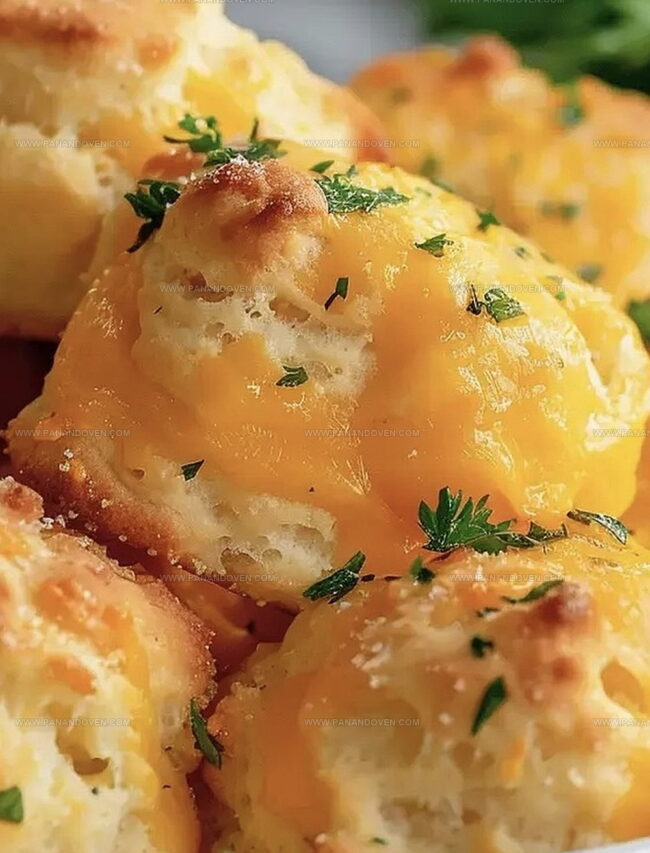
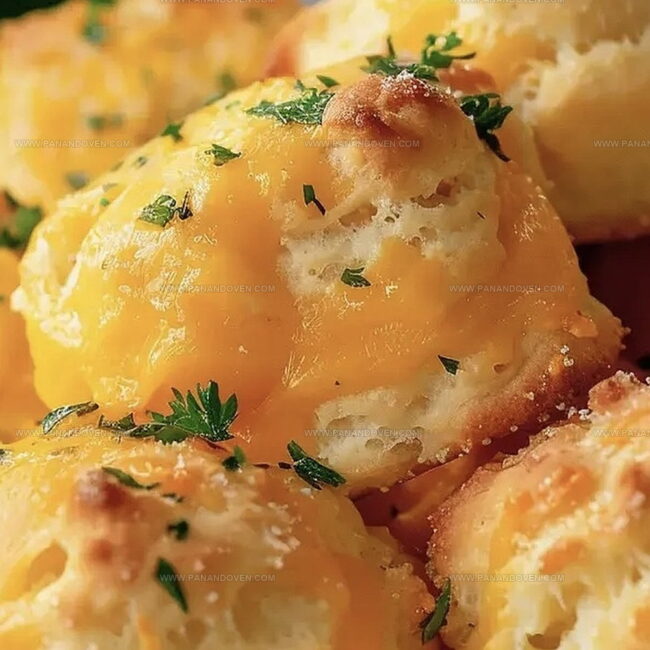
Warm, flaky biscuits loaded with garlic cheddar cheese bombs promise pure comfort on a plate.

These golden-brown treasures burst with rich, cheesy flavor that melts in your mouth.

Buttery layers combine with sharp cheddar and aromatic garlic for an irresistible side dish.

Each bite delivers a perfect balance of crisp exterior and soft, tender interior.

The aroma alone will draw everyone to the kitchen, eager to savor these delectable bites.

Simple ingredients transform into a crowd-pleasing treat that feels like a warm hug.

Prepare to fall in love with these addictive biscuits that elevate any meal from ordinary to extraordinary.

Garlic Cheddar Biscuits (Cheese Bombs): Golden Bites

  • Perfect for busy home cooks needing a speedy side dish that takes minimal preparation and delivers maximum flavor.
  • Versatile recipe allows swapping cheese types, adjusting garlic intensity, and creating personalized variations to suit different taste preferences.
  • Cheesy, garlicky bites that appeal to both children and adults, making it an ideal snack or accompaniment for family meals and gatherings.
  • Looks sophisticated and professionally made, yet requires basic cooking skills and simple ingredients anyone can handle.

The Essentials For Cheddar Biscuits

Main Ingredients:
  • Refrigerated Biscuit Dough: A convenient base that provides a soft and flaky exterior for the cheese bombs.
  • Cheddar Cheese Cubes: Sharp and melty cheese that creates a gooey center in each biscuit bomb.
Binding and Coating Ingredients:
  • Butter, Garlic: A rich and flavorful mixture that adds moisture and aromatic depth to the biscuits.
  • Parsley, Parmesan Cheese: A complementary herb and cheese blend that provides a savory coating and extra flavor.
Optional Enhancement Ingredients:
  • Salt, Black Pepper: Seasonings that enhance the overall taste profile of the biscuit bombs.

Biscuit Baking Tools List

  • Large Mixing Bowl: Perfect for combining ingredients smoothly.
  • Microwave-Safe Bowl: Essential for melting butter and garlic quickly.
  • Baking Sheet: Lined with parchment paper for easy cleanup and non-stick baking.
  • Cheese Grater: Helpful for preparing fresh parmesan if needed.
  • Measuring Spoons: For accurate seasoning and butter measurements.
  • Cutting Board: Useful for preliminary ingredient preparation.
  • Pastry Brush (optional): Can help evenly distribute melted butter.

Crafting Buttery Garlic Cheese Bombs

Step 1: Fire Up The Oven

Crank your oven to a toasty 375 degrees Fahrenheit, getting ready for some cheesy magic.

Step 2: Transform Biscuit Dough

  • Slice each refrigerated biscuit in half
  • Gently stretch the dough
  • Nestle a cube of cheddar cheese right in the center
  • Wrap the dough completely around the cheese
  • Roll into a smooth, sealed ball

Step 3: Create Flavor Fusion

  • Combine softened butter and minced garlic in a small bowl
  • Zap in microwave for about 12 seconds
  • In another bowl, mix
  • Fresh chopped parsley
  • Grated parmesan cheese

Step 4: Dress Up The Bombs

  • Dunk each cheese-filled dough ball into the garlic butter
  • Roll immediately in the parsley-parmesan mixture
  • Place on a parchment-lined baking sheet

Step 5: Bake To Golden Perfection

Slide the pan into the preheated oven and bake for 10-12 minutes until the biscuits turn a beautiful golden brown.

Watch closely to prevent burning.

Biscuit Tips For Gooey Centers

  • Ensure biscuit dough is completely sealed around cheese cube to prevent leaking during baking.
  • Use a good melting cheese like cheddar or mozzarella for best gooey interior results.
  • Lightly brush garlic butter to prevent soggy bottoms and maintain crispy texture.
  • Let refrigerated ingredients sit out for 15 minutes to help dough handle more easily and create smoother bombs.
  • Consume these cheese bombs immediately after baking for maximum flavor and melted cheese experience.

Biscuit Swaps & Cheesy Flavors

  • Gluten-Free Variation: Replace regular biscuit dough with gluten-free biscuit mix, using almond flour or gluten-free all-purpose flour for a celiac-friendly version.
  • Vegan Cheese Bombs: Swap cheddar cheese cube with vegan cheese alternative, using plant-based butter and nutritional yeast for a dairy-free option.
  • Spicy Jalapeño Version: Add diced fresh jalapeños inside the cheese cube or mix into the cheese coating for a zesty, hot flavor profile.
  • Low-Carb Adaptation: Substitute biscuit dough with fathead dough made from almond flour, cream cheese, and mozzarella for a keto-friendly approach.

Serving Cheese Bombs Warm And Fresh

  • Party Poppers: Perfect as an appetizer for game nights, these cheesy bombs will vanish quickly from your serving platter, delighting guests with their gooey centers and crispy exteriors.
  • Brunch Companion: Serve alongside scrambled eggs or as a side to frittatas, adding a delicious cheesy garlic punch that elevates your morning meal.
  • Dipping Delights: Pair with marinara sauce, ranch dressing, or herb-infused aioli for an extra layer of flavor that complements the biscuits' rich cheesy profile.
  • Picnic Perfect: Pack these portable treats in a cooler for outdoor gatherings, providing a crowd-pleasing snack that stays tasty even when slightly cooled.

Biscuit Storage For Lasting Softness

  • Store leftover biscuits in an airtight container for up to 3 days. Keep them in a single layer to prevent sticking and maintain their delicious texture.
  • Wrap individual biscuits tightly in plastic wrap, then place in a freezer bag. Freeze for up to 1 month to enjoy later without losing flavor or quality.
  • Warm biscuits at 350F for 5-7 minutes, spread on a baking sheet. This method helps restore their crispy exterior and warm, gooey cheese center.
  • Heat biscuits for 15-20 seconds on a microwave-safe plate. Check carefully to avoid overheating, which can make them tough and chewy.

FAQs

  • Can I use pre-shredded cheese for the filling?

No, use a block of cheddar cheese and cut it into small cubes. Pre-shredded cheese doesn’t melt as smoothly and can make the biscuits dry.

  • Do I need special baking skills to make these?

Not at all! This recipe is beginner-friendly. The key is sealing the cheese inside the biscuit dough completely to prevent leaking during baking.

  • What type of biscuit dough works best?

Refrigerated buttermilk biscuit dough from a tube works perfectly. It’s quick, easy, and provides a consistent texture for these cheese bombs.

  • How can I tell when the biscuits are done?

Look for a golden brown color and slightly puffy appearance. They should be lightly browned on the outside and soft when touched.

Print
clock clock iconcutlery cutlery iconflag flag iconfolder folder iconinstagram instagram iconpinterest pinterest iconfacebook facebook iconprint print iconsquares squares iconheart heart iconheart solid heart solid icon
Garlic Cheddar Biscuits (Garlic Cheese Bombs) Recipe

Garlic Cheddar Biscuits (Garlic Cheese Bombs) Recipe


5 Stars 4 Stars 3 Stars 2 Stars 1 Star

4.5 from 15 reviews

  • Total Time: 27 minutes
  • Yield: 10 1x

Description

Southern-style garlic cheddar biscuits showcase cheesy, herbal magic in a quick bread that melts in your mouth. Buttery, golden bites offer comfort with sharp cheddar and aromatic garlic, inviting you to savor each delicious morsel.


Ingredients

Scale

Main Ingredients:

  • 1 can refrigerated biscuits (10 pieces)
  • 20 cubes cheddar cheese (4 ounces / 113 grams)
  • 1/3 cup parmesan cheese

Flavor Enhancers:

  • 3 tablespoons butter
  • 1 clove garlic, crushed
  • 2 teaspoons dried parsley

Instructions

  1. Heat the oven to 375°F, preparing a parchment-lined baking sheet for the garlic cheese bombs.
  2. Slice prepared biscuit dough into halves and gently flatten each piece. Position a cheese cube at the center of each dough section.
  3. Carefully encase the cheese cube with the dough, pinching and sealing the edges completely. Gently roll each filled dough into a smooth, round ball.
  4. Combine melted butter with minced garlic in a small mixing bowl, creating a fragrant infusion.
  5. Mix chopped parsley with grated parmesan cheese in a separate shallow dish.
  6. Generously coat each cheese-filled dough ball first in the garlic butter mixture, then roll thoroughly in the parsley-parmesan blend.
  7. Arrange the prepared bombs on the parchment-lined baking sheet, ensuring even spacing.
  8. Bake for 10-12 minutes until the exterior turns golden brown and crispy, watching carefully to prevent overcooking.

Notes

  • Cheese Selection Opt for high-quality sharp cheddar for more intense flavor, which elevates the overall taste of these garlic cheese bombs.
  • Dough Handling Gently stretch refrigerated biscuit dough to prevent tearing when wrapping cheese cubes, ensuring a smooth and even coverage.
  • Sealing Technique Press edges firmly when enclosing cheese to prevent leakage during baking, creating a perfect molten cheese center.
  • Butter Infusion Let garlic sit in melted butter for a few extra moments to intensify the aromatic garlic flavor throughout the biscuits.
  • Prep Time: 15 minutes
  • Cook Time: 12 minutes
  • Category: Appetizer, Snacks
  • Method: Baking
  • Cuisine: American

Nutrition

  • Serving Size: 10
  • Calories: 175
  • Sugar: 1 g
  • Sodium: 450 mg
  • Fat: 10 g
  • Saturated Fat: 6 g
  • Unsaturated Fat: 4 g
  • Trans Fat: 0 g
  • Carbohydrates: 15 g
  • Fiber: 0.5 g
  • Protein: 5 g
  • Cholesterol: 30 mg
Marcus Reed

Marcus Reed

Founder & Food Content Creator

Expertise

Single-recipe development, Seasonal and local ingredient utilization, Food photography and styling, Culinary writing and content creation​

Education

Culinary Arts Certificate, Blue Ridge Community and Technical College, WV
Focus: Fundamentals of culinary techniques, emphasizing hands-on experience in small-scale kitchen settings.


Marcus’s story begins in Asheville, where good food and family kitchens shaped his earliest memories. After hands-on culinary training and a lot of trial (and a little error), he realized that real cooking isn’t about perfection, it’s about connection.
At Pan and Oven, Marcus crafts recipes that are easy to follow, packed with flavor, and built for real kitchens.

Leave a Reply

Your email address will not be published. Required fields are marked *

Recipe rating 5 Stars 4 Stars 3 Stars 2 Stars 1 Star