
Jolly Christmas Mint Oreo Fudge Recipe: Holiday Magic
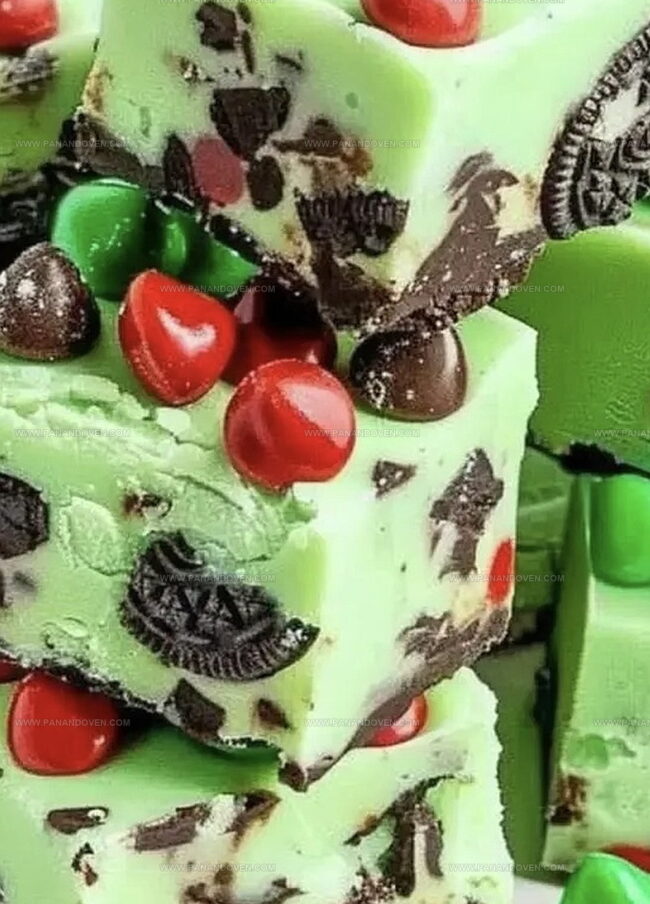
Creamy, decadent swirls of chocolate mingle with crushed Christmas mint Oreo fudge recipe, creating a holiday treat that melts in your mouth.
Sweet festive vibes dance across each delightful square of chocolate goodness.
Rich and smooth textures combine in this irresistible dessert that screams winter celebration.
Oreo cookies add delightful crunch and peppermint spirit to every bite.
Chocolate lovers will swoon over this simple yet elegant confection.
The combination of cool mint and deep chocolate promises pure indulgence.
You won’t be able to resist this magical holiday treat that brings joy to any gathering.
Festive Mint Oreo Fudge Why It’s a Holiday Treat
Mint Oreo Fudge Ingredient Checklist
Base Ingredients:Flavor Enhancers:Crunch and Decoration Ingredients:Preparation Ingredient:Tools for Making Minty Fudge at Home
Steps for Festive Oreo Fudge

Step 1: Prepare Baking Dish
Line an 8×8-inch baking pan with parchment paper, letting the edges hang over for easy removal.
This trick helps you lift out the fudge smoothly without any sticky mess.
Step 2: Create Chocolate Base
Grab a medium saucepan and combine:Warm over medium heat, stirring constantly until the mixture transforms into a silky, smooth liquid.
Keep watching to prevent burning.
Step 3: Enhance Festive Flavor
Remove the chocolate mixture from heat and stir in peppermint extract.
For a jolly Christmas look, add a few drops of green food coloring and mix until the color spreads evenly throughout.
Step 4: Add Crunchy Mint Oreo Chunks
Gently fold chopped Mint Oreo cookies into the fudge mixture.
Make sure the cookie pieces are distributed evenly for a delightful crunch in every bite.
Step 5: Pour And Decorate
Transfer the fudge mixture into the prepared pan, using a spatula to create a smooth, even surface.
Sprinkle additional chopped Mint Oreos and crushed candy canes on top for a festive finish.
Step 6: Chill And Set
Place the pan in the refrigerator for 2-3 hours.
The fudge needs time to firm up and develop its rich, creamy texture.
Step 7: Slice And Serve
Once completely set, lift the fudge out using the parchment paper edges.
Cut into small, bite-sized squares.
Serve and watch everyone enjoy this minty Christmas delight!
Tips for Creamy, Minty Fudge Squares
Mint Oreo Fudge Flavor Ideas
Serving Fudge for Christmas Celebrations
Storing Mint Oreo Fudge
FAQs
Mint Oreos are a special flavor of the classic sandwich cookie that features chocolate wafers with a mint cream filling, perfect for adding a cool, festive twist to desserts.
Yes, you can substitute regular Oreos, but the mint flavor will be less pronounced. The recipe works best with Mint Oreos for that signature Christmas taste.
Absolutely! This fudge is kid-friendly and doesn’t contain any alcohol. The sweet white chocolate and mint flavor make it a fun holiday treat that children will love.
The fudge can be stored in an airtight container in the refrigerator for up to 7 days, making it a great make-ahead holiday dessert.
Print
Festive Christmas Mint Oreo Fudge Recipe
- Total Time: 3 hours 20 minutes
- Yield: 12 1x
Description
Mint oreo fudge brings holiday cheer with creamy white chocolate and crushed cookies. Chocolate lovers will delight in this simple, festive dessert that delivers rich peppermint flavor and sweet crunch.
Ingredients
Main Ingredients:
- 3 cups white chocolate chips
- 1 (14 ounces/400 grams) can sweetened condensed milk
- 1.5 cups mint Oreos, roughly chopped
Flavoring and Color:
- 1 teaspoon peppermint extract
- Green food coloring (optional)
Garnish:
- Crushed candy canes (optional)
- Extra chopped mint Oreos for garnish
Instructions
- Prepare a festive foundation by lining an 8×8-inch baking dish with parchment paper, ensuring overhang for effortless fudge extraction.
- Create a silky base by melting white chocolate chips and sweetened condensed milk in a medium saucepan over medium heat, stirring consistently until achieving a uniform, glossy consistency.
- Infuse holiday spirit by removing the melted mixture from heat and incorporating peppermint extract, then optionally introducing green food coloring for a vibrant Christmas-themed appearance.
- Enhance texture by gently folding chopped Mint Oreos throughout the fudge mixture, distributing them evenly to ensure each bite contains delightful cookie fragments.
- Transfer the luxurious mixture into the prepared pan, using a spatula to smooth the surface and sprinkle additional chopped Mint Oreos and crushed candy canes for a festive decorative touch.
- Allow the fudge to solidify by refrigerating for 2-3 hours at 40°F, ensuring it becomes completely firm and compact.
- Finalize the treat by lifting the set fudge from the pan using parchment paper edges, then slicing into bite-sized squares ready for indulgence.
Notes
- Customize Coloring Experiment with different food coloring shades to match your holiday theme, from soft mint green to vibrant festive emerald.
- Texture Tip Chop Mint Oreos into varying sizes for a more interesting mouthfeel, with some chunks providing delightful crunch and others blending smoothly into the fudge.
- Storage Strategy Keep the fudge refrigerated in an airtight container for up to one week, ensuring maximum freshness and preventing potential texture changes from room temperature exposure.
- Dietary Adaptation For a gluten-free version, substitute regular Mint Oreos with gluten-free mint chocolate sandwich cookies, maintaining the same delicious flavor profile.
- Prep Time: 20 minutes
- Cook Time: 3 hours
- Category: Desserts, Snacks
- Method: Chilling
- Cuisine: American
Nutrition
- Serving Size: 12
- Calories: 200
- Sugar: 22 g
- Sodium: 70 mg
- Fat: 8 g
- Saturated Fat: 5 g
- Unsaturated Fat: 3 g
- Trans Fat: 0 g
- Carbohydrates: 30 g
- Fiber: 1 g
- Protein: 2 g
- Cholesterol: 5 mg
Marcus Reed
Founder & Food Content Creator
Expertise
Single-recipe development, Seasonal and local ingredient utilization, Food photography and styling, Culinary writing and content creation
Education
Culinary Arts Certificate, Blue Ridge Community and Technical College, WV
Focus: Fundamentals of culinary techniques, emphasizing hands-on experience in small-scale kitchen settings.
Marcus’s story begins in Asheville, where good food and family kitchens shaped his earliest memories. After hands-on culinary training and a lot of trial (and a little error), he realized that real cooking isn’t about perfection, it’s about connection.
At Pan and Oven, Marcus crafts recipes that are easy to follow, packed with flavor, and built for real kitchens.