
Easy Cheesy Beef Filled Bites Recipe: Tasty Homemade Snacks
Savory beef and melted cheese create a mouthwatering combination in these irresistible easy cheesy beef filled bites that will make your taste buds dance.
These bite-sized delights pack incredible flavor into every single morsel.
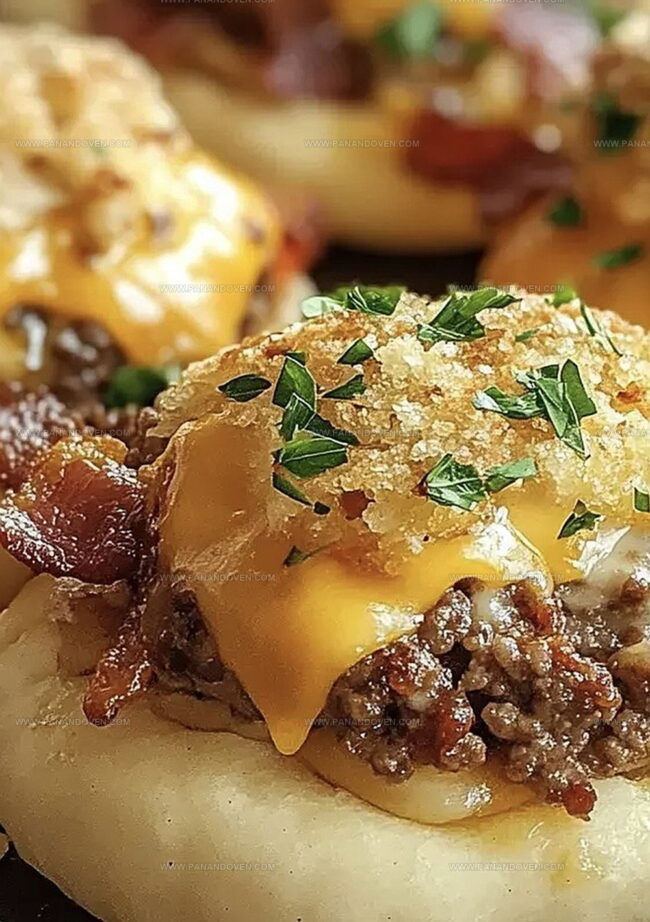
Perfectly crispy on the outside and wonderfully soft inside, they offer a delectable texture that keeps you coming back for more.
The recipe blends simple ingredients with minimal preparation time, making it ideal for quick snacks or party appetizers.
Each bite delivers a burst of rich, meaty goodness balanced with creamy cheese that melts in your mouth.
No complicated techniques or fancy equipment are needed to whip up these crowd-pleasing treats.
Serve them hot and watch as everyone reaches for seconds, eager to enjoy these delicious little morsels.
Why Cheesy Beef Filled Bites Work
Cheesy Beef Bite Ingredient Essentials
Main Protein:Cheese Components:Dough and Finishing Elements:Tools for Beef Filled Bites Success
How to Make Cheesy Beef Bites Easily

Step 1: Preheat Oven
Fire up your oven to a toasty 375°F (190°C) to get ready for some mouthwatering bites.
Step 2: Sizzle Ground Beef
Grab a skillet and brown the ground beef with fragrant minced garlic.
Once cooked, drain away any excess fat to keep things light and tasty.
Step 3: Create Cheese Blend
Introduce a delightful mix of cheeses into the beef:Stir the cheeses thoroughly into the meat mixture, creating a rich and creamy filling.
Step 4: Shape Savory Pockets
Gently flatten each biscuit dough and prepare to transform them into irresistible pockets:Step 5: Bake and Garnish
Transfer your stuffed pockets onto a lined baking sheet.
Brush the tops with melted butter for a golden, glossy finish.
Slide into the preheated oven and bake for 12-15 minutes until they turn a beautiful golden brown.
Once done, let them cool briefly.
Sprinkle with fresh chopped parsley and serve these warm, gooey delights to eager guests.
Tips for Beef Bites That Are Gooey

Creative Variations for Cheesy Beef Bites

Serving Beef Filled Bites Hot
Storage Tips for Cheesy Beef Filled Bites

FAQs
Ground beef, biscuit dough, Parmesan and cheddar cheese, minced garlic, and melted butter are the main ingredients for these cheesy beef bites.
Absolutely! Ground turkey or ground chicken work great as substitutes for ground beef in this recipe.
Yes, these cheesy beef bites are perfect for kids. They’re bite-sized, cheesy, and easy to eat, making them a hit with children.
Ensure you seal the edges of the biscuit dough completely when forming the bombs. Press and pinch the edges firmly to keep the cheese and beef filling inside during baking.
Print
Easy Cheesy Beef Filled Bites Recipe
- Total Time: 35 minutes
- Yield: 4 1x
Description
Savory easy cheesy beef filled bites combine rich ground beef with melted cheese in a crispy pastry shell. Hearty snacks deliver comfort and satisfaction for gatherings or casual meals you’ll definitely enjoy.
Ingredients
Main Components:
- 1 lb (454 grams) ground beef
- 1 can (16.3 ounces / 462 grams) biscuit dough
Cheese & Seasonings:
- 1/2 cup (50 grams) Parmesan cheese, diced
- 1 cup (113 grams) cheddar cheese, cubed
- 2 cloves garlic, minced
Finishing Touches:
- 2 tablespoons (30 milliliters) butter, melted
- 1 tablespoon (15 milliliters) parsley, chopped
Instructions
- Preheat the oven to 375°F (190°C), preparing a baking sheet with parchment paper for optimal non-stick results.
- In a large skillet, sauté ground beef with minced garlic over medium-high heat, breaking meat into small crumbles until fully cooked and browned.
- Drain excess fat from the beef using a colander, then return meat to the skillet.
- Incorporate Parmesan and cheddar cheeses into the beef mixture, stirring until evenly distributed and cheese begins to melt slightly.
- Gently flatten each biscuit using your palm or a rolling pin, creating a thin circular base.
- Place a generous spoonful of the beef and cheese mixture in the center of each flattened biscuit.
- Carefully fold the edges of the biscuit over the filling, pinching and sealing to create a secure pocket or “bomb” shape.
- Arrange the sealed beef bombs on the prepared baking sheet, maintaining space between each piece.
- Brush the tops of the bombs with melted butter for a golden, crispy exterior.
- Bake in the preheated oven for 12-15 minutes, watching for a rich golden-brown color.
- Remove from oven, let cool for 3-5 minutes, then garnish with fresh chopped parsley.
- Serve warm as an appetizer or quick snack.
Notes
- Customize cheese choices by swapping in your favorite varieties like mozzarella or pepper jack for unique flavor profiles.
- Reduce fat content by using lean ground turkey or chicken instead of beef.
- Create gluten-free version by selecting gluten-free biscuit dough and checking cheese ingredients for potential gluten contamination.
- Prep ahead by assembling bombs earlier and refrigerating until ready to bake, perfect for quick weeknight meals or party appetizers.
- Prep Time: 20 minutes
- Cook Time: 15 minutes
- Category: Appetizer, Snacks, Dinner
- Method: Baking
- Cuisine: American
Nutrition
- Serving Size: 4
- Calories: 400
- Sugar: 2 g
- Sodium: 800 mg
- Fat: 24 g
- Saturated Fat: 12 g
- Unsaturated Fat: 8 g
- Trans Fat: 0 g
- Carbohydrates: 30 g
- Fiber: 1 g
- Protein: 20 g
- Cholesterol: 80 mg
Marcus Reed
Founder & Food Content Creator
Expertise
Single-recipe development, Seasonal and local ingredient utilization, Food photography and styling, Culinary writing and content creation
Education
Culinary Arts Certificate, Blue Ridge Community and Technical College, WV
Focus: Fundamentals of culinary techniques, emphasizing hands-on experience in small-scale kitchen settings.
Marcus’s story begins in Asheville, where good food and family kitchens shaped his earliest memories. After hands-on culinary training and a lot of trial (and a little error), he realized that real cooking isn’t about perfection, it’s about connection.
At Pan and Oven, Marcus crafts recipes that are easy to follow, packed with flavor, and built for real kitchens.