
Dreamy Easter Pastel Poke Cake Recipe For Spring Celebrations
Sweet springtime calls for a delightful Easter pastel poke cake that bursts with color and joy.
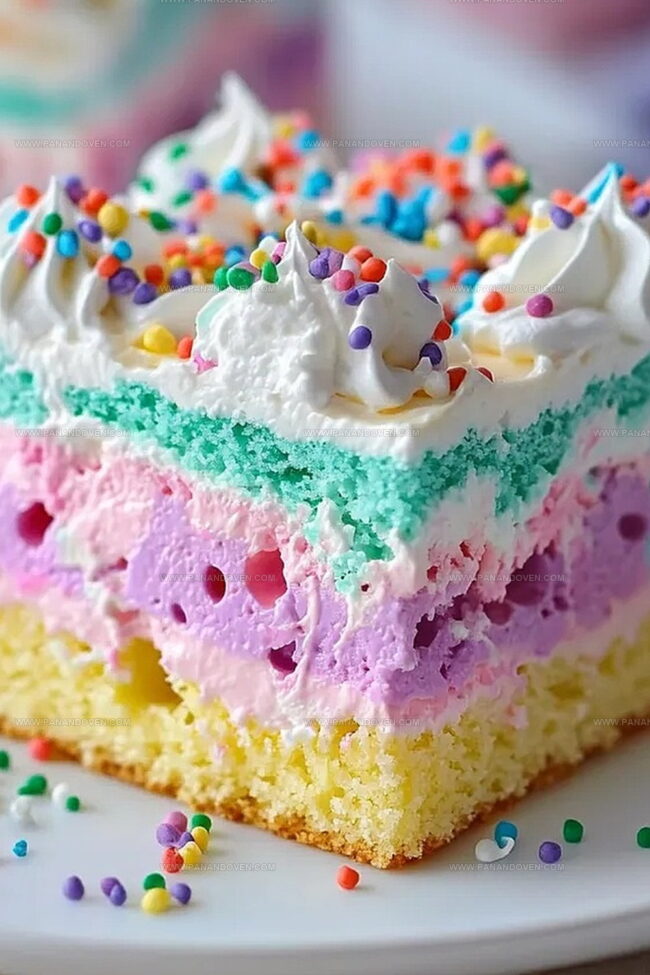
Soft, moist layers create a canvas of pastel hues that dance across your dessert plate.
Each slice promises a delectable journey through creamy textures and gentle flavor profiles.
The cake weaves together light sponge and vibrant pastel tones that celebrate the season’s cheerful spirit.
Creamy filling seeps into carefully poked holes, ensuring every bite delivers maximum deliciousness.
Decorative touches of whipped cream and sprinkles transform this dessert into a festive centerpiece.
You’ll love how easily this cake comes together, making it perfect for weekend gatherings or holiday celebrations.
Prepare to impress your loved ones with this stunning and irresistible spring treat.
Why You’ll Adore Easter Pastel Poke Cake
Everything Needed for an Easter Pastel Poke Cake
Cake Base:Liquid and Binding Ingredients:Filling and Topping Ingredients:Baking Supplies for Perfect Easter Pastel Poke Cake
Instructions for Vibrant Easter Pastel Poke Cake
Step 1: Mix Magical Cake Batter
Follow the white cake box instructions.
Divide the batter into separate bowls for each pastel color you want.
Add gel food coloring to create soft, dreamy shades:Spoon the colored batters into your cake pan and gently swirl with a knife to create a marbled masterpiece.
Step 2: Bake and Create Holes
Bake the cake according to package directions.
While still warm, grab a wooden spoon handle and poke holes throughout the cake, spacing them about an inch apart.
Make sure holes almost reach the bottom of the cake.
Step 3: Pour Creamy Pudding
In a mixing bowl, whisk together:Whisk until the mixture starts to thicken but remains pourable.
Pour the pudding over the cake, ensuring it fills all the poked holes.
Use a spatula to spread evenly across the top.
Step 4: Chill and Set
Refrigerate the cake for at least 2 hours.
This resting time allows the pudding to set and lets the flavors meld together perfectly.
Step 5: Decorate with Fluffy Topping
Once chilled, spread a layer of thawed Cool Whip across the cake’s surface.
Sprinkle Easter-themed decorative candies or sprinkles for a festive touch.
Step 6: Serve and Enjoy
Keep the cake refrigerated until serving time.
Cut into squares and watch guests delight in this colorful, creamy Easter treat!
Helpful Hints for a Gorgeous Easter Pastel Poke Cake
Colorful Variations for Easter Pastel Poke Cake

Serving Easter Pastel Poke Cake at Celebrations
Best Ways to Store Easter Pastel Poke Cake Leftovers
FAQs
You’ll need a white cake mix, gel food coloring, vanilla pudding mix, milk, Cool Whip, and optional Easter sprinkles. The key is having pastel gel colors to create the marbled cake effect.
Absolutely! You can prepare this cake a day before serving. After adding the Cool Whip topping, keep it refrigerated until you’re ready to serve. This actually helps the flavors blend and the pudding set perfectly.
You’ll want a wooden spoon handle (or similar utensil) to poke holes, a mixing bowl for pudding, and a whisk. A spatula helps spread pudding and Cool Whip evenly. No fancy equipment required!
Print
Easter Pastel Poke Cake Recipe
- Total Time: 55 minutes
- Yield: 12 1x
Description
Delightful Easter pastel poke cake brings springtime colors to dessert tables with whimsical charm. Creamy layers and pastel hues create a festive centerpiece you’ll adore serving to family and friends.
Ingredients
Cake Base:
- 1 box white cake mix
- 3 eggs
- 1/3 cup vegetable oil
- 1 cup water
- Gel food coloring in pastel colors (pink, blue, green, yellow)
Filling:
- 2 boxes instant vanilla pudding mix
- 4 cups milk (32 fluid ounces / 946 milliliters)
Topping:
- 1 container Cool Whip, thawed
- Easter-themed sprinkles (optional)
Instructions
- Prepare a white cake mix according to package instructions, then divide the batter into separate bowls. Tint each portion with gel food coloring to create soft pastel hues. Carefully layer and swirl the colored batters in a prepared cake pan to achieve a marbled appearance.
- Bake the cake at the recommended temperature until fully cooked. While still warm, use a wooden spoon handle to puncture evenly spaced holes throughout the cake, ensuring they extend nearly to the bottom.
- Whisk vanilla pudding mix with milk until it reaches a smooth, pourable consistency. Immediately pour the pudding over the cake, allowing it to seep into the created holes. Gently spread to ensure complete coverage.
- Refrigerate the cake for at least 2 hours, enabling the pudding to set and flavors to meld completely.
- Spread a uniform layer of thawed whipped topping across the chilled cake. Decorate with festive Easter-themed sprinkles for a celebratory touch.
- Maintain the cake in the refrigerator until serving time. Cut into squares and present this vibrant, creamy dessert that’s sure to delight guests.
Notes
- Choose gel food coloring for vibrant, soft pastel shades without altering cake batter consistency.
- Swirl colors gently to create beautiful marbled patterns without overmixing, which can muddle the design.
- Use a wooden spoon handle with a smooth, rounded end to create clean, uniform holes in the cake.
- Whisk pudding mixture quickly to prevent lumps and ensure smooth, even distribution over the cake.
- For a lighter version, substitute low-fat milk and sugar-free pudding mix to reduce calories.
- Experiment with different pudding flavors like banana, coconut, or lemon for unique taste variations.
- Make the cake gluten-free by using a gluten-free cake mix and checking pudding mix ingredients.
- Decorate with naturally colored sprinkles or crushed pastel-colored candies for a healthier topping option.
- Prep Time: 20 minutes
- Cook Time: 35 minutes
- Category: Desserts, Snacks
- Method: Baking
- Cuisine: American
Nutrition
- Serving Size: 12
- Calories: 210
- Sugar: 15 g
- Sodium: 250 mg
- Fat: 8 g
- Saturated Fat: 3 g
- Unsaturated Fat: 4 g
- Trans Fat: 0 g
- Carbohydrates: 30 g
- Fiber: 0 g
- Protein: 3 g
- Cholesterol: 35 mg
Clara Thompson
Recipe Developer & Food Educator
Expertise
Plant-based and vegetarian recipe development, Nutritional analysis and meal planning, Culinary education and workshop facilitation, Content writing with a focus on healthy living
Education
Diploma in Culinary Arts, Mt. San Jacinto College, CA
Focus: Comprehensive culinary training with an emphasis on sustainable cooking practices.
Certificate in Nutrition and Healthy Living, Cornell University (Online Program)
Focus: Understanding the principles of nutrition to create balanced and health-conscious recipes.
Clara lives where fresh ideas and fresh ingredients meet. She pairs her culinary know-how with her passion for healthy, planet-friendly cooking.
For Clara, good food should taste great, nourish your body, and feel easy to make. Her recipes highlight whole foods, colorful produce, and a deep respect for seasonal eating.