
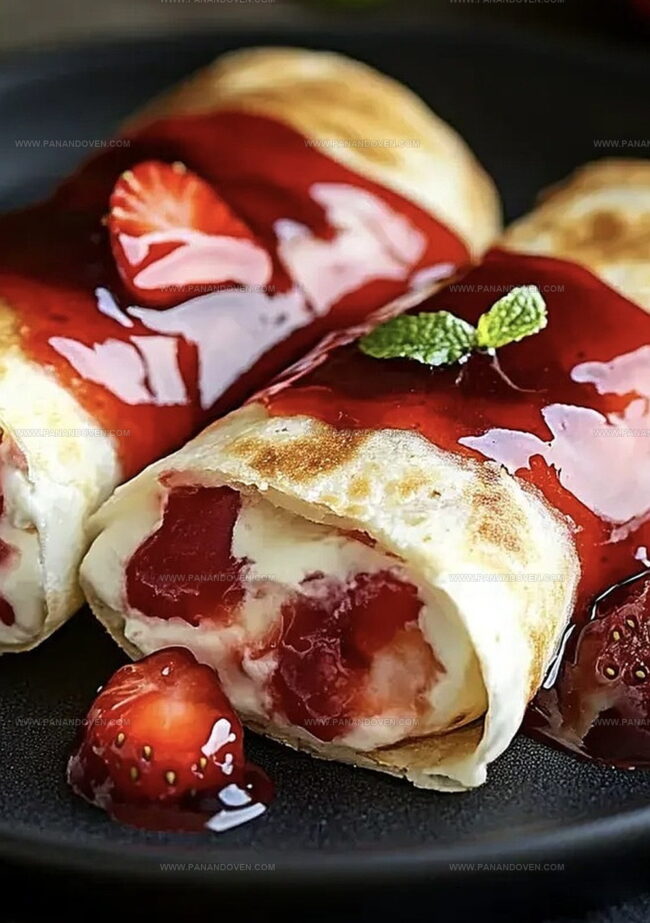
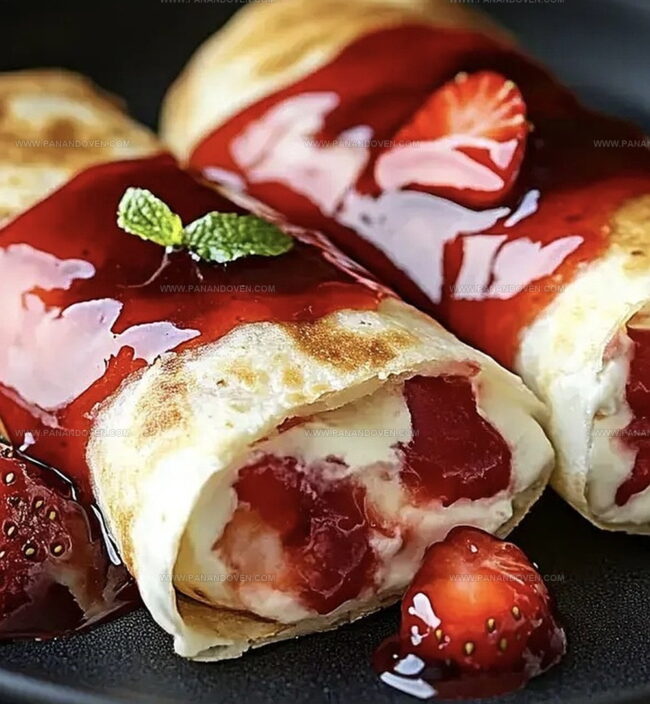
Delectable Strawberry Cheesecake Chimichangas Recipe – Sweet Twist
Sweet meets savory in these crispy strawberry cheesecake chimichangas that blend unexpected flavors into pure dessert magic.
Golden-brown tortillas cradle a luscious filling of creamy cheesecake and fresh strawberries.
Every bite promises a delightful crunch that melts into smooth, tangy cream cheese.
The strawberries add a burst of natural sweetness that dances across your palate.
These chimichangas transform a classic dessert into a playful, handheld treat that surprises and delights.
Crisp on the outside and decadent within, they’re perfect for impressing guests or indulging your sweet tooth.
Prepare to fall in love with this irresistible fusion of textures and tastes.
Why Strawberry Cheesecake Chimichangas Are a Must-Try
Ingredients for Delectable Strawberry Cheesecake Chimichangas
Tools for Assembling Strawberry Chimichangas Easily
Making Strawberry Cheesecake Chimichangas at Home
Step 1: Warm Up The Oven
Crank your oven to a toasty 375F (190C), ensuring it’s perfectly heated for our delicious adventure.
Step 2: Whip Together Creamy Goodness
In a mixing bowl, blend these delightful ingredients:Stir until the mixture becomes silky smooth and irresistibly creamy.
Step 3: Dress The Tortillas
Spread a luscious layer of the cream cheese mixture across each tortilla, leaving a small border around the edges to prevent any delicious filling from escaping.
Step 4: Add Fruity Magic
Dollop a generous spoonful of strawberry pie filling right in the center of each tortilla, creating a burst of fruity excitement.
Step 5: Roll With Precision
Carefully roll each tortilla into a tight, compact bundle, ensuring the filling stays snug inside.
Place them seam side down in a greased baking dish.
Step 6: Butter Them Up
Lovingly brush the tops of the rolled chimichangas with melted butter, creating a golden, crispy exterior.
Step 7: Sprinkle Sweet Sparkle
In a small bowl, combine:Generously dust the sugar mixture over the buttered rolls, adding a touch of sweet magic.
Step 8: Bake To Perfection
Slide the baking dish into the preheated oven and bake for 15-20 minutes.
Watch for a beautiful golden-brown color and crispy edges.
Step 9: Let Them Rest
Allow the chimichangas to cool slightly, giving them a moment to set and become even more delectable before serving.
Tips for Crispy, Creamy Chimichangas Every Time

Tasty Twists on Strawberry Cheesecake Chimichangas
Serving Chimichangas for Dessert or Parties

How to Store Cheesecake Chimichangas the Right Way
FAQs
Yes, flour tortillas work perfectly for this recipe. They provide a softer texture and are easier to roll compared to corn tortillas.
Absolutely! Kids love the sweet combination of cream cheese and strawberry filling. The crispy exterior and sugary coating make it a fun dessert that children will enjoy.
To keep the chimichangas sealed, place them seam side down in the baking dish. You can also secure them with a toothpick if needed, just remember to remove it before serving.
Print
Delectable Strawberry Cheesecake Chimichangas Recipe
- Total Time: 35 minutes
- Yield: 4 1x
Description
Strawberry cheesecake chimichangas combine Mexican and American dessert traditions in one irresistible treat. Sweet cream cheese and fresh strawberries create a delightful fusion you won’t forget.
Ingredients
Primary Ingredients:
- 8 flour tortillas
- 1 cup (240 ml) cream cheese, softened
- 1 cup (240 ml) strawberry pie filling
Sweeteners and Flavorings:
- 1/4 cup (30 g) powdered sugar
- 2 tablespoons (25 g) granulated sugar
- 1 teaspoon vanilla extract
- 1 teaspoon cinnamon
Preparation Ingredients:
- 2 tablespoons (30 ml) butter, melted
Instructions
- Warm the oven to 375°F (190°C), ensuring a consistent temperature for optimal baking.
- Create a silky cream cheese mixture by blending softened cream cheese, powdered sugar, and vanilla extract until uniformly smooth.
- Generously spread the cream cheese blend across each tortilla, maintaining a small perimeter to prevent spillage during rolling.
- Position a dollop of strawberry pie filling precisely in the center of each prepared tortilla.
- Carefully roll the tortillas into compact cylinders, tucking edges inward to secure the filling.
- Arrange the rolled chimichangas seam-side down in a greased baking dish, ensuring they are snugly positioned.
- Delicately brush the exterior of each chimichanga with melted butter for a golden, crisp finish.
- Combine granulated sugar and cinnamon, then dust the buttered surface with the aromatic mixture.
- Bake for 15-20 minutes until the chimichangas transform into a crisp, golden-brown delicacy.
- Allow the chimichangas to rest for a few minutes, permitting the filling to stabilize before serving.
Notes
- Choose soft, fresh tortillas for easier rolling and a more delicate texture.
- Ensure cream cheese is at room temperature to create a smooth, lump-free filling.
- Opt for low-fat cream cheese and whole wheat tortillas for a lighter version of this dessert.
- Experiment with alternative fruit fillings like blueberry, raspberry, or peach to add variety and personal flair.
- Prep Time: 15 minutes
- Cook Time: 20 minutes
- Category: Desserts, Snacks
- Method: Baking
- Cuisine: Mexican
Nutrition
- Serving Size: 4
- Calories: 350
- Sugar: 18g
- Sodium: 250mg
- Fat: 18g
- Saturated Fat: 10g
- Unsaturated Fat: 8g
- Trans Fat: 0g
- Carbohydrates: 44g
- Fiber: 1g
- Protein: 4g
- Cholesterol: 40mg
Marcus Reed
Founder & Food Content Creator
Expertise
Single-recipe development, Seasonal and local ingredient utilization, Food photography and styling, Culinary writing and content creation
Education
Culinary Arts Certificate, Blue Ridge Community and Technical College, WV
Focus: Fundamentals of culinary techniques, emphasizing hands-on experience in small-scale kitchen settings.
Marcus’s story begins in Asheville, where good food and family kitchens shaped his earliest memories. After hands-on culinary training and a lot of trial (and a little error), he realized that real cooking isn’t about perfection, it’s about connection.
At Pan and Oven, Marcus crafts recipes that are easy to follow, packed with flavor, and built for real kitchens.