
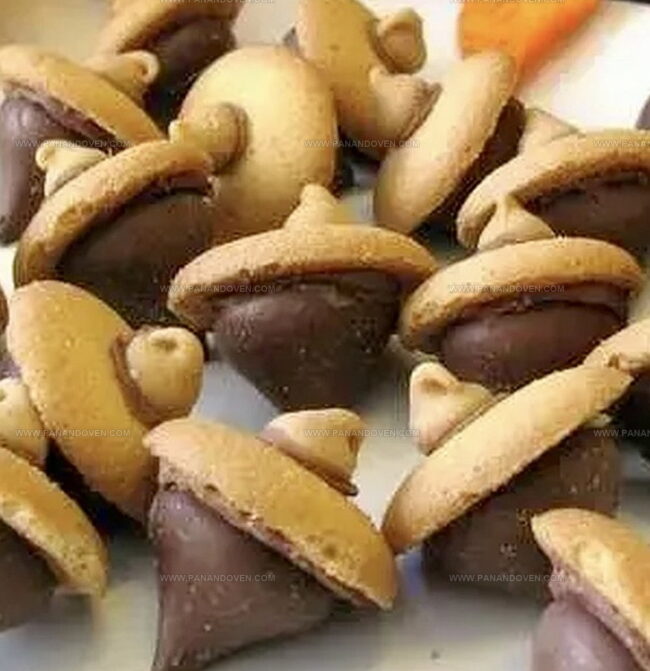
Adorable Candy Acorns Recipe: Sweet Fall Magic in Minutes
Fall’s whimsical charm comes alive with these adorable homemade candy acorns that blend nutty charm and sweet delight.
Crafting these delectable tiny treats requires minimal ingredients and simple steps.
Chocolate and peanut butter work magic to create these bite-sized woodland wonders.
Each little acorn brings a playful touch to autumn gatherings and dessert tables.
Nutty, chocolatey, and incredibly cute, these mini confections will spark joy at every celebration.
You’ll love how quickly they come together and how irresistible they look.
Prepare to delight your guests with these charming seasonal sweets that capture the essence of fall’s cozy magic.
Candy Acorns: Why They’re a Fall Favorite

What You Need for Homemade Candy Acorns
DIY Candy Acorn Equipment Guide
Candy Acorns: Making Steps
Step 1: Unwrap Chocolate Kisses
Gently remove the foil from each Hershey’s Kiss, setting them carefully aside.
Choose only perfect, unwrapped chocolates for your delightful creation.
Step 2: Prepare Cookie Base
Select whole, intact cookies from the package.
Ensure each cookie is smooth and unbroken, creating a perfect foundation for your sweet treat.
Step 3: Create Melting Chocolate
Gather chocolate chips and coconut oil in a microwave-safe bowl.
These two ingredients will form a smooth, glossy coating for your acorn-inspired dessert.
Step 4: Melt Chocolate Smoothly
Heat the chocolate mixture in short bursts, stirring between each 30-second interval.
Continue until the chocolate transforms into a silky, glossy liquid with no lumps.
Step 5: Attach Kiss to Cookie
Use a toothpick to carefully dab melted chocolate onto the cookie’s flat surface.
Gently press a Hershey’s Kiss onto the chocolate, ensuring it sits securely.
Step 6: Position Acorn Pieces
Place the cookie kiss-side up on a clean surface.
Allow the chocolate to set and create a stable connection between the kiss and cookie.
Step 7: Add Chocolate Stem Connector
Apply a small dot of melted chocolate to the cookie’s opposite side.
This will serve as the glue for your acorn’s stem.
Step 8: Create Stem Detail
Carefully press an unmelted chocolate chip onto the chocolate dot.
Hold it briefly to ensure it stays in place, forming the acorn’s adorable stem.
Step 9: Cool and Set
Let the chocolate acorns rest at room temperature.
Allow the chocolate to completely harden, creating a firm, delightful treat.
Step 10: Serve and Enjoy
Display your chocolate acorns as charming decorations or serve them in a beautiful bowl for guests to enjoy.
These sweet treats are perfect for autumn gatherings or festive occasions.
Tips for Shaping Perfect Candy Acorns
Fun Variations for Candy Acorns
Serving Candy Acorns at Gatherings
How to Store Homemade Candy Acorns
FAQs
You’ll need Hershey’s Kisses, cookies (like Nilla Wafers), chocolate baking chips, and coconut oil. These simple items create adorable candy acorns.
Yes, you can substitute chocolate baking chips with other melting chocolates like milk chocolate, dark chocolate, or candy melts. Just ensure they melt smoothly.
Microwave the chocolate in short 30-second intervals, stirring between each cycle. This helps prevent burning and ensures smooth, even melting.
Print
Cute Candy Acorns Recipe
- Total Time: 30 minutes
- Yield: 20 1x
Description
Adorable cute candy acorns bring autumn’s whimsy to dessert tables, delighting guests with their charming miniature design. Kids and adults will adore crafting these delightful nutty treats that combine sweet chocolate and nutty flavors into playful seasonal confections.
Ingredients
Main Ingredients:
- 11 ounces (311 grams) Hersheys Kisses, any flavor
- 75 mini vanilla wafers or mini peanut butter cookies
Baking Ingredients:
- 1 cup (240 milliliters) baking chips, divided
- 1 teaspoon (5 milliliters) coconut oil or cooking oil
Instructions
- Unwrap Hersheys Kisses and set them on a clean work surface, preparing for the candy acorn assembly.
- Select whole, unbroken cookies from the package, matching the number of kisses you will use.
- Create a chocolate binding mixture by combining baking chips and coconut oil in a microwave-safe bowl.
- Heat the chocolate mixture in 30-second intervals, stirring between each cycle until completely smooth and glossy, approximately 1-2 minutes total.
- Using a toothpick, carefully apply a small dot of melted chocolate to the flat surface of each cookie.
- Position a Hersheys Kiss onto the chocolate dot, pressing gently to secure, with the flat side facing downward.
- Allow the chocolate to partially set for 2-3 minutes at room temperature, ensuring the kiss remains stable.
- Apply another tiny amount of melted chocolate to the opposite rounded side of the cookie.
- Attach an unmelted baking chip vertically to create the acorn’s stem, holding briefly to ensure proper adhesion.
- Let the candy acorns rest at room temperature for 15-20 minutes until the chocolate completely hardens.
- Arrange the finished acorns on a serving platter or store in an airtight container for later enjoyment.
Notes
- Double-check chocolate quality for smoother melting and better taste texture.
- Use parchment paper or silicone mat to prevent sticking during cooling process.
- Select uniform cookies and kisses for consistent, professional-looking candy acorns.
- Work quickly while chocolate remains melted to ensure clean, precise assembly.
- Prep Time: 10 minutes
- Cook Time: 20 minutes
- Category: Snacks, Desserts
- Method: Melting
- Cuisine: American
Nutrition
- Serving Size: 20
- Calories: 92
- Sugar: 6g
- Sodium: 22mg
- Fat: 4g
- Saturated Fat: 2g
- Unsaturated Fat: 2g
- Trans Fat: 0g
- Carbohydrates: 12g
- Fiber: 0g
- Protein: 1g
- Cholesterol: 0mg
Marcus Reed
Founder & Food Content Creator
Expertise
Single-recipe development, Seasonal and local ingredient utilization, Food photography and styling, Culinary writing and content creation
Education
Culinary Arts Certificate, Blue Ridge Community and Technical College, WV
Focus: Fundamentals of culinary techniques, emphasizing hands-on experience in small-scale kitchen settings.
Marcus’s story begins in Asheville, where good food and family kitchens shaped his earliest memories. After hands-on culinary training and a lot of trial (and a little error), he realized that real cooking isn’t about perfection, it’s about connection.
At Pan and Oven, Marcus crafts recipes that are easy to follow, packed with flavor, and built for real kitchens.