
Dreamy Creamy Cut-Out Cookies Recipe: Whip Up Joy Today
Sweet moments often begin with a classic creamy cut-out cookies recipe that melts hearts and creates lasting memories.
Soft, buttery, and delightfully delicate, these cookies are a baker’s dream come true.
Each carefully crafted bite promises pure comfort and nostalgia.
The smooth dough rolls out effortlessly, waiting to be shaped into festive designs that sparkle with joy.
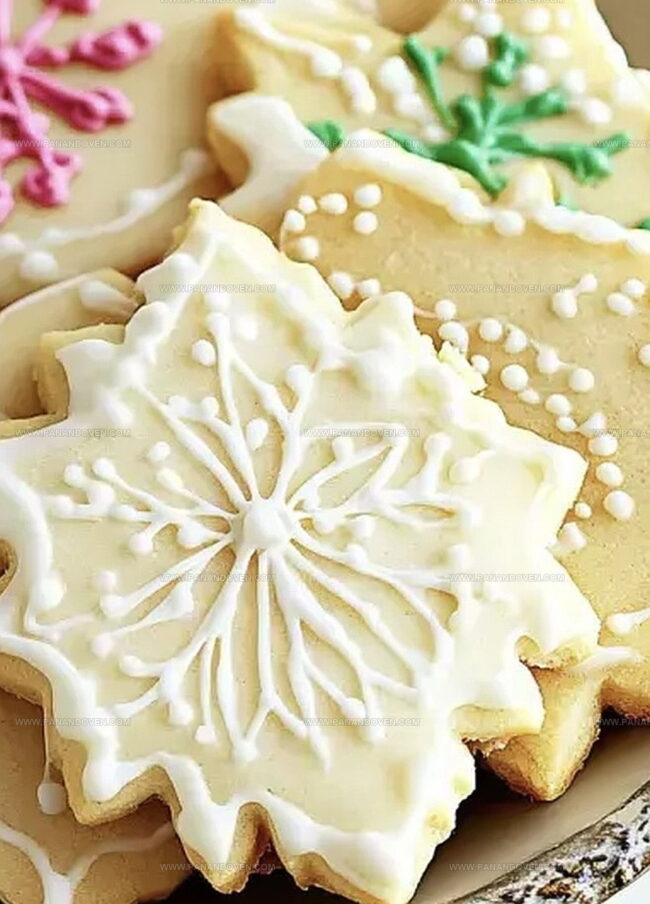
Decorative icing adds a personal touch that turns simple cookies into edible art.
You’ll love how these treats bring smiles and warmth to any gathering.
Bake a batch and watch magic unfold in your kitchen.
Sour Cream Cut-Out Cookies: Baking Joys
Ingredients for Sour Cream Cookie Dough
Cookie Cutter & Baking Equipment List

How to Make Sour Cream Cut-Out Cookies

Step 1: Mixing Dry Ingredients
Grab a medium bowl and whisk together flour, baking soda, salt, baking powder, and a touch of nutmeg until everything is perfectly blended.
Step 2: Creaming Butter And Sugar
In a large bowl, beat butter and sugar until the mixture becomes light, fluffy, and looks like a cloud of sweetness.
Step 3: Incorporating Wet Components
Crack an egg into the butter mixture and beat thoroughly.
Then gently fold in the sour cream, creating a smooth and creamy base.
Step 4: Blending Ingredients
Slowly add the dry ingredients to the wet mixture, stirring carefully until just combined.
Don’t overmix – you want a tender cookie.
Step 5: Chilling The Dough
Pop the dough into the refrigerator for at least an hour.
This helps the cookies keep their shape and enhances the flavors.
Step 6: Rolling Out The Dough
Dust your work surface with flour and roll out the chilled dough to about 1/4 inch thickness.
Aim for an even, smooth surface.
Step 7: Cutting Cookie Shapes
Use fun cookie cutters to create delightful shapes.
Carefully transfer the cut cookies to a parchment-lined baking sheet, leaving space between each one.
Step 8: Baking To Perfection
Heat the oven to 375F (190C).
Bake the cookies for 10-12 minutes until the edges turn a light golden color.
The tops should remain pale and soft.
Step 9: Crafting Buttercream Frosting
Whip up a classic buttercream frosting, adding a splash of vanilla and optional almond extract for extra flavor.
Step 10: Decorating Cookies
Once the cookies have completely cooled, generously frost them with your prepared buttercream.
Let your creativity shine!
Tips for Soft, Cut-Out Cookies
Sour Cream Cookie Recipe Options
Ways to Serve Sour Cream Cookies
Keeping Sour Cream Cookies Tender

FAQs

Chilling helps prevent spreading and maintains the cookie’s shape during baking. Cold dough is firmer and easier to handle, ensuring clean cuts and precise edges.
Yes, you can freeze the dough for up to 3 months. Wrap it tightly in plastic wrap and place in a freezer bag. Thaw in the refrigerator overnight before rolling and cutting.
Look for light golden edges while keeping the tops pale. They should look set but not browned. The cookies will continue to firm up after removing from the oven.
Print
Creamy Cut-Out Cookies Recipe
- Total Time: 42 minutes
- Yield: 24 1x
Description
Classic creamy cut-out cookies invite bakers into a world of delicate sweetness and nostalgic charm. German baking traditions shine through this simple yet elegant dessert that provides joy with each carefully crafted bite.
Ingredients
Dry Ingredients:
- 2 1/4 cups (280 grams) all-purpose flour
- 1 teaspoon baking soda
- 1 teaspoon salt
- 1 teaspoon baking powder
- 1/2 teaspoon nutmeg
Wet Ingredients:
- 1 cup (227 grams) unsalted butter, at room temperature
- 1 cup (200 grams) granulated sugar
- 1 egg
- 1/2 cup (120 milliliters) sour cream
Optional Frosting:
- Buttercream frosting (with vanilla and almond flavoring)
Instructions
- Blend flour, baking soda, salt, baking powder, and nutmeg thoroughly in a medium mixing bowl using a whisk.
- Utilize an electric mixer to cream butter and sugar until the mixture achieves a pale, airy consistency with soft peaks.
- Incorporate egg into the butter mixture, then gently fold in sour cream until smooth and well-integrated.
- Gradually introduce dry ingredient mixture into wet ingredients, stirring minimally to prevent overmixing and maintain tender cookie texture.
- Transfer dough to refrigerator and allow to chill for 60-90 minutes, which helps prevent spreading and maintains precise cookie shapes.
- Dust work surface generously with flour, then roll chilled dough to approximately 1/4 inch uniform thickness using gentle, even pressure.
- Select decorative cookie cutters and press firmly into rolled dough, positioning shapes closely to maximize dough usage.
- Transfer cut cookies onto parchment-lined baking sheets, spacing them approximately 1 inch apart to prevent merging during baking.
- Preheat oven to 375°F (190°C) and bake cookies for 10-12 minutes, watching for delicate golden edges while maintaining a pale, soft center.
- After complete cooling, prepare buttercream frosting with optional vanilla and almond extracts, then carefully decorate cookies with smooth, even strokes.
Notes
- Chill dough thoroughly to prevent spreading and maintain crisp cookie shapes during baking.
- Use room temperature ingredients to ensure smooth, even mixing and consistent texture.
- Minimize handling of dough to keep cookies tender and prevent tough, dense results.
- Experiment with different extracts like lemon or orange to create unique flavor variations that complement the sour cream’s tangy profile.
- Prep Time: 30 minutes
- Cook Time: 12 minutes
- Category: Desserts, Snacks
- Method: Baking
- Cuisine: American
Nutrition
- Serving Size: 24
- Calories: 150
- Sugar: 6 g
- Sodium: 80 mg
- Fat: 7 g
- Saturated Fat: 4 g
- Unsaturated Fat: 2 g
- Trans Fat: 0 g
- Carbohydrates: 22 g
- Fiber: 0 g
- Protein: 2 g
- Cholesterol: 20 mg
Marcus Reed
Founder & Food Content Creator
Expertise
Single-recipe development, Seasonal and local ingredient utilization, Food photography and styling, Culinary writing and content creation
Education
Culinary Arts Certificate, Blue Ridge Community and Technical College, WV
Focus: Fundamentals of culinary techniques, emphasizing hands-on experience in small-scale kitchen settings.
Marcus’s story begins in Asheville, where good food and family kitchens shaped his earliest memories. After hands-on culinary training and a lot of trial (and a little error), he realized that real cooking isn’t about perfection, it’s about connection.
At Pan and Oven, Marcus crafts recipes that are easy to follow, packed with flavor, and built for real kitchens.