
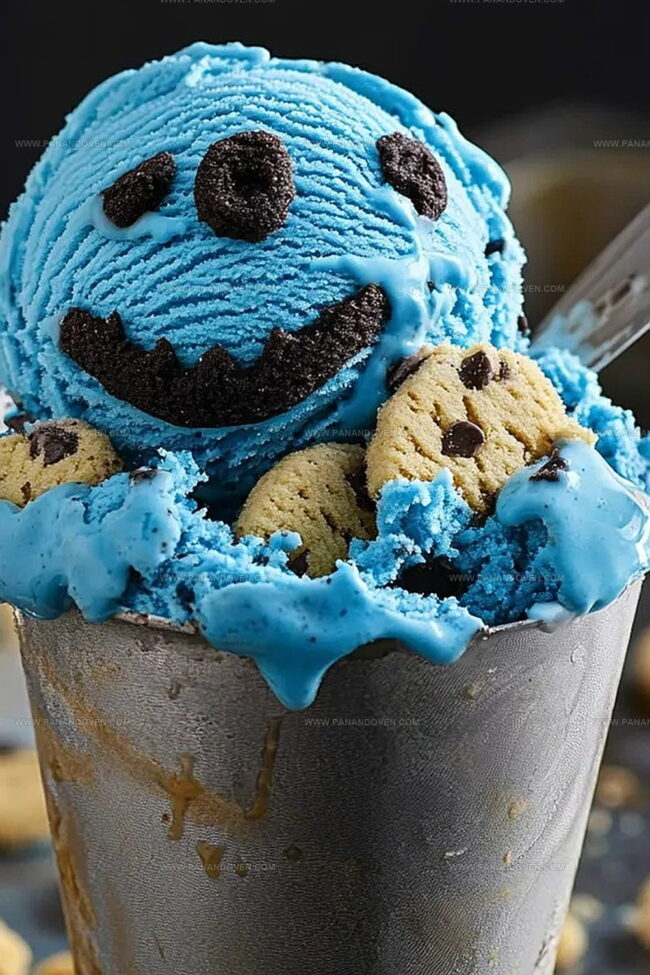
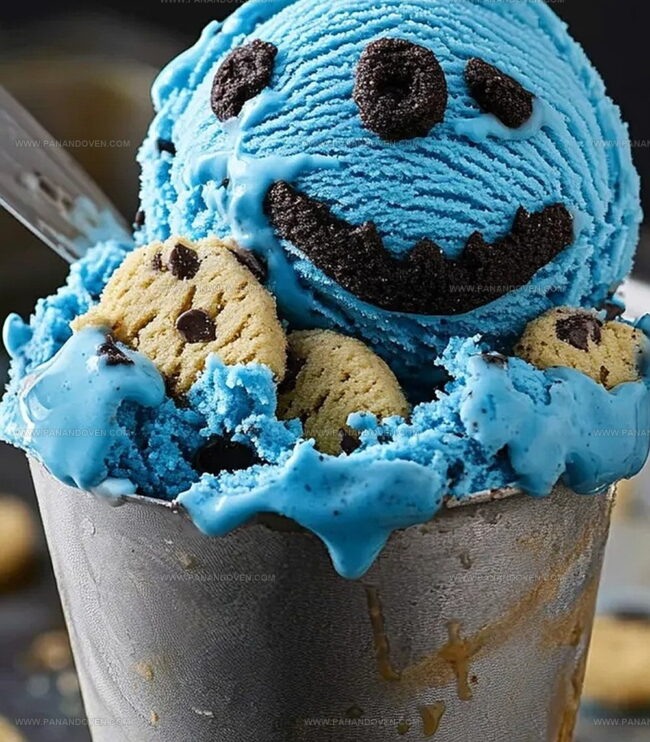
Homemade Cookie Monster Ice Cream Recipe: Fun Blue Treat
Indulge in a whimsical dessert that brings childhood nostalgia to life with this vibrant cookie monster ice cream recipe bursting with color and fun.
Blue-tinted vanilla base swirls with chunky chocolate chip cookie pieces that dance through each creamy scoop.
Soft, playful, and utterly delightful, this treat captures the spirit of everyone’s favorite fuzzy blue character.
cookie crumbles add delightful texture and crunch to the smooth, cool backdrop of sweet cream.
No mixer needed for this simple dessert that comes together in minutes.
Each spoonful promises a burst of joy and sweet memories.
Grab a spoon and dive into this magical frozen creation that will make you smile from the first colorful bite.
Cookie Monster Ice Cream Fun Treat
Ingredients for Cookie Monster Ice Cream
Dairy Base:Flavor Enhancers:Cookie Mix-Ins:Tools Needed for Cookie Monster Ice Cream
How to Make Cookie Monster Ice Cream at Home
Step 1: Whip Creamy Blue Base
Grab your mixer and pour in the heavy whipping cream.
Add vanilla extract and blue gel food coloring.
Whip everything together until the mixture forms gorgeous stiff peaks that stand up tall and proud.
The blue color should look vibrant and playful.
Step 2: Blend Sweet Smoothness
Pour in the sweetened condensed milk and mix on low speed.
Swirl in additional blue food coloring if you want a deeper blue shade.
Make sure everything blends smoothly without any lumps.
Step 3: Sprinkle Cookie Chunks
Carefully fold chopped cookies into the creamy mixture.
Use these cookies for extra fun:Distribute cookie pieces throughout the ice cream base.
Sprinkle some extra cookie bits on top for a delightful crunch and visual appeal.
Step 4: Freeze and Set
Transfer the mixture to a loaf pan or 8-inch cake pan.
Cover completely with plastic wrap or a tight-fitting lid.
Place in the freezer and let it chill for at least 6 hours.
Overnight freezing works best to create a perfectly firm and creamy texture.
Step 5: Scoop and Enjoy
Remove from freezer, let sit for a few minutes, then scoop and serve.
Your Cookie Monster Ice Cream is ready to devour!
Tips for Blue Cookie Monster Scoops
Creative Swaps for Cookie Monster Ice Cream
Serving Cookie Monster Ice Cream Playfully
Storing Cookie Monster Ice Cream
FAQs
Fold the cookies gently at the very end and avoid overmixing. Add cookie pieces just before freezing to maintain their crunch and prevent them from becoming mushy.
Absolutely! While Oreos and Chips Ahoy work great, you can experiment with chocolate chip cookies, graham crackers, or any crunchy cookie you enjoy. Just ensure they’re chopped into bite-sized pieces.
You can skip the food coloring and make a white version of the ice cream. Alternatively, use other gel food colors like green or purple for a fun twist on the classic Cookie Monster theme.
Print
Cookie Monster Ice Cream Recipe
- Total Time: 15 minutes
- Yield: 8 1x
Description
Cookie monster blue ice cream celebrates childhood nostalgia with creamy vanilla base and colorful cookie mix-ins. Playful dessert brings joy and whimsy to summer treats you will devour with pure delight.
Ingredients
Cookies
- 20 Oreos, chopped
- 15 Chips Ahoy cookies, chopped
Base Ingredients
- 1 pint (473 ml) heavy whipping cream
- 14 ounces (397 grams) sweetened condensed milk
- 1 tablespoon vanilla extract
- 1/2 teaspoon blue gel food coloring (AmeriColor recommended)
Instructions
- Prepare the whipping base by vigorously blending heavy whipping cream with vanilla extract and blue gel food coloring using an electric mixer until stiff, voluminous peaks develop.
- Incorporate sweetened condensed milk into the whipped mixture at low speed, ensuring thorough integration and adjusting blue coloration to achieve desired vibrant azure tone.
- Delicately fold crushed Oreo and Chips Ahoy cookies into the creamy mixture, distributing them evenly throughout the base.
- Transfer the ice cream blend into a chilled loaf pan, artfully garnishing the surface with additional cookie fragments for textural intrigue.
- Seal the pan securely with plastic wrap or tight-fitting lid, then place in freezer for 6-8 hours or overnight until completely solidified.
- Remove from freezer approximately 5-10 minutes before serving to allow slight softening, which enhances scooping and flavor release.
Notes
- Customize Color Intensity Adjust the blue gel food coloring gradually to achieve the perfect Cookie Monster shade, ensuring vibrant yet natural-looking results.
- Cookie Texture Variation Roughly chop cookies for varied sizes, creating exciting texture differences throughout the ice cream and preventing uniform crumbles.
- Storage Hack Wrap the ice cream container tightly with plastic wrap and place in an airtight container to prevent freezer burn and maintain creamy consistency.
- Dietary Modifications Substitute dairy ingredients with coconut cream and condensed coconut milk for a vegan-friendly version that maintains the same rich, indulgent texture.
- Prep Time: 15 minutes (excluding freezing time)
- Cook Time: 0 minutes
- Category: Desserts, Snacks
- Method: Freezing
- Cuisine: American
Nutrition
- Serving Size: 8
- Calories: 370
- Sugar: 22 g
- Sodium: 120 mg
- Fat: 24 g
- Saturated Fat: 14 g
- Unsaturated Fat: 8 g
- Trans Fat: 0 g
- Carbohydrates: 36 g
- Fiber: 1 g
- Protein: 4 g
- Cholesterol: 80 mg
Clara Thompson
Recipe Developer & Food Educator
Expertise
Plant-based and vegetarian recipe development, Nutritional analysis and meal planning, Culinary education and workshop facilitation, Content writing with a focus on healthy living
Education
Diploma in Culinary Arts, Mt. San Jacinto College, CA
Focus: Comprehensive culinary training with an emphasis on sustainable cooking practices.
Certificate in Nutrition and Healthy Living, Cornell University (Online Program)
Focus: Understanding the principles of nutrition to create balanced and health-conscious recipes.
Clara lives where fresh ideas and fresh ingredients meet. She pairs her culinary know-how with her passion for healthy, planet-friendly cooking.
For Clara, good food should taste great, nourish your body, and feel easy to make. Her recipes highlight whole foods, colorful produce, and a deep respect for seasonal eating.