
Charming Chocolate Easter Egg Nest Cake Recipe for Spring Fun
Chocolate lovers rejoice as this delectable chocolate Easter egg nest cake recipe brings pure magic to your dessert table.
Nestled with charm and whimsy, the cake combines rich chocolate flavors with playful Easter egg decorations.
Spring celebrations deserve something special and sweet.
chocolate crumbs mingle with delicate nest-like textures, creating a dessert that delights both children and adults.
Each slice promises a delightful journey of flavor and festive fun.
This irresistible treat will become the centerpiece of your Easter gathering.
Prepare to wow your guests with a cake that tastes as beautiful as it looks.
Why You’ll Love Chocolate Easter Egg Nest Cake
What You’ll Need for Easter Egg Nest Cake
Cake Base Ingredients:Wet Ingredients:Decoration and Topping Ingredients:Tools for Baking and Decorating Nest Cake
Steps to Build a Fun Easter Egg Nest Cake
Step 1: Whip Up the Chocolate Cake Base
Preheat your oven to a toasty 350F (175C).
Grab a 9-inch round cake pan and give it a quick spray with cooking oil, then line the bottom with parchment paper.
In a big mixing bowl, blend together:Pour in the buttermilk, vegetable oil, eggs, and vanilla extract.
Mix everything until it looks smooth and silky.
Slowly stir in hot water or coffee, which will make the batter look thin and runny – don’t worry, that’s totally normal!
Step 2: Bake the Chocolatey Goodness
Pour the batter into your prepared pan and slide it into the oven.
Bake for 30-35 minutes until a toothpick comes out clean when you poke the center.
Let the cake hang out in the pan for 10 minutes, then transfer it to a wire rack to cool completely.
Step 3: Create Dreamy Chocolate Ganache
Heat heavy cream in a saucepan until it just starts to simmer – no boiling allowed!
Take it off the heat and pour over chopped dark chocolate.
Let it sit quietly for 2-3 minutes, then stir until ultra-smooth.
Add butter and mix until everything looks glossy.
Allow the ganache to cool and thicken slightly.
Step 4: Craft a Chocolate Nest
Melt dark chocolate in the microwave, stirring every 30 seconds until perfectly smooth.
Transfer to a piping bag or ziplock bag with a tiny corner snipped off.
On a parchment-lined baking tray, pipe chocolate in crisscrossing strands to form a nest shape.
Chill in the refrigerator for 15-20 minutes until firm.
Step 5: Decorate and Serve
Place the cooled cake on a pretty serving platter.
Pour ganache over the top, letting it dramatically drip down the sides.
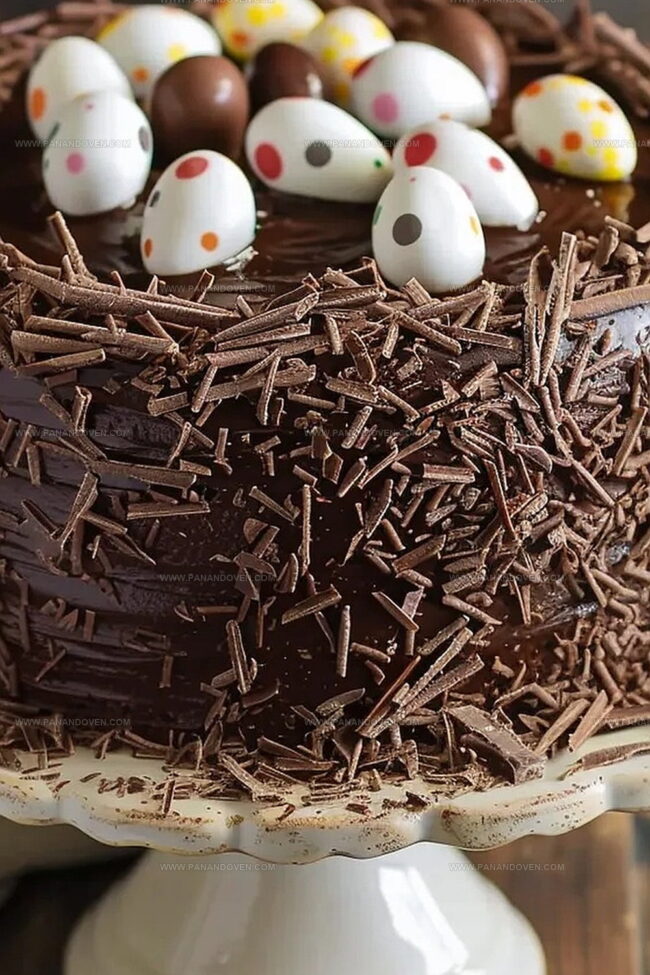
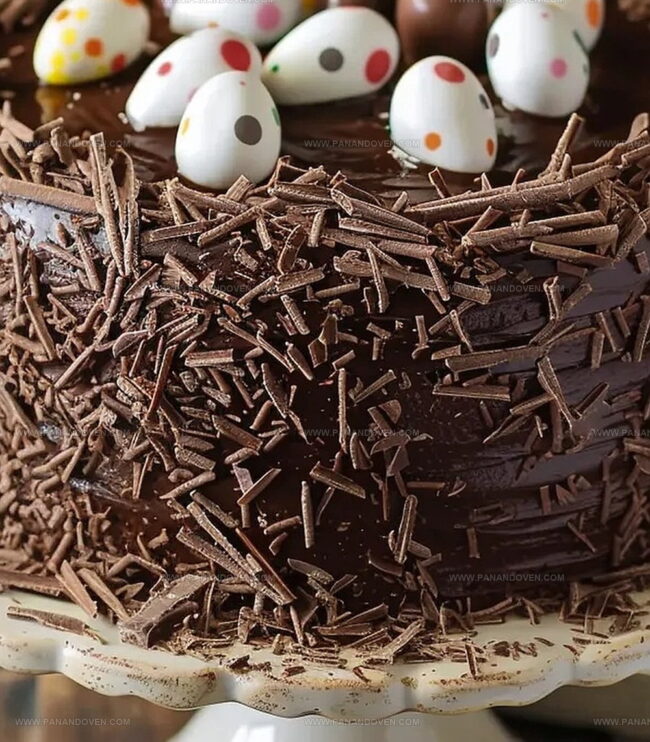
Carefully lift the chocolate nest off the parchment and nestle it on top of the cake.
Fill the nest with adorable mini chocolate eggs and get ready to wow your guests!
Cake Tips for Rich Flavor and Perfect Texture
Creative Twists for Chocolate Nest Cake
Ways to Serve Easter Egg Nest Cake at Parties
How to Store Chocolate Easter Egg Nest Cake
FAQs
Dark chocolate provides a richer flavor, but you can substitute milk chocolate. Just note that milk chocolate is sweeter and might change the overall taste and texture of the ganache and nest.
You only need a piping bag or a ziplock bag with a corner cut off. A baking tray and parchment paper are helpful for creating the nest shape, but these are common kitchen items.
Insert a toothpick into the center of the cake. If it comes out clean with no wet batter, your cake is done. The baking time is typically 30-35 minutes at 350F (175C).
Print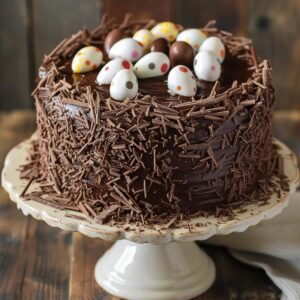
Chocolate Easter Egg Nest Cake Recipe
- Total Time: 1 hour 5 minutes
- Yield: 12 1x
Description
Delectable chocolate easter egg nest cake brings together rich cocoa layers nestled with delicate chocolate eggs. Sweet chocolate crumbles and creamy frosting create a festive dessert perfect for spring celebrations you’ll cherish.
Ingredients
Primary Ingredients:
- 2 cups (400g) granulated sugar
- 1 3/4 cups (220g) all-purpose flour
- 3/4 cup (75g) unsweetened cocoa powder
- 2 large eggs
- 1 cup (240ml) buttermilk
- 1 cup (240ml) hot water or coffee
Leavening and Seasoning Ingredients:
- 2 teaspoons baking powder
- 1 teaspoon baking soda
- 1/2 teaspoon salt
- 2 teaspoons vanilla extract
- 1/2 cup (120ml) vegetable oil
Decorative and Finishing Ingredients:
- 1 cup (240ml) heavy cream
- 8 ounces (225g) dark chocolate, chopped
- 6 ounces (170g) dark chocolate, melted
- 1 tablespoon unsalted butter
- mini chocolate eggs or candy-coated Easter eggs for decoration
Instructions
- Prepare the chocolate cake: Preheat the oven to 350F (175C). Coat a 9-inch round cake pan with butter and line with parchment paper. Combine dry ingredients in a mixing bowl, whisking flour, cocoa powder, sugar, baking powder, baking soda, and salt together. Incorporate wet ingredients by adding buttermilk, vegetable oil, eggs, and vanilla extract, mixing until smooth. Gradually blend in hot water or coffee, creating a thin, silky batter.
- Bake the cake: Transfer batter to the prepared pan and bake for 30-35 minutes. Check doneness by inserting a toothpick into the center – it should come out clean. Allow cake to rest in the pan for 10 minutes, then carefully transfer to a wire rack for complete cooling.
- Craft the chocolate ganache: Gently heat heavy cream in a saucepan until it reaches a soft simmer, avoiding boiling. Pour hot cream over chopped dark chocolate in a bowl. Let mixture sit undisturbed for 2-3 minutes to melt chocolate, then stir until achieving a glossy, smooth consistency. Incorporate butter and mix thoroughly. Allow ganache to cool and thicken slightly while remaining pourable.
- Design the chocolate nest: Melt dark chocolate using microwave in 30-second intervals, stirring between each session. Use a piping bag or ziplock bag to create intricate chocolate strands on parchment paper, forming a circular nest shape. Chill in refrigerator for 15-20 minutes until chocolate sets firmly.
- Final assembly: Position cooled cake on a decorative serving platter. Generously drizzle chocolate ganache over the cake, allowing elegant drips down the sides. Delicately transfer the chocolate nest onto the cake’s surface. Artfully arrange mini chocolate eggs inside the nest before presenting.
Notes
- Use room temperature ingredients to ensure smooth, even mixing and optimal cake texture.
- Add a splash of strong coffee to enhance the chocolate flavor without making the cake taste like coffee.
- For a gluten-free version, substitute all-purpose flour with gluten-free flour blend and add xanthan gum for better structure.
- Prevent chocolate nest from breaking by using tempered chocolate or adding a small amount of coconut oil for flexibility.
- Prep Time: 30 minutes
- Cook Time: 35 minutes
- Category: Desserts
- Method: Baking
- Cuisine: British
Nutrition
- Serving Size: 12
- Calories: 487
- Sugar: 38g
- Sodium: 330mg
- Fat: 27g
- Saturated Fat: 15g
- Unsaturated Fat: 10g
- Trans Fat: 0g
- Carbohydrates: 56g
- Fiber: 3g
- Protein: 5g
- Cholesterol: 50mg
Clara Thompson
Recipe Developer & Food Educator
Expertise
Plant-based and vegetarian recipe development, Nutritional analysis and meal planning, Culinary education and workshop facilitation, Content writing with a focus on healthy living
Education
Diploma in Culinary Arts, Mt. San Jacinto College, CA
Focus: Comprehensive culinary training with an emphasis on sustainable cooking practices.
Certificate in Nutrition and Healthy Living, Cornell University (Online Program)
Focus: Understanding the principles of nutrition to create balanced and health-conscious recipes.
Clara lives where fresh ideas and fresh ingredients meet. She pairs her culinary know-how with her passion for healthy, planet-friendly cooking.
For Clara, good food should taste great, nourish your body, and feel easy to make. Her recipes highlight whole foods, colorful produce, and a deep respect for seasonal eating.