
The Cheesiest Taco Breadsticks Recipe You’ll Ever Crave
Crispy golden breadsticks packed with spicy taco seasoning and melted cheese have been a total game-changer in my weekend snack rotation.
These zesty cheesy taco breadsticks bring an explosion of southwestern flavors that dance across your taste buds.
The recipe combines simple ingredients with bold, punchy seasonings that elevate a basic breadstick into something extraordinary.
Comfort food meets Mexican-inspired excitement in every single bite.
cheesy, savory, and perfectly crisp, these breadsticks work brilliantly as an appetizer or standalone snack.
Each stick promises a mouthwatering blend of gooey cheese and warm spices that’ll have everyone asking for seconds.
Prepare to transform an ordinary evening into a delicious culinary adventure.
Cheesy Taco Breadsticks: Snackable Mexican Fusion
Flavorful Ingredients For Cheesy Taco Breadstick Magic
Main Protein:Dough and Cheese:Seasoning and Aromatics:Finishing Touches:Tools Needed For Stuffed Breadstick Goodness
Breadstick Baking Steps For Cheesy Taco Flavor
Step 1: Sizzle and Spice Ground Beef
In a large skillet, heat up the pan and toss in diced onions and minced garlic.
Let them dance around until they become soft and fragrant.
Add ground beef and sprinkle with:Cook the mixture until the beef turns a rich, deep brown.
Break up the meat into small crumbles as it cooks.
Once done, set the beef mixture aside to cool slightly.
Step 2: Warm Up the Oven
Crank your oven to a toasty 425°F (220°C).
Let it heat up while you prepare the rest of the ingredients.
Step 3: Roll and Stuff the Dough
Dust your work surface with flour.
Gently stretch out the pizza dough and slice it into 5 equal strips.
Down the center of each strip, layer:Step 4: Create Taco Cheese Rollers
Carefully fold the dough over the filling.
Pinch and seal the edges tightly, making sure no cheese or meat can escape.
Crimp the ends to create neat little parcels.
Step 5: Prep for Baking
Drizzle olive oil over each roller, giving them a beautiful golden sheen.
Place the rollers on a baking sheet lined with parchment paper.
Step 6: First Bake
Slide the baking sheet into the preheated oven.
Bake for 10 minutes until the dough starts to turn golden.
Step 7: Cheese Finale
Pull the rollers out and sprinkle additional cheese on top.
Return to the oven for another 5 minutes until the cheese melts and becomes bubbly and slightly crisp.
Step 8: Serve and Enjoy
Let the rollers cool for a few minutes.
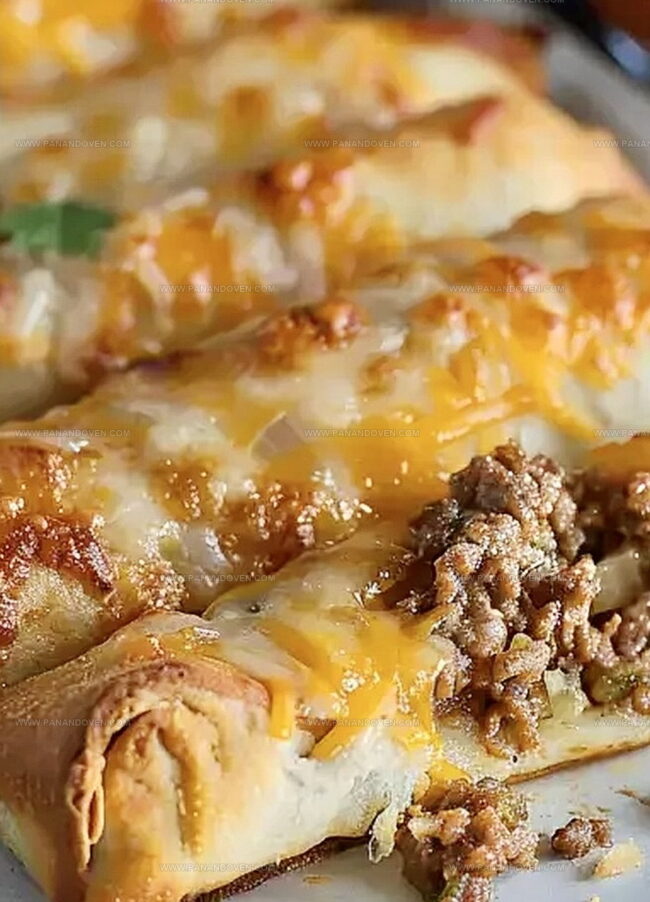
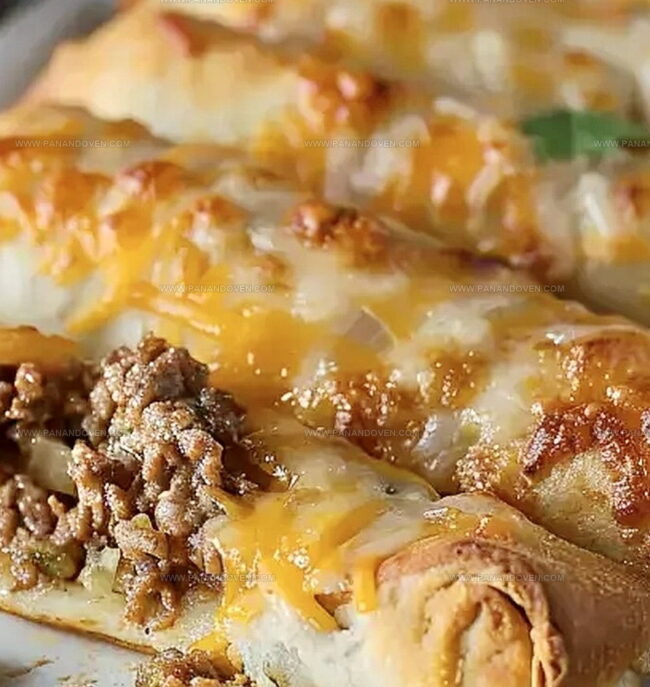
Slice diagonally and serve hot with salsa or sour cream on the side.
Tips For Gooey Cheese And Soft Breadsticks
Flavor Twists On Cheesy Taco Breadsticks
Fun Dips And Serving Ideas For Breadsticks
Breadstick Storage To Keep Them Soft
FAQs
Mexican cheese blend is ideal, but you can also use shredded cheddar, Monterey Jack, or a mix of cheeses for great flavor and melting properties.
Absolutely! Ground turkey is a perfect lean protein substitute that will work wonderfully with the taco seasoning and maintain similar taste and texture.
Pinch the dough edges firmly and ensure the seams are completely sealed to keep the filling inside during baking. Press the edges together carefully and fold them tightly.
Print
Cheesy Taco Breadsticks Recipe
- Total Time: 40 minutes
- Yield: 4 1x
Description
Cheesy taco breadsticks bring Mexican-inspired comfort to classic appetizers. Crispy edges, melted cheese, and zesty spices create an irresistible snack you’ll want to devour with friends.
Ingredients
Main Protein:
- 1 lb (455 g) ground beef
- 2 tablespoons taco seasoning
Dough and Cheese:
- 1 lb (455 g) pizza dough, rolled out into a rectangle
- 1 cup (100 g) Mexican cheese blend
- 1 tablespoon olive oil
Aromatics and Dips:
- 1 small onion, diced
- 1 tablespoon garlic, minced
- Salsa, for dipping
- Guacamole, for dipping
Instructions
- Sauté diced onions and minced garlic in a skillet until fragrant and translucent, releasing their aromatic flavors.
- Incorporate ground beef and taco seasoning, stirring continuously until the meat browns evenly and develops a rich, spicy profile.
- Remove beef mixture from heat and allow to cool slightly while preparing the dough.
- Preheat the oven to 425°F (220°C), ensuring a hot environment for optimal baking.
- Roll out pizza dough on a lightly floured surface, creating five uniform rectangular strips.
- Distribute the seasoned beef mixture down the center of each dough strip, leaving space at the edges.
- Sprinkle Mexican cheese blend generously over the beef filling.
- Carefully fold the dough edges over the filling, pinching and sealing to create a secure, enclosed breadstick.
- Crimp the ends tightly to prevent the filling from leaking during baking.
- Brush the exterior of each breadstick with olive oil, promoting a golden, crispy exterior.
- Arrange breadsticks on a prepared baking sheet, ensuring they are not touching.
- Bake for 10 minutes until the dough begins to turn golden and firm.
- Remove from oven and top each breadstick with additional cheese for extra melty goodness.
- Return to oven and bake for an additional 5 minutes until cheese is completely melted and slightly browned.
Notes
- Customize the meat by using ground turkey or plant-based crumbles for a healthier alternative.
- Use gluten-free pizza dough to make this recipe suitable for those with gluten sensitivities.
- Enhance flavor by adding fresh chopped jalapeños or diced bell peppers to the beef mixture for extra zest.
- Experiment with different cheese blends like pepper jack or sharp cheddar to create unique flavor profiles.
- Prep Time: 25 minutes
- Cook Time: 15 minutes
- Category: Appetizer, Snacks, Dinner
- Method: Baking
- Cuisine: Mexican
Nutrition
- Serving Size: 4
- Calories: 400
- Sugar: 1 g
- Sodium: 700 mg
- Fat: 20 g
- Saturated Fat: 8 g
- Unsaturated Fat: 10 g
- Trans Fat: 0 g
- Carbohydrates: 35 g
- Fiber: 2 g
- Protein: 18 g
- Cholesterol: 60 mg
Marcus Reed
Founder & Food Content Creator
Expertise
Single-recipe development, Seasonal and local ingredient utilization, Food photography and styling, Culinary writing and content creation
Education
Culinary Arts Certificate, Blue Ridge Community and Technical College, WV
Focus: Fundamentals of culinary techniques, emphasizing hands-on experience in small-scale kitchen settings.
Marcus’s story begins in Asheville, where good food and family kitchens shaped his earliest memories. After hands-on culinary training and a lot of trial (and a little error), he realized that real cooking isn’t about perfection, it’s about connection.
At Pan and Oven, Marcus crafts recipes that are easy to follow, packed with flavor, and built for real kitchens.