Heavenly Cheesy PB&J Cheesecake Recipe: Sweet Bliss on a Plate
Dessert enthusiasts adore this nostalgic cheesy pb&j cheesecake recipe that blends childhood memories with gourmet sophistication.
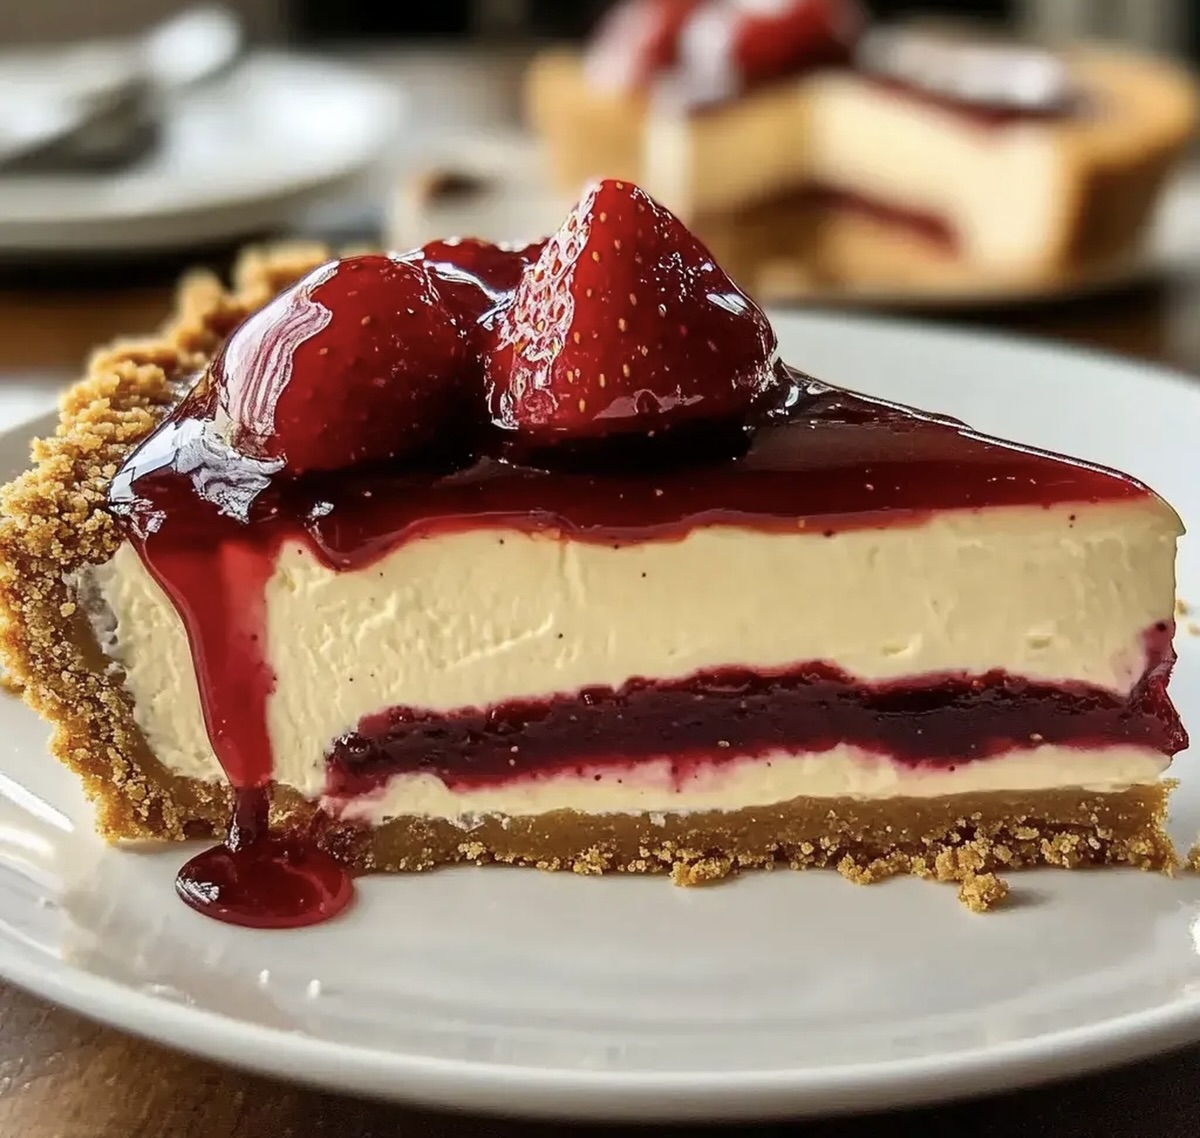
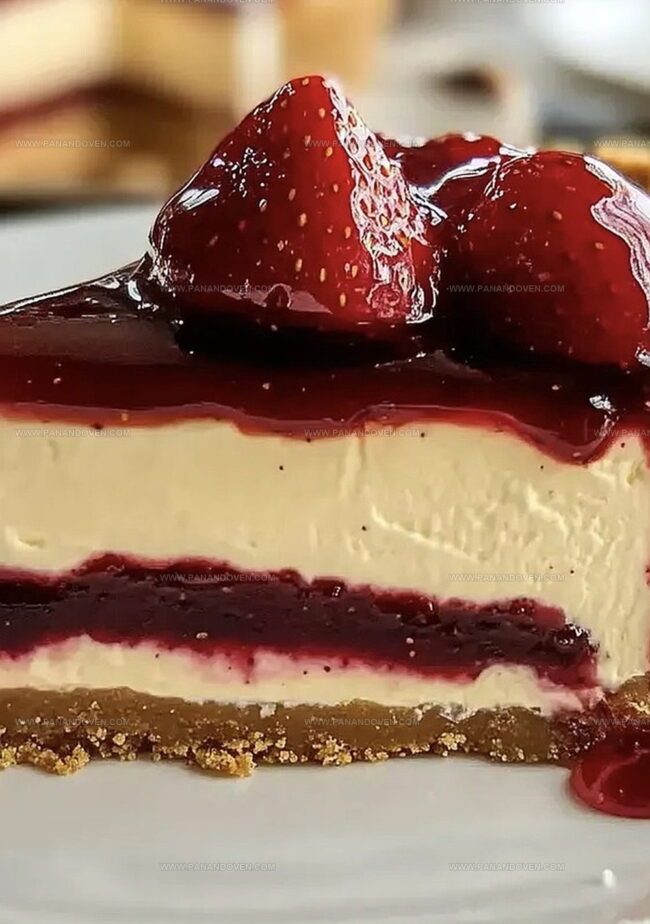
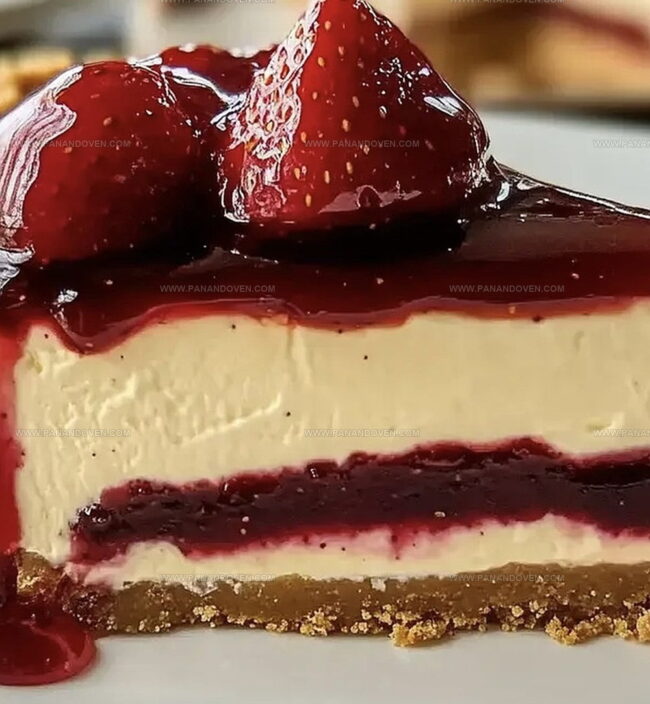
Sweet and tangy flavors dance across a creamy landscape of decadent indulgence.
The classic sandwich gets a luxurious makeover through rich cream cheese and smooth peanut butter layers.
Swirls of vibrant raspberry jam add a playful burst of color and taste to every slice.
Crumbly graham cracker crust provides the perfect textural foundation for this innovative treat.
Each bite promises a delightful journey through familiar yet unexpected flavor combinations.
You’ll want to savor every creamy, fruity, nutty moment of this extraordinary dessert.
Peanut Butter & Jelly Cheesecake: What’s Special
Key Ingredients for PB&J Cheesecake
Crust:Cheesecake Filling:Topping:Baking Tools for Cheesecake Success
PB&J Cheesecake: How to Prepare It
Step 1: Warm Up The Oven
Get your oven ready by turning the dial to 325F (165C).
Grab a 9-inch springform pan and give it a quick spray or butter coating to prevent sticking.
Step 2: Create The Crumbly Base
In a mixing bowl, grab these ingredients:Press the mixture firmly into the bottom of your prepared pan.
Pop it into the oven and bake for 10 minutes.
Let the crust cool down completely.
Step 3: Whip Up The Creamy Filling
In a large mixing bowl, blend together:Mix until the texture is silky smooth and free of lumps.
Step 4: Add Flavor Enhancers
Pour in vanilla extract and mix thoroughly to distribute the flavor evenly.
Step 5: Incorporate Eggs
Gently add eggs one at a time, stirring well after each addition to create a uniform mixture.
Step 6: Pour In Cream
Slowly introduce heavy whipping cream and blend until just combined.
Don’t overmix!
Step 7: Fill The Pan
Transfer the luscious filling over the cooled crust, spreading it evenly.
Step 8: Bake To Perfection
Slide the pan into the oven and bake for 50-60 minutes.
The center should have a gentle jiggle when done.
Turn off the oven and let the cheesecake rest inside with the door slightly open.
Step 9: Chill And Set
Refrigerate the cheesecake for at least 4 hours or overnight to allow it to firm up completely.
Step 10: Add The Fruity Finale
Before serving, drizzle warm strawberry preserves or topping across the surface.
Step 11: Slice And Enjoy
Cut into beautiful slices and savor the dreamy combination of peanut butter and jelly in this decadent cheesecake.
Tips for Perfect Peanut Butter Cheesecake
Creative Takes on PB&J Cheesecake
Serving PB&J Cheesecake at Gatherings
Cheesecake Storage and Freshness Tips
FAQs

Yes, you can substitute peanut butter with almond butter, cashew butter, or sunflower seed butter for a different flavor profile.
Use room temperature ingredients, avoid overmixing, and bake in a water bath to help prevent cracks in the cheesecake.
Strawberry preserves work great, but you can also use raspberry, grape, or mixed berry jelly to complement the peanut butter flavor.
Substitute the graham cracker crust with gluten-free graham crackers or use gluten-free cookie crumbs to make the recipe gluten-free.
Print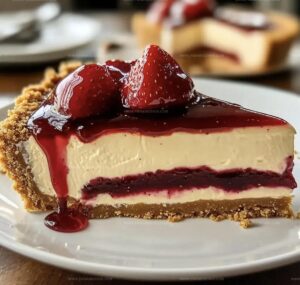
Cheesy PB&J Cheesecake Recipe
- Total Time: 1 hour 30 minutes
- Yield: 12 1x
Description
Delightful Cheesy PB&J Cheesecake marries classic comfort with gourmet flair, blending creamy cheesecake, nostalgic peanut butter, and sweet raspberry jam. Cheesecake enthusiasts will savor this playful dessert that brings childhood memories to elegant life.
Ingredients
Main Ingredients:
- 4 packages (8 ounces each) cream cheese, softened
- 1 cup smooth peanut butter
- 3 large eggs
- 3/4 cup sugar
Crust Ingredients:
- 2 cups graham cracker crumbs
- 6 tablespoons butter, melted
Additional Ingredients:
- 3 tablespoons flour
- 2 teaspoons vanilla extract
- 3/4 cup heavy whipping cream
- 1 1/2 cups strawberry topping or preserves, warmed
Instructions
- Preheat the oven to 325F (165C) and prepare a 9-inch springform pan with light greasing.
- Crush graham crackers and blend thoroughly with melted butter, creating a uniform mixture. Press firmly into the pan’s bottom, ensuring an even base. Bake for 10 minutes, then allow to cool completely.
- In a large mixing bowl, whip cream cheese, peanut butter, sugar, and flour until achieving a silky, homogeneous texture.
- Incorporate vanilla extract, blending seamlessly into the creamy mixture.
- Introduce eggs individually, gently folding and mixing after each addition to maintain a smooth consistency.
- Stream heavy whipping cream into the batter, stirring until just integrated.
- Carefully transfer the cheesecake filling over the cooled graham cracker crust.
- Bake for 50-60 minutes, monitoring until the center exhibits a subtle wobble. Switch off the oven, leaving the cheesecake inside with the door slightly open for gradual cooling.
- Refrigerate for a minimum of 4 hours or overnight to achieve optimal setting and flavor development.
- Prior to serving, warm strawberry preserves and generously spread across the cheesecake’s surface.
- Slice and present this luxurious dessert, showcasing the harmonious blend of rich peanut butter and sweet jelly flavors.
Notes
- Swap graham crackers with gluten-free alternatives like almond flour or crushed gluten-free cookies for a celiac-friendly version.
- Use reduced-fat cream cheese and natural peanut butter to create a lighter, healthier cheesecake without compromising taste.
- Prevent cheesecake cracking by avoiding overmixing eggs and using a water bath during baking for gentle, even heat distribution.
- Experiment with different fruit preserves like raspberry or grape to customize the jelly topping and create unique flavor combinations.
- Prep Time: 30 minutes
- Cook Time: 1 hour
- Category: Desserts
- Method: Baking
- Cuisine: American
Nutrition
- Serving Size: 12
- Calories: 450
- Sugar: 26 g
- Sodium: 370 mg
- Fat: 30 g
- Saturated Fat: 12 g
- Unsaturated Fat: 18 g
- Trans Fat: 0 g
- Carbohydrates: 38 g
- Fiber: 1 g
- Protein: 9 g
- Cholesterol: 90 mg
Marcus Reed
Founder & Food Content Creator
Expertise
Single-recipe development, Seasonal and local ingredient utilization, Food photography and styling, Culinary writing and content creation
Education
Culinary Arts Certificate, Blue Ridge Community and Technical College, WV
Focus: Fundamentals of culinary techniques, emphasizing hands-on experience in small-scale kitchen settings.
Marcus’s story begins in Asheville, where good food and family kitchens shaped his earliest memories. After hands-on culinary training and a lot of trial (and a little error), he realized that real cooking isn’t about perfection, it’s about connection.
At Pan and Oven, Marcus crafts recipes that are easy to follow, packed with flavor, and built for real kitchens.