
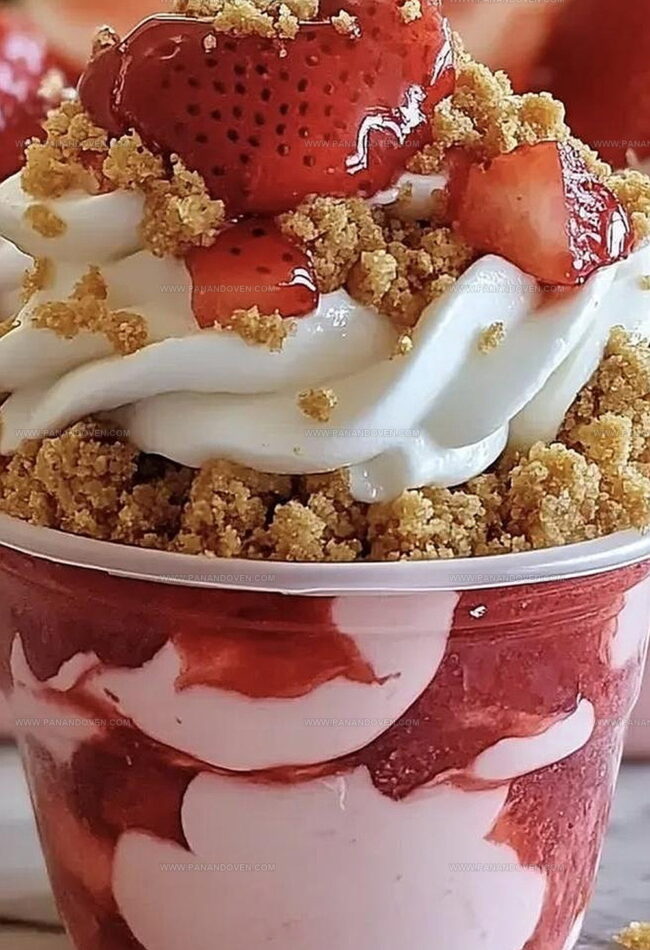
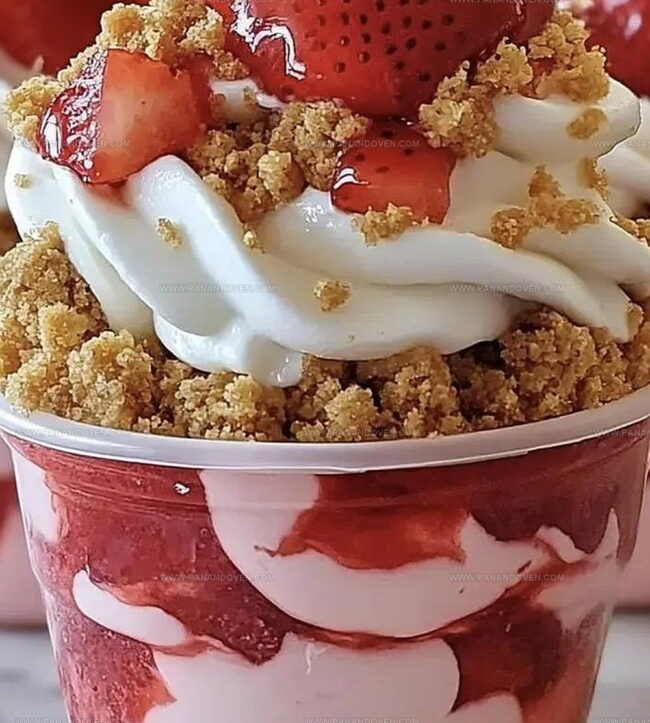
Dreamy Cheesecake Crunch Cup Recipe for Sweet Tooth Joy
Dessert enthusiasts adore a classic cheesecake crunch cup that balances creamy richness with delightful texture.
This decadent treat combines smooth cream cheese with crisp, golden layers of crunchy goodness.
Crumbled graham crackers create a perfect foundation for the silky filling.
Each spoonful delivers a luxurious blend of sweet and tangy flavors that dance across your palate.
The contrast between soft cream cheese and crisp topping makes this dessert a true crowd-pleaser.
Simple ingredients transform into an elegant masterpiece that requires minimal effort.
Let your taste buds embark on a delectable journey with this irresistible cheesecake crunch cup.
Crunch Cup Reasons to Smile
What’s Inside a Crunch Cup

Must-Have Tools for Crunch Cups
Quick Guide to Building Crunch Cups
Step 1: Create A Delicious Crust
In a medium bowl, grab graham cracker crumbs, sugar, and melted butter.
Stir everything together until the mixture looks perfectly combined and feels like wet sand.
Step 2: Press The Crust Into Cups
Divide the crumbly mixture among serving cups.
Use your fingers or the back of a spoon to press down firmly, creating a solid base for your cheesecake cups.
Step 3: Whip The Cream Cheese Base
Grab a large bowl and beat cream cheese with powdered sugar.
Keep mixing until the texture becomes silky smooth and free of any lumps.
Step 4: Add Vanilla Magic
Pour vanilla extract into the cream cheese mixture.
Stir gently to distribute the flavor throughout the creamy base.
Step 5: Whip The Heavy Cream
In a separate bowl, grab heavy whipping cream and beat until stiff peaks form.
The cream should stand up tall and hold its shape when the whisk is lifted.
Step 6: Combine Cream Cheese And Whipped Cream
Carefully fold the whipped cream into the cream cheese mixture.
Use gentle, sweeping motions to keep the mixture light and airy.
Step 7: Fill The Cups With Cheesecake
Spoon or pipe the dreamy cheesecake filling over the crust in each cup.
Smooth the top for a beautiful presentation.
Step 8: Crush The Strawberry Crunch
Toss freeze-dried strawberries and golden Oreos into a food processor.
Pulse until you have fine, sandy crumbs.
Step 9: Create Crumble Topping
Transfer the crumbs to a bowl and mix in melted butter.
Stir until the mixture becomes delightfully crumbly.
Step 10: Prepare Fresh Strawberry Topping
Mix ingredients and let sit for 5-10 minutes to release natural strawberry juices.
Step 11: Layer The Crunch Topping
Sprinkle the strawberry crunch mixture over the cheesecake layer in each cup, creating a delightful textural contrast.
Step 12: Add Fresh Strawberry Goodness
Spoon the macerated strawberry mixture over the crunch layer, adding a burst of fresh fruit flavor.
Step 13: Chill And Set
Slide the cups into the refrigerator for at least 1 hour.
This helps the dessert set and allows flavors to mingle and develop.
Smart Moves for Better Crunch Cups
Crunch Cup Topping Ideas
Ways to Serve Crunch Cups
Crunch Cup Storage Instructions
FAQs
Freeze-dried strawberries are strawberries with all moisture removed, creating a crunchy texture and concentrated flavor. They add intense strawberry taste and a unique crispness to the dessert without adding extra liquid.
Yes, you can prepare these cups up to 2 days in advance. Keep them covered in the refrigerator until ready to serve. The crunch topping will stay crisp if stored properly.
While an electric mixer makes creating smooth cheesecake filling easier, you can use a whisk and some arm strength. Just ensure the cream cheese is very soft and mix thoroughly to avoid lumps.
Print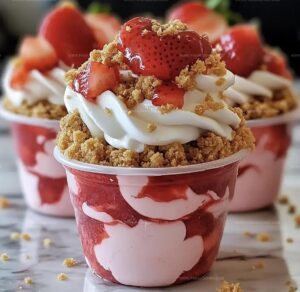
Cheesecake Crunch Cup Recipe
- Total Time: 1 hour 25 minutes
- Yield: 8 1x
Description
Creamy new york cheesecake crunch cup melds rich textures with unexpected layers of delight. Chocolate graham base and silky filling create a perfect dessert experience you’ll savor with each indulgent bite.
Ingredients
Main Ingredients:
- 8 ounces (226 grams) cream cheese, softened
- 1 cup fresh strawberries, diced
- 1 cup freeze-dried strawberries
- 1 cup golden Oreos
Crust Ingredients:
- 1 cup graham cracker crumbs
- 1/4 cup (60 milliliters) unsalted butter, melted
- 2 tablespoons granulated sugar
- 3 tablespoons unsalted butter, melted
Finishing Ingredients:
- 1/2 cup powdered sugar
- 1 teaspoon vanilla extract
- 1/2 cup heavy whipping cream
- 2 tablespoons granulated sugar
- 1 tablespoon lemon juice
Instructions
- Create a crumbly foundation by mixing graham cracker crumbs, sugar, and melted butter until the texture resembles wet sand.
- Evenly distribute the graham mixture into serving cups, firmly pressing to form a compact base layer.
- Whip softened cream cheese and powdered sugar in a large bowl until achieving a silky, lump-free consistency.
- Incorporate vanilla extract into the cream cheese mixture, stirring until thoroughly integrated.
- Whip heavy cream in a separate bowl, beating until stiff, peaks hold their shape when the whisk is lifted.
- Delicately fold the whipped cream into the cream cheese mixture, maintaining the airy texture.
- Fill each cup with the cheesecake mixture, using a spoon or piping bag for even distribution.
- Pulse freeze-dried strawberries and golden Oreos in a food processor until transforming into fine, uniform crumbs.
- Transfer crumb mixture to a bowl and blend with melted butter until achieving a slightly clumpy texture.
- Macerate fresh strawberries with sugar and lemon juice, allowing the fruit to release natural juices for 5-10 minutes at room temperature.
- Generously sprinkle the strawberry crunch topping across the cheesecake layer in each cup.
- Drizzle the macerated strawberry mixture over the crunch layer for added moisture and flavor.
- Chill the dessert cups in the refrigerator for a minimum of 1 hour to set and enhance flavors.
Notes
- Swap graham crackers with gluten-free alternatives like almond flour or crushed rice crackers for a celiac-friendly version.
- Reduce sugar content by using stevia or monk fruit sweetener for a low-carb, diabetic-friendly dessert option.
- Enhance dairy-free adaptability by substituting cream cheese with cashew or coconut cream cheese alternatives.
- Create make-ahead convenience by preparing components separately and assembling just before serving to maintain optimal texture and crunch.
- Prep Time: 25 minutes
- Cook Time: 1 hour
- Category: Desserts, Snacks
- Method: Chilling
- Cuisine: American
Nutrition
- Serving Size: 8
- Calories: 380
- Sugar: 22 g
- Sodium: 210 mg
- Fat: 24 g
- Saturated Fat: 14 g
- Unsaturated Fat: 10 g
- Trans Fat: 0 g
- Carbohydrates: 39 g
- Fiber: 1 g
- Protein: 4 g
- Cholesterol: 60 mg
Marcus Reed
Founder & Food Content Creator
Expertise
Single-recipe development, Seasonal and local ingredient utilization, Food photography and styling, Culinary writing and content creation
Education
Culinary Arts Certificate, Blue Ridge Community and Technical College, WV
Focus: Fundamentals of culinary techniques, emphasizing hands-on experience in small-scale kitchen settings.
Marcus’s story begins in Asheville, where good food and family kitchens shaped his earliest memories. After hands-on culinary training and a lot of trial (and a little error), he realized that real cooking isn’t about perfection, it’s about connection.
At Pan and Oven, Marcus crafts recipes that are easy to follow, packed with flavor, and built for real kitchens.