
Sweet & Spooky Candy Corn Fudge Recipe for Halloween Joy
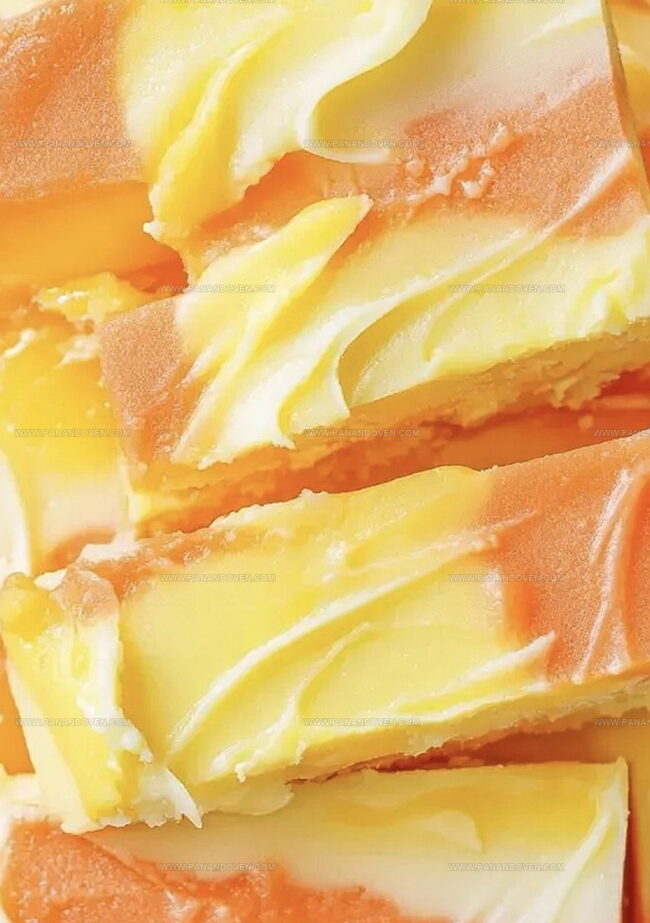
Sweet Halloween treats don’t get more festive than this candy corn fudge that captures the essence of autumn’s most iconic confection.
Layers of creamy white, orange, and yellow melt together in a delightful tribute to the classic seasonal candy.
Each bite brings a nostalgic wave of childhood memories and holiday cheer.
The recipe combines simple ingredients with a touch of seasonal magic.
Vibrant colors make this fudge a showstopper at any Halloween gathering.
You’ll love how easily these squares come together, creating a dessert that’s both delicious and visually stunning.
Prepare to delight your guests with this irresistible Halloween-inspired confection.
Why Candy Corn Fudge Is a Party Favorite
Everything for Making Candy Corn Fudge
Candy Corn Fudge—Your Kitchen Setup
How to Whip Up Candy Corn Fudge at Home

Step 1: Prepare The Baking Pan
Line a 9×5 inch loaf pan with parchment paper, allowing extra hanging on sides for easy removal.
Lightly spray parchment with nonstick cooking spray.
Step 2: Create White Fudge Layer
Melt white candy melts in microwave-safe bowl.
Heat in 30-second intervals, stirring between each.
Continue until completely smooth.
Mix in sweetened condensed milk until well combined.
Spread white mixture evenly across pan bottom using offset spatula.
Smooth surface carefully.
Refrigerate for 30 minutes.
Step 3: Craft Orange Fudge Layer
Melt orange candy melts using same microwave technique as white layer.
Stir until completely smooth.
Add sweetened condensed milk and blend thoroughly.
Gently pour orange mixture over white layer.
Use spatula to create even surface.
Return to refrigerator for 30 minutes.
Step 4: Design Yellow Fudge Layer
Repeat melting process with yellow candy melts.
Stir until fully melted and glossy.
Incorporate sweetened condensed milk.
Pour yellow mixture over orange layer.
Spread carefully to create uniform thickness.
Refrigerate for additional 30 minutes.
Step 5: Complete Final Chilling
Allow fudge to set completely in refrigerator for 2-3 hours.
Ensure layers are firm and cohesive.
Step 6: Slice And Serve
Remove fudge from pan using parchment paper edges.
Cut into classic candy corn triangle shapes or traditional squares.
Enjoy your festive sweet treat!
Tips for Fudge That’s Silky and Sweet
Candy Corn Fudge: Flavor Combos to Explore
Serving Candy Corn Fudge in Style
Keeping Fudge Fresh for Days
FAQs
Candy melts are special confectionery coating that melts easily and hardens quickly. You can substitute with white chocolate chips or almond bark, but the texture and setting might slightly differ.
Ensure each layer is completely chilled for 30 minutes before adding the next layer. This helps create distinct, clean layers and prevents color bleeding.
Sweetened condensed milk helps create a smooth, creamy texture and adds richness to the fudge. It also helps prevent sugar crystallization, ensuring a soft, melt-in-your-mouth consistency.
Print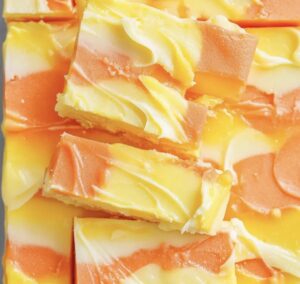
Candy Corn Fudge Recipe
- Total Time: 3 hours 20 minutes
- Yield: 12 1x
Description
Sweet homemade candy corn fudge blends creamy white chocolate with festive orange and yellow layers for Halloween treats. Seasonal dessert lovers will savor this simple, nostalgic confection that brings holiday spirit to any gathering.
Ingredients
Main Ingredients:
- 3/4 cup white candy melts or white chocolate chips
- 3/4 cup orange candy melts
- 3/4 cup yellow candy melts
Binding Ingredient:
- 9–12 tablespoons sweetened condensed milk
Instructions
- Prepare a 9×5 loaf pan by lining it with parchment paper, ensuring edges overhang for easy extraction. Lightly coat the parchment with nonstick spray.
- Create the white layer by gently melting white candy melts in the microwave at 50% power for 30-second intervals, stirring between each heating until completely smooth. Incorporate sweetened condensed milk, mixing thoroughly until uniform. Carefully spread the mixture evenly across the pan’s bottom using an offset spatula. Chill in the refrigerator for 30 minutes.
- For the orange layer, follow the same melting technique with orange candy melts, maintaining careful temperature control. Blend in sweetened condensed milk until consistency is glossy and well-combined. Delicately pour over the white layer, ensuring a clean, even surface. Return to refrigerator for 30 minutes.
- Repeat the melting process with yellow candy melts, maintaining gentle heat and consistent stirring. Mix in sweetened condensed milk until texture is silky. Gently distribute over the orange layer, creating a smooth final surface.
- Allow the entire fudge to set completely in the refrigerator for 2-3 hours until firm and fully consolidated.
- Once set, lift the fudge from the pan using parchment edges. Slice into traditional triangular candy corn shapes or classic rectangular pieces for serving.
Notes
- Check chocolate melts carefully to prevent burning, stirring frequently during microwave heating to maintain smooth consistency.
- Experiment with candy melt color ratios to create perfect candy corn gradient, ensuring each layer has similar thickness.
- Use room temperature sweetened condensed milk to help blend smoothly with melted candy melts and prevent clumping.
- Store fudge in airtight container in refrigerator for up to one week, separating layers with parchment paper to maintain texture and prevent sticking.
- Prep Time: 20 minutes
- Cook Time: 3 hours
- Category: Desserts, Snacks
- Method: Refrigerating
- Cuisine: American
Nutrition
- Serving Size: 12
- Calories: 120
- Sugar: 18 g
- Sodium: 50 mg
- Fat: 6 g
- Saturated Fat: 4 g
- Unsaturated Fat: 2 g
- Trans Fat: 0 g
- Carbohydrates: 16 g
- Fiber: 0 g
- Protein: 1 g
- Cholesterol: 5 mg
Marcus Reed
Founder & Food Content Creator
Expertise
Single-recipe development, Seasonal and local ingredient utilization, Food photography and styling, Culinary writing and content creation
Education
Culinary Arts Certificate, Blue Ridge Community and Technical College, WV
Focus: Fundamentals of culinary techniques, emphasizing hands-on experience in small-scale kitchen settings.
Marcus’s story begins in Asheville, where good food and family kitchens shaped his earliest memories. After hands-on culinary training and a lot of trial (and a little error), he realized that real cooking isn’t about perfection, it’s about connection.
At Pan and Oven, Marcus crafts recipes that are easy to follow, packed with flavor, and built for real kitchens.