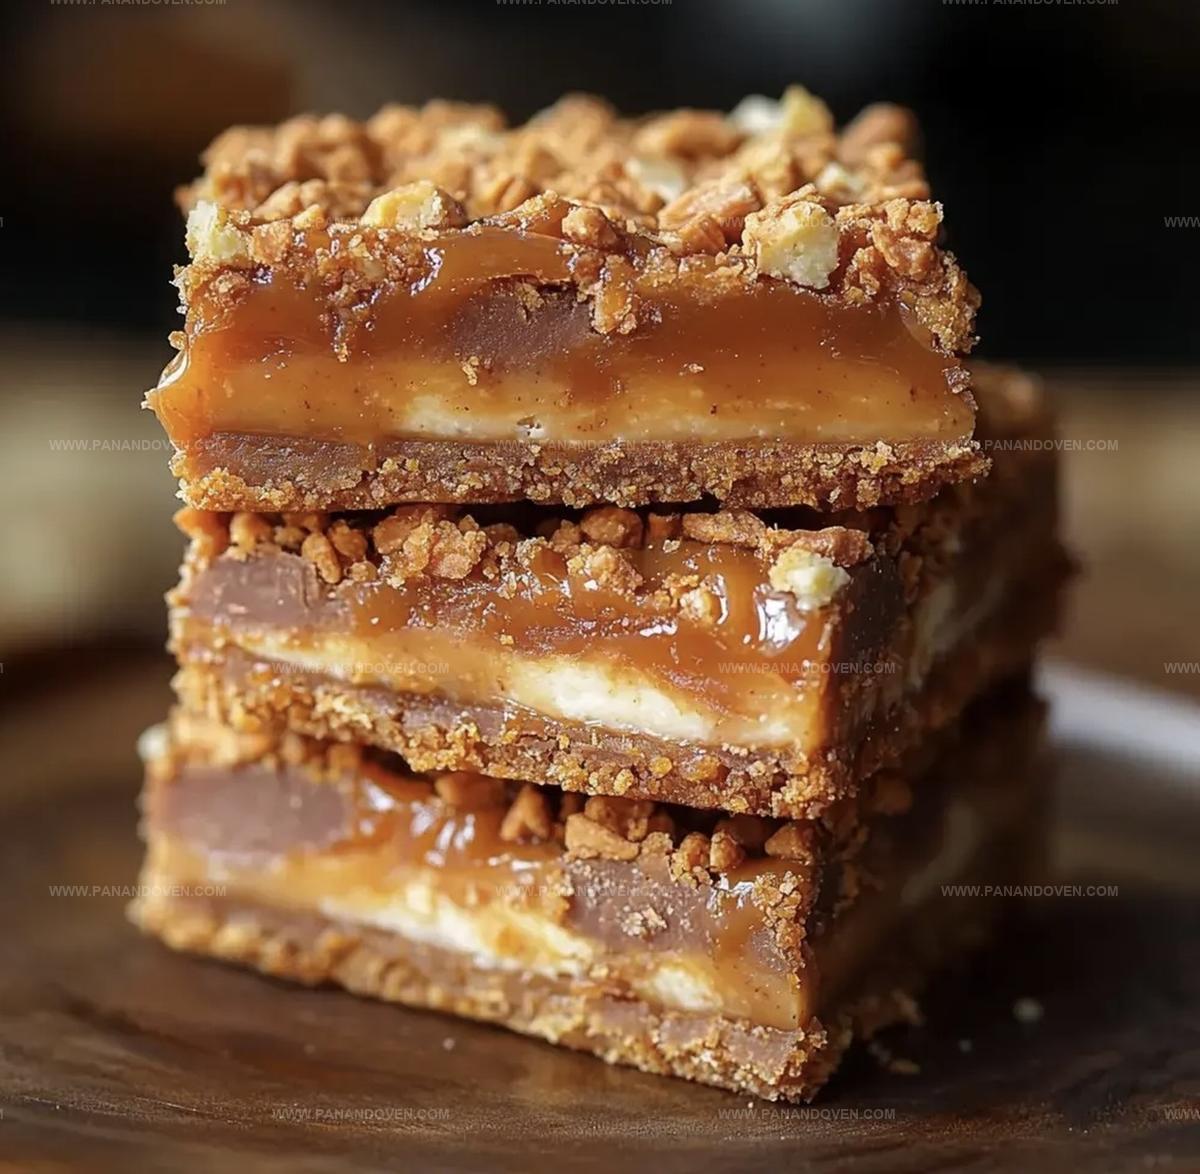
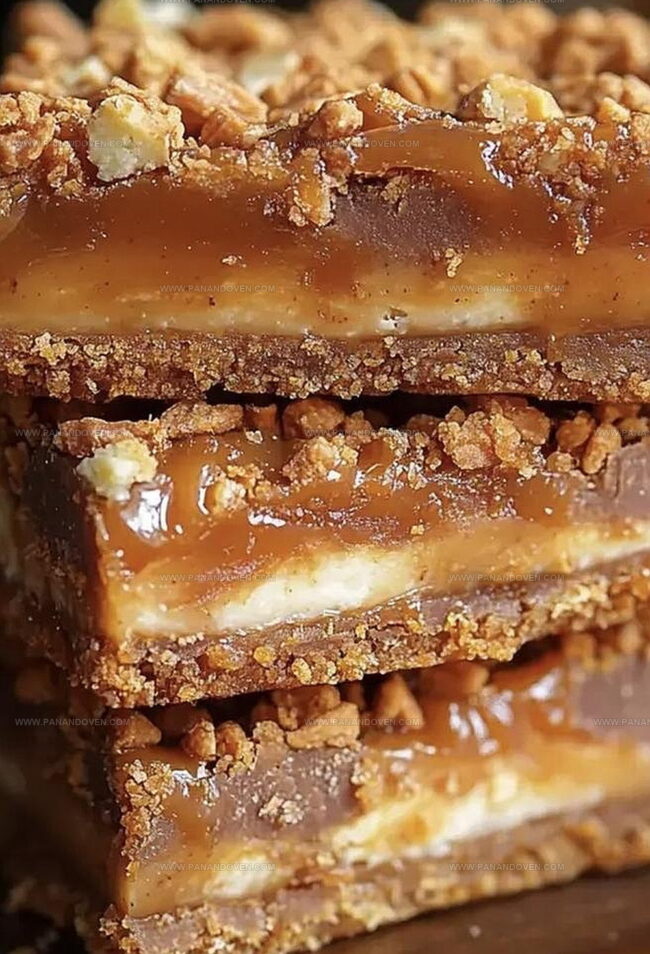
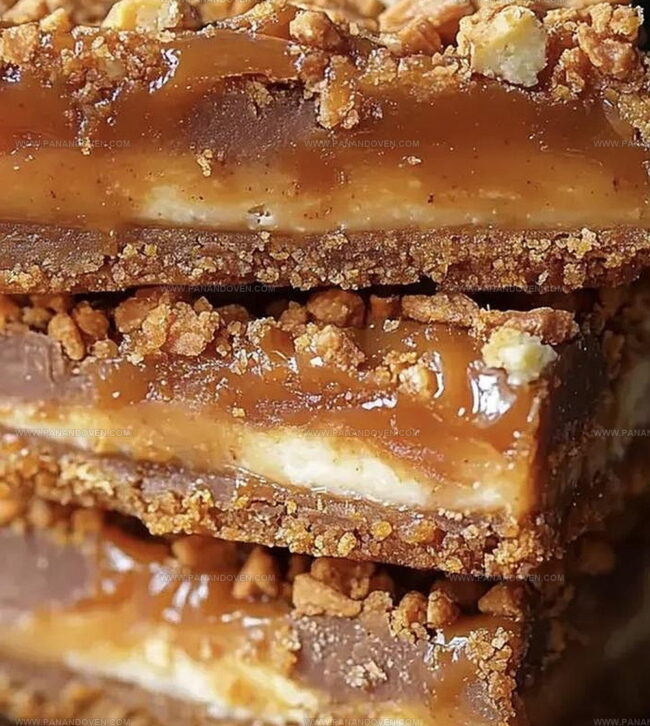
The Perfect Butterfinger Caramel Bars Recipe for Sweet Cravings
Decadent chocolate and caramel merge with the irresistible crunch of butterfinger caramel bars in this ultimate dessert sensation.
Layers of sweet, golden caramel weave through rich chocolate, creating a mouthwatering treat that stops conversations.
Candy bar lovers recognize this combination as pure indulgence.
Each bite delivers a perfect balance of creamy, crispy textures that dance across your palate.
Homemade versions beat store-bought treats every single time.
The recipe transforms simple ingredients into an extraordinary dessert everyone will crave.
Prepare to savor a dessert that’s guaranteed to become your new sweet obsession.
Butterfinger Bar Best Features
What’s in Butterfinger Bars
Butterfinger Bar Tool List

How to Make Butterfinger Bars
Step 1: Prepare the Baking Vessel
Line a 9×9 inch baking pan with aluminum foil, ensuring extra foil hangs over the edges for easy bar removal.
Generously coat the foil with non-stick cooking spray to prevent sticking.
Step 2: Create Graham Cracker Foundation
Carefully arrange graham crackers across the bottom of the pan, breaking and fitting pieces to create an even layer that completely covers the base.
Step 3: Blanket with Marshmallow Clouds
Evenly distribute marshmallows across the graham cracker layer, creating a soft, puffy surface.
Step 4: Craft Silky Caramel Sauce
Combine caramel and milk in a microwave-safe bowl.
Heat in 30-second intervals, stirring between each burst until the mixture becomes smooth and fully melted.
Step 5: Cascade Caramel Layer
Gently pour the warm caramel over the marshmallows, allowing it to flow and create a rich, gooey coating.
The heat will slightly melt the marshmallows, creating a decadent texture.
Step 6: Sprinkle Butterfinger Crunch
Scatter chopped Butterfinger pieces across the caramel surface.
Softly press the candy fragments into the caramel to ensure they adhere.
Step 7: Melt Chocolate Topping
Place semi-sweet chocolate in a microwave-safe bowl.
Heat in 30-second intervals, stirring between each session until completely melted and glossy.
Step 8: Drizzle Chocolate Finale
Artfully drizzle the melted chocolate over the Butterfinger-studded surface, creating an elegant pattern.
Step 9: Chill and Set
Refrigerate the bars for one hour or until the chocolate sets and the layers become firm.
Step 10: Slice and Serve
Cut into square portions when ready to indulge in this sweet, crunchy treat.
Butterfinger Bar Smart Tips
Butterfinger Bar Variety Options

Serving Butterfinger Bars with Style
Butterfinger Bar Storage for Crunch
FAQs
The bars combine graham crackers, marshmallows, caramel, Butterfinger candy pieces, and semi-sweet chocolate for a rich and decadent dessert.
No, these bars are surprisingly easy to make and require basic ingredients and simple microwave melting techniques for caramel and chocolate.
Yes, you can prepare these bars in advance and store them in the refrigerator, which helps them set and maintains their texture and flavor.
You’ll just need a 9×9 baking pan, aluminum foil, a microwave, and basic measuring tools to create these delicious Butterfinger bars.
Print
Butterfinger Caramel Bars Recipe
- Total Time: 1 hour 15 minutes
- Yield: 12 1x
Description
Butterfinger caramel bars combine rich chocolate, crunchy candy pieces, and smooth caramel in one irresistible dessert. Chocolate enthusiasts and sweet tooth lovers will crave this indulgent treat that delivers complex layers of flavor and texture.
Ingredients
Main Ingredients:
- 1 (10 oz) Butterfinger Bites
- 1 (11 oz) caramel bits
- 6 1/2 graham crackers
Binding Ingredients:
- 2 cups mini marshmallows
- 2 tablespoons milk
Finishing Ingredient:
- 2 ounces semi-sweet chocolate (for drizzle)
Instructions
- Prepare a 9×9-inch baking pan by lining it with aluminum foil, ensuring overhang for easy extraction. Coat the foil thoroughly with non-stick cooking spray.
- Create a uniform base layer by arranging graham crackers across the pan’s bottom, trimming pieces as needed to ensure complete coverage.
- Distribute marshmallows evenly over the graham cracker foundation, creating a fluffy white layer.
- Create a smooth caramel sauce by microwaving caramel and milk together. Heat for 1 minute, then stir and continue warming in 30-second increments until completely liquefied.
- Gently cascade the molten caramel over the marshmallow layer, allowing it to naturally spread and slightly melt the marshmallows.
- Scatter chopped Butterfinger pieces across the caramel surface, delicately pressing the candy fragments to ensure they adhere to the sticky base.
- Melt semi-sweet chocolate using microwave technique, heating in 30-second intervals at high power until completely smooth and glossy.
- Artfully drizzle the melted chocolate across the Butterfinger-studded surface, creating an elegant pattern.
- Refrigerate the dessert for approximately 1 hour, or until the layers have solidified and set completely.
- When ready to serve, slice into uniform squares, revealing the decadent layers within.
Notes
- Customize Crunch Experiment with different candy bars like Snickers or Reese’s for unique flavor variations.
- Make Gluten-Free Swap graham crackers with gluten-free alternatives like almond flour or rice crackers to accommodate dietary restrictions.
- Prevent Sticking Ensure foil is well-greased to easily remove bars without breaking or tearing.
- Temperature Control Let bars sit at room temperature for 5-10 minutes before cutting to achieve cleaner, smoother slices.
- Prep Time: 15 minutes
- Cook Time: 1 hour
- Category: Desserts, Snacks
- Method: Baking
- Cuisine: American
Nutrition
- Serving Size: 12
- Calories: 180
- Sugar: 17 g
- Sodium: 90 mg
- Fat: 7 g
- Saturated Fat: 4 g
- Unsaturated Fat: 3 g
- Trans Fat: 0 g
- Carbohydrates: 27 g
- Fiber: 1 g
- Protein: 2 g
- Cholesterol: 5 mg
Marcus Reed
Founder & Food Content Creator
Expertise
Single-recipe development, Seasonal and local ingredient utilization, Food photography and styling, Culinary writing and content creation
Education
Culinary Arts Certificate, Blue Ridge Community and Technical College, WV
Focus: Fundamentals of culinary techniques, emphasizing hands-on experience in small-scale kitchen settings.
Marcus’s story begins in Asheville, where good food and family kitchens shaped his earliest memories. After hands-on culinary training and a lot of trial (and a little error), he realized that real cooking isn’t about perfection, it’s about connection.
At Pan and Oven, Marcus crafts recipes that are easy to follow, packed with flavor, and built for real kitchens.