
The Cutest Bunny Butt Oreo Balls Recipe for Easter Fun
Playful desserts always spark joy at parties, and these bunny butt Oreo balls deliver adorable charm with every bite.
Sweet treats can instantly brighten moods and create memorable moments.
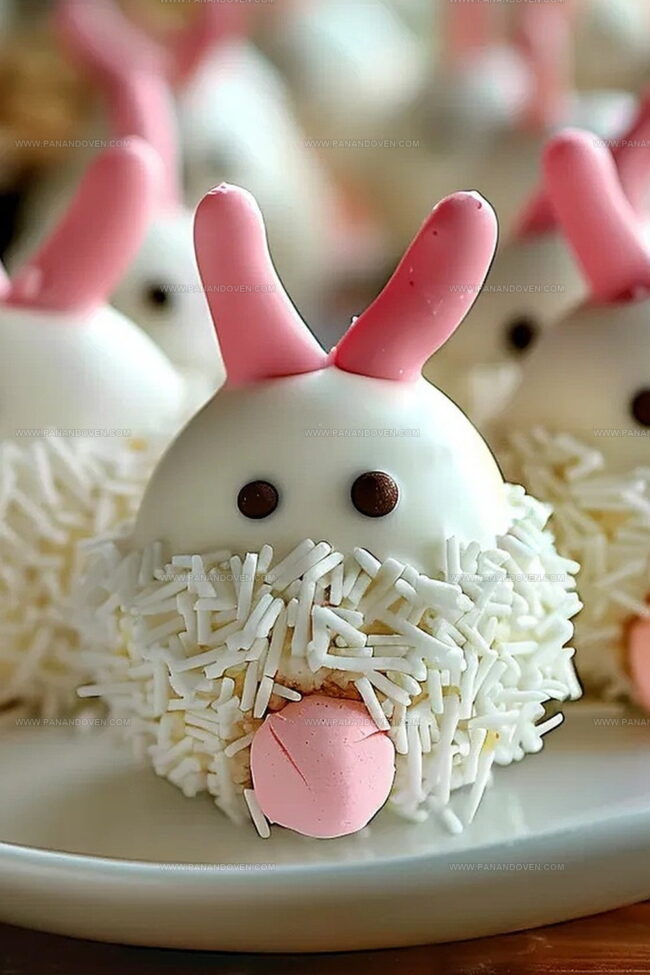
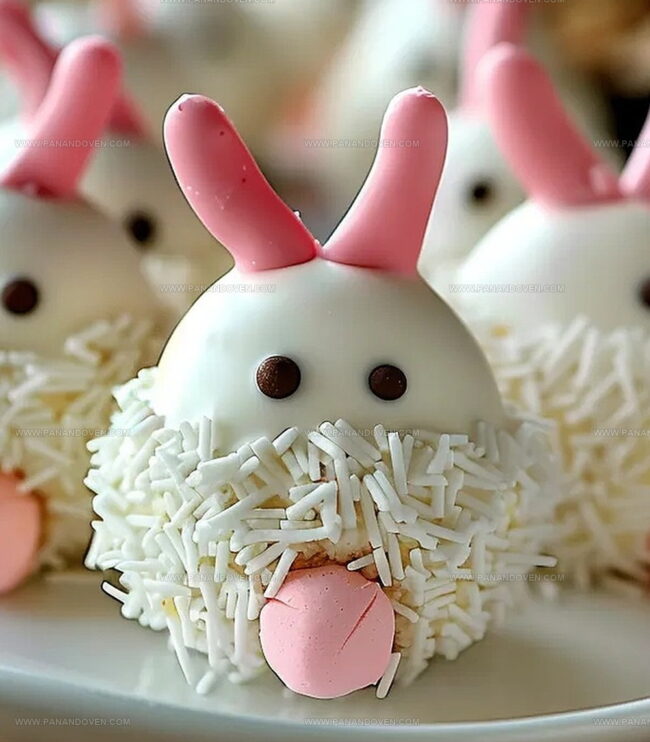
Creamy Oreo centers wrapped in smooth white chocolate make these cute confections irresistible.
Each delightful ball mimics a whimsical bunny backside, complete with tiny details that will make guests smile.
The recipe combines simple ingredients with clever decorating techniques.
Crafting these delectable treats becomes a fun activity that brings smiles to faces of all ages.
Prepare to delight your loved ones with these charming and delicious bunny-inspired sweets.
Bunny Butt Oreo Balls: Fun Reasons to Make Them
Ingredients for Bunny Butt Oreo Balls Fun
Base Ingredients:Coating and Decoration Ingredients:Accent Ingredients:Tools Needed to Shape Bunny Butt Oreo Balls
Oreo Balls – How to Bring Bunny Butts to Life
Step 1: Crush Oreo Cookies
Toss whole Oreo cookies into a food processor.
Pulse until the cookies transform into fine, sandy crumbs.
The filling stays with the cookies during this process.
Mix in softened cream cheese until the mixture becomes a thick, cohesive dough that sticks together perfectly.
Step 2: Create Smooth Oreo Balls
Grab a spoon and scoop out small portions of the Oreo mixture.
Roll each portion between your palms, creating smooth, round balls.
Arrange these adorable spheres on a parchment-lined baking sheet.
Pop the tray into the freezer for 15-20 minutes to help them firm up nicely.
Step 3: Prepare White Chocolate Coating
Place white chocolate or candy melts in a microwave-safe bowl.
Melt the chocolate in short 30-second bursts, stirring between each interval.
Continue until the chocolate becomes completely smooth and silky.
If the chocolate seems too thick, add a touch of coconut oil or vegetable shortening to achieve the perfect dipping consistency.
Step 4: Dip and Decorate Oreo Balls
Use a fork or specialized dipping tool to carefully submerge each chilled Oreo ball into the melted white chocolate.
Gently tap off any excess chocolate.
Return the coated balls to the parchment-lined baking sheet.
For an extra fluffy look, sprinkle shredded coconut over the balls while the chocolate is still wet.
Step 5: Add Bunny Details
Transform your Oreo balls into adorable bunny butts!
While the white chocolate is still soft, attach a mini marshmallow or candy pearl to represent the bunny tail.
For the feet, melt pink candy melts and pipe small oval shapes onto parchment paper.
Once set, attach two tiny feet to each Oreo ball using a dab of white chocolate.
Create cute toe pads using small white chocolate chips.
Step 6: Final Set and Serve
Allow the decorated Bunny Butt Oreo Balls to rest at room temperature for 15 minutes.
Alternatively, refrigerate for 10 minutes until completely set.
These charming treats are now ready to delight and entertain at any Easter celebration!
Tips for Perfect Bunny Butt Oreo Balls Every Time
Playful Variations for Bunny Butt Oreo Balls
Serving Bunny Butt Oreo Balls at Parties
Storing Oreo Balls to Keep Them Fresh
FAQs
Keep your hands slightly damp with cold water or wear food-safe gloves. This helps create smooth balls without the mixture clinging to your fingers.
Yes, you can use milk or dark chocolate. Just ensure it’s melted smoothly and at the right temperature for dipping to get a clean, even coating.
Add a teaspoon of coconut oil or vegetable shortening to thin it out. Stir gently until you reach a smooth, dippable consistency. Avoid adding water, which can cause chocolate to clump.
Print
Bunny Butt Oreo Balls Recipe
- Total Time: 45 minutes
- Yield: 24 1x
Description
Playful bunny butt oreo balls showcase whimsical Easter charm with adorable cookie treats. Sweet chocolate-coated spheres delight guests with charming rabbit-inspired design, providing delightful dessert you’ll love serving.
Ingredients
Main Ingredients:
- 1 (14 ounces/397 grams) package Oreo cookies, finely crushed
- 8 ounces/227 grams cream cheese, softened
Coating Ingredients:
- 12 ounces/340 grams white chocolate or white candy melts, melted
- 1/2 cup shredded coconut (for a fluffy tail effect, optional)
Decorative Ingredients:
- Mini marshmallows or candy pearls (for the bunny tail)
- Pink candy melts or pink sprinkles (for bunny feet details)
- Small white chocolate chips (for foot decoration, optional)
Instructions
- Pulverize Oreo cookies, including filling, in a food processor until they transform into fine, uniform crumbs. Incorporate softened cream cheese and blend thoroughly until the mixture becomes a cohesive, dense dough that maintains its shape.
- Carefully form the mixture into uniform spherical shapes, using approximately one tablespoon per ball. Gently roll between palms to create smooth, round surfaces. Transfer to a parchment-lined tray and chill in the freezer for 15-20 minutes to solidify.
- Melt white chocolate or candy melts in a microwave-safe container, heating in 30-second increments and stirring between each interval. Ensure complete liquefaction. If the consistency appears too thick, introduce a teaspoon of coconut oil or vegetable shortening to achieve a smoother dipping texture.
- Utilize a fork or specialized dipping tool to submerge each chilled ball into the melted white chocolate. Delicately remove excess coating by tapping. Restore to the parchment-lined surface. While chocolate remains wet, optionally sprinkle shredded coconut to create a fluffy texture.
- During the chocolate’s soft state, affix a mini marshmallow or candy pearl to each ball, representing the bunny tail. Melt pink candy melts and carefully pipe small oval shapes onto parchment paper for bunny feet. Once set, attach feet to each ball using a minimal amount of melted white chocolate. Add white chocolate chips as delicate toe pad accents.
- Allow decorated Oreo balls to rest at ambient temperature for 15 minutes or refrigerate for 10 minutes until completely solidified. Serve these whimsical Easter-themed treats and delight in their charming appearance.
Notes
- Blend Oreos thoroughly to ensure a smooth, consistent texture without large cookie chunks that might disrupt the ball’s shape.
- Keep cream cheese at room temperature for easier mixing and a more uniform dough that holds together perfectly.
- Use cold hands or slightly dampened palms when rolling balls to prevent sticky mixture from clinging to your skin.
- Chill balls before dipping to maintain their round shape and prevent crumbling during chocolate coating.
- Choose high-quality white chocolate or candy melts for a smoother, more professional finish.
- Add coconut oil sparingly to thin chocolate, avoiding over-thinning which can make coating too runny.
- Work quickly when attaching decorative elements like marshmallow tails and candy feet before chocolate hardens.
- Store finished Oreo balls in an airtight container in the refrigerator for up to 5 days to maintain freshness.
- Prep Time: 30 minutes
- Cook Time: 15 minutes
- Category: Desserts, Snacks
- Method: Blending
- Cuisine: American
Nutrition
- Serving Size: 24
- Calories: 150
- Sugar: 12 g
- Sodium: 100 mg
- Fat: 8 g
- Saturated Fat: 5 g
- Unsaturated Fat: 3 g
- Trans Fat: 0 g
- Carbohydrates: 20 g
- Fiber: 1 g
- Protein: 2 g
- Cholesterol: 10 mg
Clara Thompson
Recipe Developer & Food Educator
Expertise
Plant-based and vegetarian recipe development, Nutritional analysis and meal planning, Culinary education and workshop facilitation, Content writing with a focus on healthy living
Education
Diploma in Culinary Arts, Mt. San Jacinto College, CA
Focus: Comprehensive culinary training with an emphasis on sustainable cooking practices.
Certificate in Nutrition and Healthy Living, Cornell University (Online Program)
Focus: Understanding the principles of nutrition to create balanced and health-conscious recipes.
Clara lives where fresh ideas and fresh ingredients meet. She pairs her culinary know-how with her passion for healthy, planet-friendly cooking.
For Clara, good food should taste great, nourish your body, and feel easy to make. Her recipes highlight whole foods, colorful produce, and a deep respect for seasonal eating.