
Quick Boston Cream Pie Cupcakes Recipe: Bite-sized Bakery Bliss
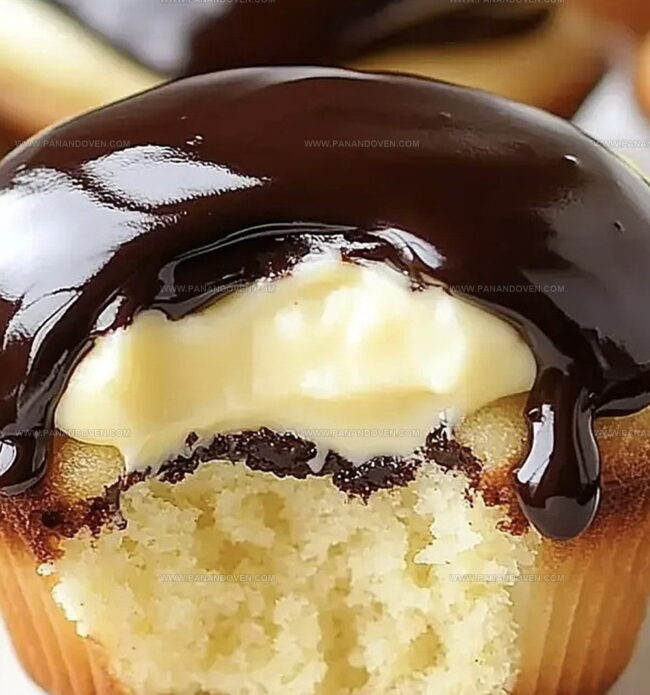
Sweet dreams come true with these decadent Boston cream pie cupcakes that combine classic dessert flavors in one irresistible bite.
Soft, tender vanilla cupcakes hide a luscious cream filling waiting to surprise you at first taste.
The silky pastry cream peeks through tender cake layers, promising pure indulgence.
Rich chocolate ganache drapes elegantly over each cupcake, creating a stunning dessert that looks as amazing as it tastes.
Bakery-style quality meets homemade charm in this delightful treat that transforms an ordinary afternoon into a celebration.
These cupcakes deliver bakery-worthy magic right from your kitchen, tempting everyone who catches a glimpse.
Prepare to fall in love with every creamy, chocolatey spoonful.
Boston Cream Pie Cupcake Appeal

Everything You Need for Cupcakes
Tools for Boston Cream Pie Cupcakes
How to Bake These Cupcakes
Step 1: Whip Up The Cupcake Batter
Grab your mixing bowls and let’s create magic!
Warm up the oven to a cozy 350F.
Line your muffin tin with cute cupcake liners.
In one bowl, mix flour, baking powder, and salt.
In another bowl, cream butter and sugar until they become fluffy clouds.
Crack in eggs one by one, stirring after each.
Add a splash of vanilla for extra yumminess.
Gently fold in flour mixture and milk, alternating between the two.
Don’t overmix!
Scoop batter into liners, filling about two-thirds full.
Bake for 15-18 minutes until a toothpick comes out clean.
Let cupcakes cool completely on a wire rack.
Step 2: Create Dreamy Pastry Cream
Time to make the luscious filling!
Warm milk in a saucepan until it starts to simmer.
In a separate bowl, whisk together:Slowly pour hot milk into the yolk mixture, whisking constantly.
Transfer back to the saucepan and cook over medium heat until thickened.
Take off heat, stir in vanilla, and let cool down.
Step 3: Hollow Out And Fill Cupcakes
Get ready for some cupcake surgery!
Using a sharp knife, carefully remove the center of each cooled cupcake.
Create a perfect little pocket for our delicious cream.
Gently fill each cupcake with the cooled pastry cream.
Step 4: Craft Chocolate Ganache
Chocolate time!
Heat heavy cream in a small saucepan until it starts to simmer.
Pour the hot cream over chopped chocolate in a bowl.
Stir until smooth and glossy.
Let it cool slightly.
Step 5: Dunk And Decorate
Dip each cupcake top into the rich ganache, letting it drip beautifully down the sides.
Pop the cupcakes in the refrigerator for 15-20 minutes to help the ganache set perfectly.
Sweetest Cupcake Tips to Try
Creative Cupcake Spin-Offs

Boston Cream Cupcake Serving Style
Storing Cupcakes for Lasting Softness
FAQs
This recipe requires intermediate baking skills. While not extremely complex, it involves multiple steps like making pastry cream, coring cupcakes, and preparing ganache. Home bakers with some experience will find it manageable.
You’ll need a muffin tin, cupcake liners, mixing bowls, whisk, electric mixer, saucepan, wire cooling rack, and a knife for coring the cupcakes. Basic kitchen tools work perfectly.
Yes, you can prepare the components in advance. Bake cupcakes and make pastry cream a day before. Assemble and add ganache just before serving for the best texture and taste. Store assembled cupcakes in the refrigerator.
Print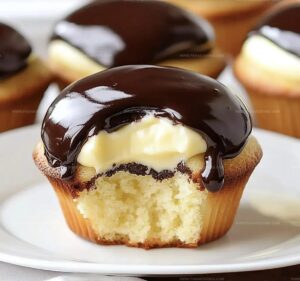
Boston Cream Pie Cupcakes Recipe
- Total Time: 55 minutes
- Yield: 12 1x
Description
These boston cream pie cupcakes merge classic American dessert elegance with convenient single-serving charm. Creamy vanilla custard and glossy chocolate ganache create a delightful indulgence you cannot resist.
Ingredients
Main Ingredients:
- 1 cup all-purpose flour
- 1/2 cup unsalted butter
- 1/2 cup granulated sugar
- 2 large eggs
- 1 cup milk
- 3 egg yolks
- 4 ounces semi-sweet chocolate, chopped
Leavening and Seasoning Ingredients:
- 1 teaspoon baking powder
- 1/4 teaspoon salt
- 1 teaspoon vanilla extract
- 2 tablespoons cornstarch
Dairy and Cream Ingredients:
- 1/2 cup milk
- 1/2 cup heavy cream
- 1/4 cup granulated sugar
Instructions
- Prepare the oven to 350F (175C) and arrange cupcake liners in a 12-cup muffin tin. Whisk flour, baking powder, and salt in a medium bowl and set aside.
- Cream butter and sugar until fluffy. Incorporate eggs individually, mixing thoroughly after each addition. Blend in vanilla extract.
- Gradually combine flour mixture with butter mixture, alternating with milk. Mix until just incorporated, ensuring no overmixing occurs.
- Distribute batter evenly among cupcake liners, filling approximately two-thirds full. Bake for 15-18 minutes until a toothpick emerges clean when inserted.
- Transfer cupcakes to a wire rack and allow complete cooling.
- Heat milk in a saucepan until it reaches a gentle simmer. Whisk egg yolks, sugar, and cornstarch in a separate bowl.
- Gradually stream hot milk into yolk mixture while continuously whisking. Return combined mixture to saucepan and cook over medium heat until thickened.
- Remove from heat, incorporate vanilla, and let pastry cream cool completely.
- Carefully core the center of each cooled cupcake using a small knife, creating space for filling.
- Generously fill each cupcake cavity with prepared pastry cream.
- Warm heavy cream in a saucepan until it begins to simmer. Pour over chopped chocolate in a bowl, stirring until achieving a smooth ganache.
- Allow ganache to cool slightly, then dip cupcake tops, permitting chocolate to cascade down sides.
- Refrigerate cupcakes for 15-20 minutes to set ganache coating.
Notes
- Achieve smooth cupcake batter by ensuring butter and eggs are at room temperature before mixing.
- Prevent dry cupcakes by avoiding overmixing the batter and checking doneness with a toothpick test.
- Create uniform pastry cream by whisking constantly while adding hot milk to prevent egg scrambling.
- Simplify ganache preparation by using high-quality chocolate with at least 60% cocoa content for richer flavor.
- Prep Time: 30 minutes
- Cook Time: 25 minutes
- Category: Desserts, Snacks
- Method: Baking
- Cuisine: American
Nutrition
- Serving Size: 12
- Calories: 260
- Sugar: 15 g
- Sodium: 150 mg
- Fat: 16 g
- Saturated Fat: 10 g
- Unsaturated Fat: 4 g
- Trans Fat: 0 g
- Carbohydrates: 29 g
- Fiber: 1 g
- Protein: 4 g
- Cholesterol: 70 mg
Marcus Reed
Founder & Food Content Creator
Expertise
Single-recipe development, Seasonal and local ingredient utilization, Food photography and styling, Culinary writing and content creation
Education
Culinary Arts Certificate, Blue Ridge Community and Technical College, WV
Focus: Fundamentals of culinary techniques, emphasizing hands-on experience in small-scale kitchen settings.
Marcus’s story begins in Asheville, where good food and family kitchens shaped his earliest memories. After hands-on culinary training and a lot of trial (and a little error), he realized that real cooking isn’t about perfection, it’s about connection.
At Pan and Oven, Marcus crafts recipes that are easy to follow, packed with flavor, and built for real kitchens.